Tool Tote
Think of this compact bench as a project manager you don't have to pay. You've already got the wood scraps to build it.
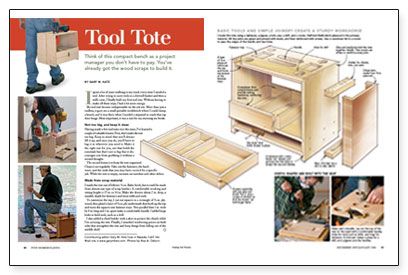
Synopsis: Master carpenter Gary Katz shows how to use spare pieces of 1/2-in. plywood to build a tool tote that works like an able apprentice for almost any carpentry or home-improvement task. The sturdy tote can function as a toolbox, a step stool, a small workbench, or even a seat where you can take a coffee break. The ingenious design includes enough recesses, trays, compartments, and drawer space to hold the portable power tools, accessories, fasteners, and hardware for all kinds of carpentry jobs.
I spent a lot of years walking to my truck every time I needed a tool. After trying to carry tools in a drywall bucket and then a milk crate, I finally built my first tool tote. Without having to make all those trips, I had a lot more energy.
My tool tote became indispensable on the job site. More than just a toolbox, it gave me a small portable workbench where I could clamp a board, and it was there when I needed a step stool to reach that top door hinge. Most important, it was a seat for my morning tea break.
Not too big, and keep it clean
Having made a few tool totes over the years, I’ve learned a couple of valuable lessons. First, don’t make the tote too big. Keep in mind that you’ll always fill it up, and once you do, you’ll have to lug it to wherever you need it. Make it the right size for you, one that holds the essentials but that’s not so big that it discourages you from grabbing it without a second thought.
The second lesson is to keep the tote organized. Clean it out regularly. Take out the fasteners, the hardware, and the tools that you may have carried for a specific job. While the tote is empty, vacuum out sawdust and other debris.
Made from scrap material
I made this tote out of leftover 1⁄2-in. Baltic birch, but it could be made from almost any type of scrap lumber. A comfortable working and sitting height is 15 in. to 16 in. Make the drawer about 2 in. deep, a suitable depth for fasteners and most odds and ends.
To customize the top, I cut out squares in a rectangle of 1⁄2-in. plywood, then glued a layer of 1⁄4-in. ply underneath that beefs up the top and turns the squares into fastener trays. Two parallel slots 1 in. wide by 4 in. long and 1 in. apart make a comfortable handle. I added large holes to hold tools, such as a drill.
I also added a chisel holder with a skirt to protect the chisels while I’m carrying the tote. Finally, I attached reinforcing pieces on both sides that strengthen the tote and keep things from falling out of the middle shelf.
For more photos, drawings, and details, click the View PDF button below: