FHB Logo Facebook LinkedIn Email Pinterest Twitter Instagram Plus Icon Close Icon Navigation Search Icon Navigation Search Icon Arrow Down Icon Video Guide Icon Article Guide Icon Modal Close Icon Guide Search Icon Skip to content
Subscribe

In every issue you'll find...

  • Expert insights on techniques and principles
  • Unbiased tool reviews
  • Step-by-step details to master the job
  • Field-tested advice and know-how
Subscribe Now!
Subscribe
  • How-To
  • Design
  • Tools & Materials
  • Videos
  • Blogs
  • Forum
  • Magazine
  • Members
  • FHB House
  • Podcast
  • Join
  • Log In
Subscribe
Tips & Techniques

Z-flashing Retrofit

Issue 181

Living in North America’s northernmost rain forest has forced me to become good at repairing rotten rim joists. One part of the job that always gave me a hard time was installing Z-flashing. Many houses in Juneau were sided with 4-ft. by 9-ft. sheets of T-111 plywood. After cutting off the bottom of the siding to expose the rotten rim for repair, I was left with the job of either replacing the entire sheet of siding (if homeowners insurance was paying) or just replacing the bottom foot or so (if the homeowner was paying).

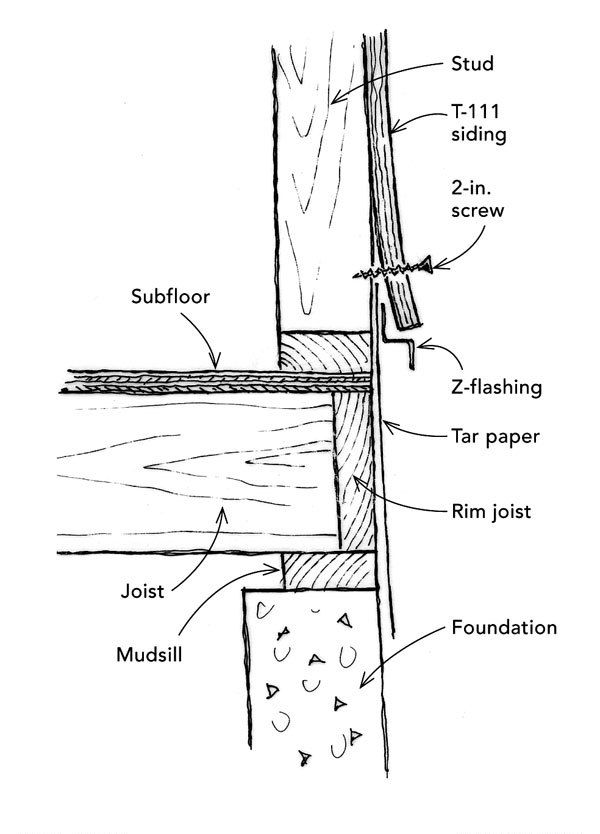
If the latter was the case, I first had to slide building wrap (usually #15 tar paper) an inch or two up behind the existing siding, then slide the top flange of the Z-flashing up between the building wrap and the existing siding. Oftentimes, the siding seemed welded to the bottom plate or subsheathing, making this task at least a two-person—or more—operation. This job almost never went smoothly. Add the fact that this work usually took place in the drip line of the eave (did I mention I live in a rain forest?), and tempers could become short.

After more years than I’d like to admit doing this chore the old way, I finally figured out that 2-in. screws and a screw gun can eliminate two workers and a lot of swearing. As shown in the drawing, I now pry the existing siding away from the bottom plate or subsheathing a half-inch or so, insert a screw a couple of inches up from the bottom of the cut siding, start it into the stud, and stop. I repeat this procedure down the length of the wall. I now have a beautiful, uniform gap to slip the building wrap and then the flashing into. Once the flashing is in place, I back out the screw closest to the center of the length of flashing, and the siding usually snaps back, pinching the flashing in place. I then can finish up by putting a nail in the screw hole, slipping in the new siding, and nailing it off.

Steve Hamilton, Douglas, AK

Sign up for the Fine Homebuilding Tip of the Day and get daily tips and special offers delivered to your inbox.

Signing you up...

This site is protected by reCAPTCHA and the Google Privacy Policy and Terms of Service apply.
See all newsletters
See all newsletters
×

Get home building tips, offers, and expert advice in your inbox

Signing you up...

This site is protected by reCAPTCHA and the Google Privacy Policy and Terms of Service apply.
See all newsletters
See all newsletters

New Feature

Fine Homebuilding Forums

Ask questions, offer advice, and share your work

View Comments

  1. user-5910362 | Jul 04, 2016 12:13am | #1

    This is a great tip. thanks for sharing it.

  2. RTennyBuilder | Jul 28, 2016 09:29am | #2

    Steve, I want to make a suggestion. When this ongoing chore comes up again, instead of replacing your rim joist cap with plywood siding, try a 1x12 piece of pine. This board is called a "Water Table". (you already know why) The solid board will last a lot longer than the laminated plywood. If you can't cover with one 1x12, just add another piece of z flash and extend down. You could also add a molding at the bottom. This will move the drip line off the foundation, and will help with moisture transfer through the masonry surface. This creates a pleasing look on most buildings and can be seen in many New England area homes. I'm sure you'll be able to find a picture on-line. Hope this will save you some future work.

Log in or create an account to post a comment.

Sign up Log in

Become a member and get full access to FineHomebuilding.com

More Tips & Techniques

View All
  • Precut Shims for Faster Door Hanging
  • Seal Toilets Partway to Detect Leaks
  • Mobile Kitchen Island on Furniture Glides
  • Makeshift Mud Mixer for Drywall
View All

Up Next

Video Shorts

Featured Story

6 Ways to Make a Small Lot Live Big

Strategic elements such as fences, framed views, and walled gardens can make constrained lot sizes feel both spacious and private.

Featured Video

How to Install Exterior Window Trim

Learn how to measure, cut, and build window casing made of cellular PVC, solid wood, poly-ash boards, or any common molding material. Plus, get tips for a clean and solid installation.

Related Stories

  • Tips for Choosing and Installing a Woodstove
  • Podcast 527: Sloping Decks, Brick-Filled Framing, and Skylights
  • Advantages of a Vented Over-Roof
  • Air-Sealing Exposed Rafter Tails

Discussion Forum

Recent Posts and Replies

  • |
  • |
  • |
  • |
  • |
  • |
View More Create Post

Highlights

Fine Homebuilding All Access
Fine Homebuilding Podcast
Tool Tech
Plus, get an extra 20% off with code GIFT20

"I have learned so much thanks to the searchable articles on the FHB website. I can confidently say that I expect to be a life-long subscriber." - M.K.

Get home building tips, offers, and expert advice in your inbox

Signing you up...

This site is protected by reCAPTCHA and the Google Privacy Policy and Terms of Service apply.
See all newsletters
See all newsletters

Video

View All
  • How to Install Exterior Laminate PVC Siding
  • Mixing Exterior Cladding the Right Way
  • Podcast 463: The Best of the Fine Homebuilding Podcast, Volume 3
  • Removing Lead Paint: DIY or Hire a Contractor?
View All

Framing

View All Framing Articles
  • Mudsill detail
    Airtight Mudsill Connection
  • outside of house
    High Ceilings in the Hills
  • A man in a workshop next to an I joist
    The Hole Truth: How to Properly Place, Cut and Drill Holes in TJI’s
  • How to Frame an I-Joist Roof
View All Framing Articles

BOOKS, DVDs, & MERCH

Shop the Store
  • Pretty Good House
    Buy Now
  • 2023 Tool Guide
    Buy Now
  • Code Check Building 4th Edition
    Buy Now
  • 2022 Fine Homebuilding Archive
    Buy Now
  • Shop the Store

Fine Homebuilding Magazine

  • Issue 313 - Feb/March 2023
    • Practical System for a Seismic Retrofit
    • Fine Homebuilding Issue #313 Online Highlights
    • Practical System for a Seismic Retrofit
  • Issue 312 - Dec 2022/Jan 2023
    • Tool Test: Cordless Tablesaws
    • Gray-Water System for a Sustainable Home
    • Insulate a Cape Roof to Avoid Ice Dams
  • Issue 311 - November 2022
    • 7 Steps to a Perfect Exterior Paint Job
    • Options for Smarter Home-Energy Tracking
    • The Fine Homebuilding Interview: James Metoyer
  • Issue 310 - October 2022
    • Choosing a Tile-Leveling System
    • Choosing Between HRVs and ERVs
    • Custom Built-in Cabinets Made Easy
  • Issue 309 - Aug/Sept 2022
    • 10 Steps to Install Crown Molding on Cabinets
    • How to Get Sturdy Walls Without OSB
    • Choosing the Right Construction Tape for the Job

Fine Homebuilding

Follow

  • twitter
  • facebook
  • instagram
  • pinterest

Newsletter

Get home building tips, offers, and expert advice in your inbox

Signing you up...

This site is protected by reCAPTCHA and the Google Privacy Policy and Terms of Service apply.
See all newsletters
See all newsletters

Membership & Magazine

  • Online Archive
  • Start Free Trial
  • Magazine Subscription
  • Magazine Renewal
  • Gift a Subscription
  • Customer Support
  • Privacy Preferences

Taunton Network

  • Green Building Advisor
  • Fine Woodworking
  • Fine Gardening
  • Threads
  • About
  • Contact
  • Advertise
  • Careers
  • Copyright
  • Terms of Use
  • Site Map
  • Do not sell or share my information
  • Privacy Policy
  • Accessibility
  • California Privacy Rights

© 2023 The Taunton Press, Inc. All rights reserved.

X
X
This is a dialog window which overlays the main content of the page. The modal window is a 'site map' of the most critical areas of the site. Pressing the Escape (ESC) button will close the modal and bring you back to where you were on the page.

Main Menu

  • How-To
  • Design
  • Tools & Materials
  • Video
  • Blogs
  • Forum
  • Reader Projects
  • Magazine
  • Members
  • FHB House

Podcasts

  • FHB Podcast
  • ProTalk

Webinars

  • Upcoming and On-Demand

Account

  • Log In
  • Join

Podcasts

  • FHB Podcast
  • ProTalk

Webinars

  • Upcoming and On-Demand

Popular Topics

  • Kitchens
  • Business
  • Bedrooms
  • Roofs
  • Architecture and Design
  • Green Building
  • Decks
  • Framing
  • Safety
  • Remodeling
  • Bathrooms
  • Windows
  • Tilework
  • Ceilings
  • HVAC

Magazine

  • Current Issue
  • Past Issues
  • Magazine Index
  • Subscribe
  • Online Archive
  • Author Guidelines

All Access

  • Member Home
  • Start Free Trial
  • Gift Membership

Shop the Store

  • Books
  • DVDs
  • Taunton Workshops

More

  • FHB Ambassadors
  • Reader Projects
  • Podcast
  • Customer Support

Account

  • Log In
  • Join

Newsletter

Get home building tips, offers, and expert advice in your inbox

Signing you up...

This site is protected by reCAPTCHA and the Google Privacy Policy and Terms of Service apply.
See all newsletters
See all newsletters

Follow

  • twitter
  • facebook
  • instagram
  • pinterest

Join All Access

Become a member and get instant access to thousands of videos, how-tos, tool reviews, and design features.

Start Your Free Trial

Subscribe

FHB Magazine

Start your subscription today and save up to 70%

Subscribe

We hope you’ve enjoyed your free articles. To keep reading, become a member today.

Get complete site access to expert advice, how-to videos, Code Check, and more, plus the print magazine.

Start your FREE trial

Already a member? Log in