
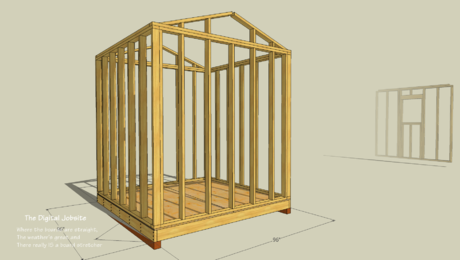
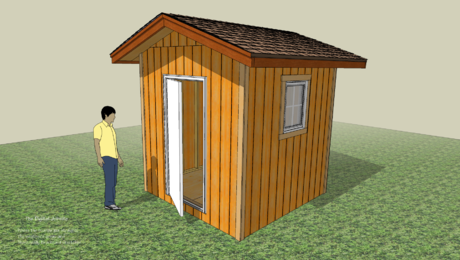
SketchUp is a very capable drawing program, so the methods shown here are just one way to go about creating this basic model of a framed structure I’m calling a shed.
A Simple Beginning:
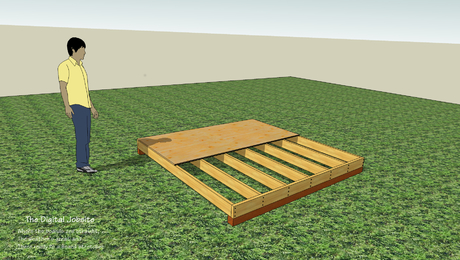
In this first of five video clips the rectangle tool is used to draw a rectangle which becomes the starting point for our model:
The “subfloor” component becomes the base for the next step, creating plates for wall framing
Plates are Next:
Here a simple method is used to create a wall plate component with the help of the Offset tool.
For simplicity sake, I created the plates as a single component. For a more detailed or realistic model I could have made the plates with individual pieces to better represent plates cut from 16′ pieces, more like a real-world jobsite.
Straightest Studs You’ve Ever Used:
To add wall studs to this model I create a component and use some more tools from the Digital Toolbox to position, duplicte and rotate it for the wall framing.
Again, to keep things simple in the video, I didn’t follow proper framer’s protocol for stud spacing. If it were important in a model you create, similar steps would be used to place studs for backing on the inside of the structure and nailing for sheathing and/or siding on the exterior.
To Top It Off:
The fifth and last video for this session shows adding double top plates on this shed to will wrap up the “building” project for now.
With walls framed and plates in place this little shed is set for some rafters, which I’ll cover in tne next session on The Digital Jobsite. Hope you’ll come back to check out the progress, and, will someone bring some donuts?
The Big Picture:
If you are getting an idea of how helpful a functional 3D model could be for design work you need to do on a daily basis or planning a one-time project, then The Digital Jobsite is working. There is a lot of room here to throw ideas around and address topics or questions that come up. I would appreciate the opportunity to help readers figure out how to apply SketchUp to their needs, so feel free to post feedback or questions.
Fine Homebuilding Recommended Products
Fine Homebuilding receives a commission for items purchased through links on this site, including Amazon Associates and other affiliate advertising programs.
Musings of an Energy Nerd: Toward an Energy-Efficient Home

A House Needs to Breathe...Or Does It?: An Introduction to Building Science

All New Bathroom Ideas that Work


View Comments
I love it! As a carpenter, I've used SketchUp to compensate for the lack of my abillity to 'visualize' the end product, and to fill in the gaps in my self-taught education. And, since I'm also self-taught in SketchUp, I enjoyed your use of Components ... learn something new every day!
I do have a question. How do you create the video you post on you tube? Are these videos created using the pro version of SketchUp? Can they be created using the free version?
Hey! There's an idea for a show! Show how the show is created!
Matt,
Not too bad of a lesson. Although as a professional design/builder who has used Sketchup for many years (since V3.1) I would recommend teaching the use of groups more so than components. At least to me I group just about everything then later come back and make components out of those groups that I may want to change in mass. By making everything components, you raise the risk of accidentally modifying a whole bunch of copied components, whereas modifying a copied group only applies to the one at hand. Grouping then making component also skips the naming the component step which I have never needed anyway. I generally name several groups in the "layer" window (plates, studs, roof, etc). I have found that this method is much easier when using Sketchup to create material estimates.
When I teach others to create something like this using Sketchup I sometimes use the outside-in method. Most people don't know much about framing so getting the outside shape first, group the surfaces and make each into plywood, etc,etc. seems to work better for those kinds.
I should also mention that standard Sketchup lessons (from Sketchup) usually advocate waiting till the drawing is finished before applying paint to objects.
CubeSquare,
While Sketchup can output an animated flythrough, it does not have a video recorder like Matt is using. I think if you look at his task bar at the bottom it will show that he is using Debut Video Capture software.
Dreamcatcher...Thanks!
Debut Video Capture is the first feed-back I've received about how these videos are made ... and I've been asking everywhere. My idea is to use this method to show 'how I did it' and similiarly to ask 'where do I go from here'? Breaktime no longer allows the posting of an skp file when posting and png just isn't enough.
I surely did enjoy Matt's use of components, in that the arrays were so quick. When I'm attempting something new, I'm all about groups to protect the what ever I draw first, simply because whatever you draw on top doesn't stick and also can be triple clicked to form a group.
I love your idea about using groups to estimate materials ... thanks, I'll be using that also.
I can see that sketch up is a usefull tool. Although, because of an old computer and a bad set of ears, I may not have heard correctly in Part D wall. When you copied the corner stud and rotated it and put it against the other corner stud you copied it again and moved it to the left. What I heard was, move it 16", and then each one after that 16". If I heard correctly, then what happened to the 3.5" for the other wall corner stud? If I heard correctly, then the sheeting would not have lined up. What do you think?
This is a nice article. After I retired took a 7 month program about carpentry. Wish I would have learned more. Even though I have some experience (mostly stacking lumber) I am still hesitant about working on a shed-I'm afraid of the job not being "perfect."
I think like papabob in the first comment posted-there's not enough perfect detail.
I wish we could somehow correspond with each other via email. It might be a morale booster when you try a project on your own.
Frank C.
Great dialog here guys, thanks for taking the time to comment.
Looks like some questions are already answered, like the Debut Video Capture. Being more of a carpenter than a "geek" I just picked software that wasn't too expensive and seemed to have features that would work well for this blog; so far, so good.
Like every real jobsite I've been on, I learn something new every day, and I expect this Digital Jobsite will be the same. I've still got a lot to learn about using groups and layers to simplify modeling so tips and techniques are welcome.
So far the direction of this blog has been towards demonstrating how useful a tool SketchUp is without getting too deep into details. Part D is intended to show use of rotate, move and copy tools without "proper framer's protocol for stud spacing" complicating things. The great thing about the program is that it can accommodate a wide range of detail from basic to board-by-board planning, again, depending on the desired end result. So future posts can show more carpentry layout information in addition to the tutorial information.
Stay tuned for more...
Have you tried the "House Builder" plug-in? The plugin allows you to create doors, windows and even roof pitches automatically. Very nice. You can find it here: http://rhin.crai.archi.fr/rubylibrarydepot/plugin_details.php?id=188
-Pablo Sanchez, President of Handyman Matters of Concord, NC
I am hoping someone can straighten me out here. I am following along with this because I want to build a shed and I want to learn Sketchup. I get to the part where I drage the wall plates over to the sub floor and the wall plates are always too large or somehow I am stretching the component while I drag it. I have looked at this a bunch of times but can't see where I am going wrong. Anyone help me out here?
Dave
Hey filch,
Thanks for following along. SU is such a great visual program to use it should really help get your shed planned out before you start building. I'll do what I can to help.
Although I can't tell exactly what trouble you are having with the program, my first thought is that you might be using the "scale" tool instead of the "move" tool. That would change the size of the plate component but might look like you are moving them. Or possibly you are attempting to move the plates in the "component edit" mode. That could make only selected parts of the plates move and in effect change the size instead.
If you take the subfloor perimeter line, turn it into a component, edit that component to the size you want for your plates and then make sure you exit the component edit mode before selecting your plate component with the move tool to place it on the subfloor component, it should work. It goes without saying that there are any number of ways to create plates for a SU model but the method you are following in the video is a pretty straightforward way to get it done.
Hope this helps...
Matt
Good work on the tutorial, Matt.
In Part A, you don't need to reverse the face on the subfloor prior to the Push/Pull step. Pulling the rectangle up into a box will automatically take care of the faces to make sure they are properly oriented. Saves you a step in the process.
In Part C, grabbing the stud component at a corner will prevent the Move tool from morphing into rotate mode. Also, if you make the part 3D before making it a component, the rotate handles will be farther from the corners making it less likely that you'd grab them.
As Pablo mentioned the House Builder plugin makes quick work of drawing up framing although knowing how to do it manually is definitely a good thing.
Dave
Flitch,
I'd like to make a suggestion. Learn to use the Layer Manager. Click on the View menu, hold your cursor at tool bars and a side menu will open, then put a check beside Layers. That will add the Layer Manager to your tool bars.
When you open SketchUp you will be on layer zero. Go ahead and start building you shed just the way you would have to do it in the field, one timber and one stick at a time. When you finish drawing the first timber, tripple click on it with the Select Tool, then right click on it and choose Make Group. Click off in white space and you've just begun the process of building your shed. When you draw your next timber, make that a Group also. Continue along until you have your four timbers set as individual groups. Once you get that far, click on the blue dial of the layer manager, then click on the plus sign and then click on the circle of layer one ... that de-activates layer zero and now you working on layer one. Notice that if you un-check layer zero it disappears! On layer one put your rim joists and floor joists ... on layer two put your floor ... on layer three put up your first wall ... ect. When it comes time to estimate, just start un-checking the layers. The best advice is to draw it exactly as you would build it, and by the time you finish your drawing you will be able to set up a production line and start turning out them sheds all over town.
CubeSquare
Matt,
I really like your use of the english language. "The rafter your after" just tickled my funny bone, thanks. I also enjoyed the method you used to draw the rafters without having to know height above the birdsmouth. At first I was hesitant with you because the carpentry lesson wasn't included in the SketchUp lesson ... but I came around when I realized I was learning, in spite of the fact that my nose was somewhere up there on the scaffold. I'm kidding you, buddy. I really enjoy your videos. And I'm so pleased to see SketchUp at Fine Home Building.
"The rafter your after" was the catalyst that got me to renew my on-line subscription. This is good stuff!
Dreamcatcher put me onto layers and Debut Video Screen Capture Software ... I just tried passing Layers on to Flitch and at that point I realized ... The most difficult part of learning to use SketchUp is setting up your screen with tools and choosing your template and learning to use Model Info and Preferences setting the units the drawing attributes and the precision you'll need to accomplish your drawing. Am I babbling? Anyway, thanks Matt ... Love your brain!
CubeSquare
CubeSquare writes: "Learn to use the Layer Manager." This is good advice.
I would suggest that you follow Google's advice about how to deal with layers. See this link: http://sketchup.google.com/support/bin/answer.py?hl=en&answer=38572 I've seen many models where that advice was not followed that have been messed up. They can be difficult to clean up.
The key things are to "Always draw your entities on Layer 0 and leave them there" and only associate other layers with the components and/or groups, dimensions and text in your model. So always leave Layer 0 as the active layer. After you've made the component, associate the new layer with that component.
Dave
You can use a software program called "Camtasia Studio 3" which captures whatever is on your screen between start and stop. Google "Camtasia" for more info...