FHB Logo Facebook LinkedIn Email Pinterest Twitter X Instagram Tiktok YouTube Plus Icon Close Icon Navigation Search Icon Navigation Search Icon Arrow Down Icon Video Guide Icon Article Guide Icon Modal Close Icon Guide Search Icon Skip to content
Subscribe
Log In
  • How-To
  • Design
  • Tools & Materials
  • Restoration
  • Videos
  • Blogs
  • Forum
  • Magazine
  • Members
  • FHB House
  • Podcast
Log In
Build A Deck - Fine Homebuilding

Attach-A-Deck ledger mounting system

By Mike Guertin
  • X
  • facebook
  • linkedin
  • pinterest
  • email
  • add to favorites Log in or Sign up to save your favorite articles

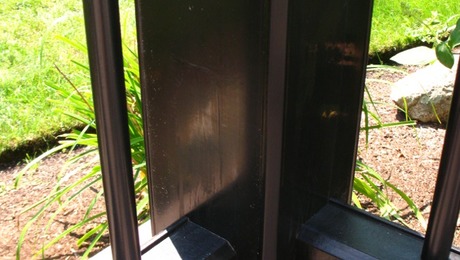
The Attach-A-Deck is a simple deck ledger mounting system that stands the ledger off the wall eliminating the need for flashing – that’s the big benefit but there are other features I like. Attach-A-Deck can be used to mount ledgers on new homes and retrofit decks over siding on existing homes, the system is tested by an engineering service, the installation is simple and fast, lag screws can be used (something the 2009 prescriptive ledger mounting table only permits for bolted ledgers), and it’s reasonably priced.

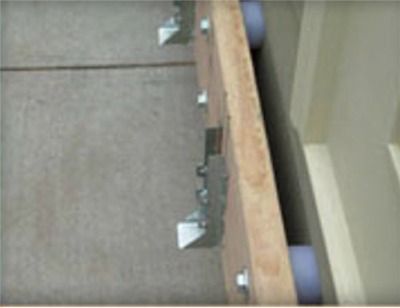
A lot of deck builders like to space ledgers off the wall so water doesn’t get trapped and leak into the floor framing system. The conventional way to do this is with stacks of washers, plastic spacers or wood blocks. Attach-A-Deck engineers the space into the attachment device and provides a fastening schedule based on the depth of a deck.

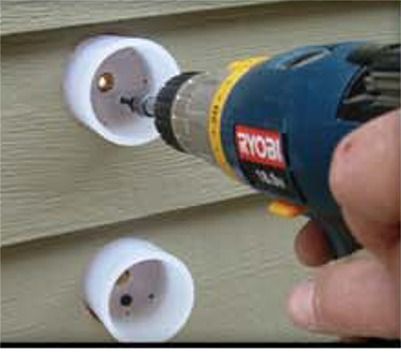
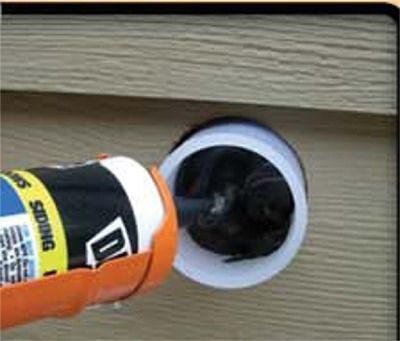
Attach-A-Deck works great for mounting a ledger over existing siding. You just drill 2 1/2 in. holes through the siding to the face of the sheathing, apply the Attach-A-Deck fasteners and mount the ledger to the house. Conventional spacing systems are limited to ½ in. by code, but ½ in. isn’t deep enough to accommodate siding thickness. And since siding is not a structural part of the wall, we can’t bear the ledger against it. Attach-A-Deck spacers are 2 in. deep so they can handle siding up to 1 1/2 in. thick and still leave ½ in. air space.

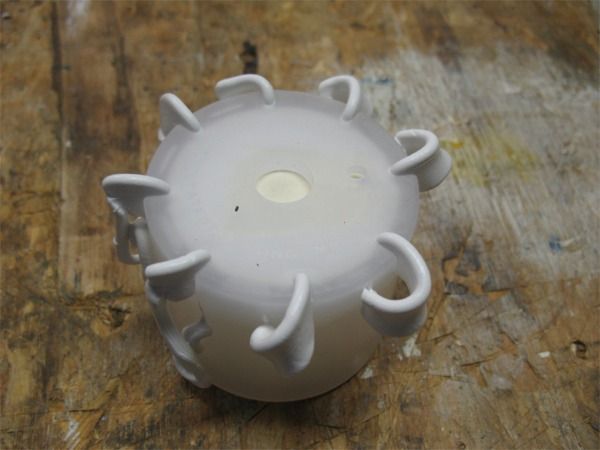
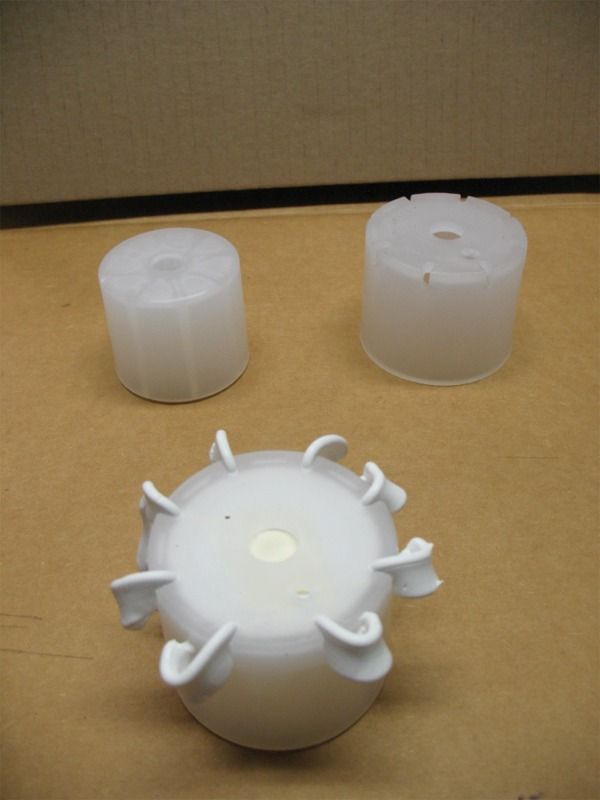
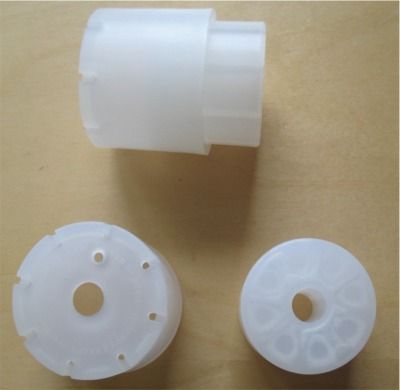
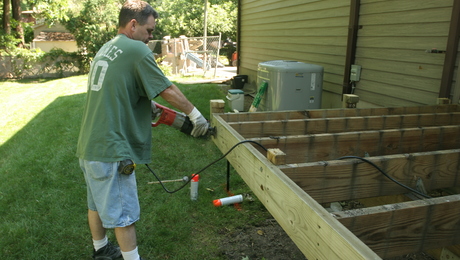
The ‘plunger and cup’ design back-caulks and seals the siding hole filling in the gaps from the inside – out. This is accomplished by filling the Attach-A-Deck cups with sealant before screwing or bolting the ledger onto the wall. The plug part of the system works like a plunger in each cup and forces sealant out of the series of holes around the perimeter of the cup. As you draw up the ledger fasteners, sealant is forced through the holes to seal the perimeter – it’s ingenious.

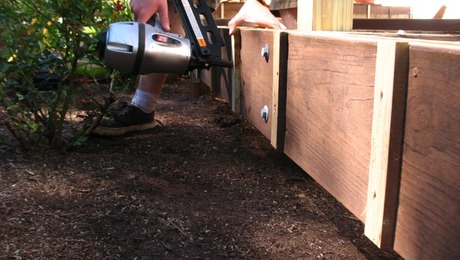
Attach-A-Deck can be mounted with ½ in lag screws or ½ in. bolts. It’s the only ledger mounting and spacing system that I know of that can be mounted with lag screws. This is handy when you don’t have access to the inside of the house rim joist to install bolts. And the system is tested for use mounting to both LVL and strand type engineered rim board; something the IRC doesn’t permit when using the prescriptive code table. Attachment schedules are for deck loads of 60, 70 and 80 lbs/sf and based on joist spans from 6 ft. up to 16 feet. Since the total load for decks is typically 50 lbs/sf (10 dead, 40 live), the additional loads can account for snow loads or locally enforced live loads. The devices are installed in pairs spaced 2 in. down from the top and up from the bottom of the ledger. There are good diagrams on the Attach-A-Deck website suitable as submittals.

Attach-A-Deck does not have an ICC-ES Report so you’ll want to check with your local building official before using them. Washington State University’s Wood Materials and Engineering Lab tested Attach-A-Deck. The report is available on the Attach-A-Deck website for submission to local building officials in lieu of an ICC-ESR. I’ve spoken with the inventor, Jeff Johnson, on several occasions. He’s happy to talk with local building officials if you want to use the system but run into resistance.

Mounting Attach-A-Deck cups to wall

There’s a short learning curve to installing Attach-A-Deck. I find using the ledger as the drilling template to be the easiest technique; it’s described on the website. Essentially you mark out the deck joist positions on the ledger, locate the Attach-A-Deck spacers so they won’t interfere with the joists or hanger flanges, tack screw the ledger to the wall, and bore pilot holes through the ledger and just a little into the siding. Lower the ledger out of the way and drill holes through the siding for the cups. After you mount the cup portions to the wall and fill them ¼ to ½ way

filling Attach-A-Deck cup with sealant

with sealant, insert the plugs into the cups.  Slide a couple of lags through pilot holes at each end of the ledger to serve as orientation dowels and then lift and orient the lags to the Attach-A-Deck centers with a helper.

I like to screw the lags into the wall about ½ in. at a pass starting at one end of the ledger and working the way down. This sequence draws the ledger to the wall in two or three passes allowing the sealant a chance to squeeze out in stages. You’ll be able to see the progress as you sock the screws down on the last pass; the sealant will ooze out between the edges of the cups and the siding. Once the rim of the cup seats to the back of the ledger, you’re done tightening.

The process for mounting the with bolts is similar with the main difference being you bore the pilot hole all the way through the rim board of the house and insert the bolts from the inside so the nuts end up on the ledger side of the assembly. I slide the cups onto the bolts, fill them 1/4 to ½ way up with sealant and then slide the plugs on. The bolts need to be an inch or two longer than the distance from back of rim joist to face of the ledger to account for the sealant-filled cup; I usually use 7 in. to 8 in. bolts depending on the thickness of the rim board and sheathing. Don’t bother trying to hand-press the ledger to the wall to account for short bolts – you need the pressure from the nuts to force the sealant out into the joint.

The sealant is a critical element in the assembly. I like to use a high quality elastomeric type sealant like Big Stretch rather than silicone mentioned on the Attach-A-Deck instructions. Most types of silicone won’t stretch much before the bond breaks whereas an elastic sealant will maintain a seal when building components like siding moves.

Attach-A-Deck devices

Attach-A-Deck devices are available online through the website for $8.95 per pair or some lumber yards where the Attach-A-Deck system has become popular. A 12 ft. deep deck joist span (house to beam) and 16 ft. long (length of ledger) will need 22 Attach-A-Deck spacers which will run you about $100. Attach-A-Deck is more economical than old-school methods of ledger mounting when you figure the time you save removing siding and installing flashing on a conventionally mounted ledger, not to mention the savings on flashing and peel and stick membrane.

Furhter Resources:

Deck Ledger Bolting by the Code

How to Attach a Deck Ledge to the House

Fine Homebuilding Recommended Products

Fine Homebuilding receives a commission for items purchased through links on this site, including Amazon Associates and other affiliate advertising programs.

Affordable IR Camera

This camera is super useful for tracking down air leaks in buildings. The one-hand pistol grip arrangement frees your other hand for steadying yourself while maneuvering tricky job sites.
Buy at Amazon

Reliable Crimp Connectors

These reliable, high-quality connectors from Wirefy work on 10-22-gauge wire have heat-shrink insulation to keep out water and road salt.
Buy at Amazon

Handy Heat Gun

This heat gun is great for drying joint compound, primer and paint when patching drywall and plaster walls. Plus it can soften adhesive, get a very cold small engine to start, and shrink heat-shrink tubing.
Buy at Amazon

Sign up for eletters today and get the latest how-to from Fine Homebuilding, plus special offers.

Signing you up...

This site is protected by reCAPTCHA and the Google Privacy Policy and Terms of Service apply.
See all newsletters
See all newsletters
×

Get home building tips, offers, and expert advice in your inbox

Signing you up...

This site is protected by reCAPTCHA and the Google Privacy Policy and Terms of Service apply.
See all newsletters
See all newsletters

New Feature

Fine Homebuilding Forums

Ask questions, offer advice, and share your work

  • X
  • facebook
  • linkedin
  • pinterest
  • email
  • add to favorites Log in or Sign up to save your favorite articles

View Comments

  1. Wood_Sculptor | May 18, 2011 01:12pm | #1

    "Malicious Web Site Blocked

    You attempted to access:

    http://www.attachadeck.com/

    This is a known malicious web site. It is recommended that you do NOT visit this site."

    This is the message my Norton Internet Security software displayed when I tried to access that website. Access it at your own risk.

  2. al_iw | May 20, 2011 12:36am | #2

    Went there (http://www.attachadeck.com/) and had no problems,even opened pdf.

  3. MikeGuertin | May 26, 2011 05:53am | #3

    I have the full Norton suite but never had trouble accessing Attach-A-Deck's site nor a warning. Perhaps an anomaly.

  4. SteveVA | May 26, 2011 07:31am | #4

    Tried to access the website and between McAfee Anti-virus, Firefox and WOT every malicious website/phishing alarm went off. Don't know what the problem is.

  5. Atch_A_Dk | Jun 15, 2011 08:51am | #5

    Sorry to anyone who had a problem logging in to the Attach-A-Deck website. Complete scans have been run by Norton and the webmaster and the site was determined to be virus free. It was determined by Fine Homebuilding computer personal and my webmaster that the alerts were caused by the underlined word Attach-A-Deck being a direct link in the article 11 times which created a spam alert on some virus protection programs. If you have any problems with the site, please contact me @ [email protected] . Thank you, Jeff Johnson, owner of Attach-A-Deck.

Log in or create an account to post a comment.

Sign up Log in

Become a member and get full access to FineHomebuilding.com

More Build A Deck - Fine Homebuilding

View All
  • IRC Footing Table Makes Sizing Deck Footings Easier
  • Spacing Deck Facias for Bolt Heads
  • Buffing out Scratches in Composite Rails
  • Is It a Bad Idea to Rehab an Old Deck?
View All

Up Next

Video Shorts

Featured Story

FHB Podcast Segment: Are Single-Room ERVs the Answer?

Learn more about the pros and cons of single-room ERVs.

Featured Video

Builder’s Advocate: An Interview With Viewrail

Learn more about affordable, modern floating stairs, from design to manufacturing to installation.

Related Stories

  • Podcast Episode 689: Basement Garages, Compact ERVs, and Safer Paint Stripper
  • A Closer Look at Smart Water-Leak Detection Systems
  • Podcast Episode 688: Obstructed Ridge Vent, Buying Fixer-Uppers, and Flashing Ledgers
  • Podcast Episode 687: Flat Roofs, Spray Foam vs. Loose-Fill Insulation, and Building Your Own Cabinets

Discussion Forum

Recent Posts and Replies

  • |
  • |
  • |
  • |
  • |
  • |
View More Create Post

Highlights

Fine Homebuilding All Access
Fine Homebuilding Podcast
Tool Tech
Plus, get an extra 20% off with code GIFT20

"I have learned so much thanks to the searchable articles on the FHB website. I can confidently say that I expect to be a life-long subscriber." - M.K.

Get home building tips, offers, and expert advice in your inbox

Signing you up...

This site is protected by reCAPTCHA and the Google Privacy Policy and Terms of Service apply.
See all newsletters
See all newsletters

Video

View All Videos
  • A Closer Look at Smart Water-Leak Detection Systems
  • Podcast Episode 678: Live from the Builders' Show-Part 2
  • Podcast Episode 677: Live from the Builders' Show-Part 1
  • FHB Podcast Segment: The Best of the Fine Homebuilding Podcast, Volume 8
View All

Fine Homebuilding Magazine

  • Issue 332 - July 2025
    • Custom Built-ins With Job-Site Tools
    • Fight House Fires Through Design
    • Making the Move to Multifamily
  • Issue 331 - June 2025
    • A More Resilient Roof
    • Tool Test: You Need a Drywall Sander
    • Ducted vs. Ductless Heat Pumps
  • Issue 330 - April/May 2025
    • Deck Details for Durability
    • FAQs on HPWHs
    • 10 Tips for a Long-Lasting Paint Job
  • Issue 329 - Feb/Mar 2025
    • Smart Foundation for a Small Addition
    • A Kominka Comes West
    • Making Small Kitchens Work
  • Issue 328 - Dec/Jan 2024
    • How a Pro Replaces Columns
    • Passive House 3.0
    • Tool Test: Compact Line Lasers

Fine Home Building

Newsletter Sign-up

  • Fine Homebuilding

    Home building tips, offers, and expert advice in your inbox.

  • Green Building Advisor

    Building science and energy efficiency advice, plus special offers, in your inbox.

  • Old House Journal

    Repair, renovation, and restoration tips, plus special offers, in your inbox.

Signing you up...

This site is protected by reCAPTCHA and the Google Privacy Policy and Terms of Service apply.
See all newsletters

Follow

  • Fine Homebuilding

    Dig into cutting-edge approaches and decades of proven solutions with total access to our experts and tradespeople.

    Start Free Trial Now
    • Facebook
    • Instagram
    • X
    • LinkedIn
  • GBA Prime

    Get instant access to the latest developments in green building, research, and reports from the field.

    Start Free Trial Now
    • Facebook
    • YouTube
  • Old House Journal

    Learn how to restore, repair, update, and decorate your home.

    Subscribe Now
    • Facebook
    • Instagram
    • X

Membership & Magazine

  • Online Archive
  • Start Free Trial
  • Magazine Subscription
  • Magazine Renewal
  • Gift a Subscription
  • Customer Support
  • Privacy Preferences
  • About
  • Contact
  • Advertise
  • Careers
  • Terms of Use
  • Site Map
  • Do not sell or share my information
  • Privacy Policy
  • Accessibility
  • California Privacy Rights

© 2025 Active Interest Media. All rights reserved.

Fine Homebuilding receives a commission for items purchased through links on this site, including Amazon Associates and other affiliate advertising programs.

  • Home Group
  • Antique Trader
  • Arts & Crafts Homes
  • Bank Note Reporter
  • Cabin Life
  • Cuisine at Home
  • Fine Gardening
  • Fine Woodworking
  • Green Building Advisor
  • Garden Gate
  • Horticulture
  • Keep Craft Alive
  • Log Home Living
  • Military Trader/Vehicles
  • Numismatic News
  • Numismaster
  • Old Cars Weekly
  • Old House Journal
  • Period Homes
  • Popular Woodworking
  • Script
  • ShopNotes
  • Sports Collectors Digest
  • Threads
  • Timber Home Living
  • Traditional Building
  • Woodsmith
  • World Coin News
  • Writer's Digest
Active Interest Media logo
X
X
This is a dialog window which overlays the main content of the page. The modal window is a 'site map' of the most critical areas of the site. Pressing the Escape (ESC) button will close the modal and bring you back to where you were on the page.

Main Menu

  • How-To
  • Design
  • Tools & Materials
  • Video
  • Blogs
  • Forum
  • Project Guides
  • Reader Projects
  • Magazine
  • Members
  • FHB House

Podcasts

  • FHB Podcast
  • ProTalk

Webinars

  • Upcoming and On-Demand

Podcasts

  • FHB Podcast
  • ProTalk

Webinars

  • Upcoming and On-Demand

Popular Topics

  • Kitchens
  • Business
  • Bedrooms
  • Roofs
  • Architecture and Design
  • Green Building
  • Decks
  • Framing
  • Safety
  • Remodeling
  • Bathrooms
  • Windows
  • Tilework
  • Ceilings
  • HVAC

Magazine

  • Current Issue
  • Past Issues
  • Magazine Index
  • Subscribe
  • Online Archive
  • Author Guidelines

All Access

  • Member Home
  • Start Free Trial
  • Gift Membership

Online Learning

  • Courses
  • Project Guides
  • Reader Projects
  • Podcast

More

  • FHB Ambassadors
  • FHB House
  • Customer Support

Account

  • Log In
  • Join

Newsletter

Get home building tips, offers, and expert advice in your inbox

Signing you up...

This site is protected by reCAPTCHA and the Google Privacy Policy and Terms of Service apply.
See all newsletters
See all newsletters

Follow

  • X
  • YouTube
  • instagram
  • facebook
  • pinterest
  • Tiktok

Join All Access

Become a member and get instant access to thousands of videos, how-tos, tool reviews, and design features.

Start Your Free Trial

Subscribe

FHB Magazine

Start your subscription today and save up to 70%

Subscribe

This is your last free article.

Don't miss another expert tip or technique from building pros. Start your free trial today.

Start your FREE trial

Already a member? Log in

We hope you’ve enjoyed your free articles. To keep reading, become a member today.

Get complete site access to expert advice, how-to videos, Code Check, and more, plus the print magazine.

Start your FREE trial

Already a member? Log in

Privacy Policy Update

We use cookies, pixels, script and other tracking technologies to analyze and improve our service, to improve and personalize content, and for advertising to you. We also share information about your use of our site with third-party social media, advertising and analytics partners. You can view our Privacy Policy here and our Terms of Use here.

Cookies

Analytics

These cookies help us track site metrics to improve our sites and provide a better user experience.

Advertising/Social Media

These cookies are used to serve advertisements aligned with your interests.

Essential

These cookies are required to provide basic functions like page navigation and access to secure areas of the website.

Delete My Data

Delete all cookies and associated data