FHB Logo Facebook LinkedIn Email Pinterest Twitter Instagram Tiktok YouTube Plus Icon Close Icon Navigation Search Icon Navigation Search Icon Arrow Down Icon Video Guide Icon Article Guide Icon Modal Close Icon Guide Search Icon Skip to content
Subscribe
Log In
  • How-To
  • Design
  • Tools & Materials
  • Videos
  • Blogs
  • Forum
  • Magazine
  • Members
  • FHB House
  • Podcast
Log In

Rhode Island 2016

The 2016 FHB House is energy-smart, connected, healthy, and durable. It’s small and sensible. Most of all, it’s a valuable model home, meant to educate designers and builders who aspire to create high-performance houses that are exceptional in their quality, comfort, and style.

How-To

Range Exhaust

Rectangular in the wall — round through the floor and out the wall.

By Mike Guertin
range exhaustIMG_20170124_144024760
10 in. x 3 1/4 in. exhaust duct run through the wall routes range hood exahust air down into the first floor joist cavity. The joints are sealed with butyl adhesive aluminum tape.

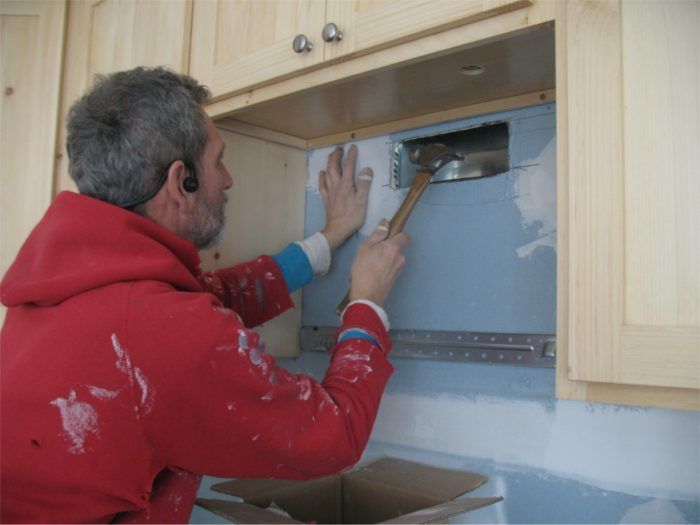
Range exhaust ducts can be tricky to run through framing and out through a wall or the roof. I mapped out the best route for the exhaust in the FHB House where the range backed up to the center bearing wall: down through the interior wall, through the first floor joist system and out the exterior basement walkout wall. I knew we were installing a Whirlpool microwave / exhaust fan combination unit but wasn’t precisely sure that the height of the exhaust port would level out once the cabinets were installed. So I made provisions for ductwork that could adapt to an unknown height. I installed a 10-in. wide by 3-1/4-in. deep rectangular duct centered in the wall where the range would go.   I ran the duct several inches higher than the exhaust port would probably be and installed a cap at the end of the duct. The rectangular duct transitioned to a 6-in. round duct in the floor and ran out through the wall.


range exhaustIMG_20170227_115642760
Damian changes the motor within the microwave housing to exhaust through the rear

Damian and I prepped the microwave by changing the blower motor to exhaust through the rear (just a matter of removing some screws and turning the motor within the microwave housing). I used the mounting template to locate where a hole in the duct would need to be so the exhaust damper frame on the microwave would mate when we installed the unit.


range exhaustIMG_4740
Aluminum tape covers the rough edge of the drywall and cut edge of the sheet metal.

I cut the drywall out 1/4 in. larger than the damper frame needed. Then I cut the a hole in the sheet metal duct and bent the metal over the edge of the drywall. To finish off the opening I wrapped strips of aluminum adhesive tape from the inside of the metal duct and out onto the face of the drywall.

range exhaustIMG_4739
Gasket strips applied to the microwave housing reduces leakage of exhaust air

After Damian was done prepping the microwave and installing the mounting bracket, we hoisted it up on the wall. The damper flange aligned precisely with the duct opening and a gasket we applied to the back of the microwave housing sealed the connection.

Sign up for eletters today and get the latest how-to from Fine Homebuilding, plus special offers.

Signing you up...

This site is protected by reCAPTCHA and the Google Privacy Policy and Terms of Service apply.
See all newsletters
See all newsletters
×

Get home building tips, offers, and expert advice in your inbox

Signing you up...

This site is protected by reCAPTCHA and the Google Privacy Policy and Terms of Service apply.
See all newsletters
See all newsletters

New Feature

Fine Homebuilding Forums

Ask questions, offer advice, and share your work

Rhode Island 2016 Videos

Navigate the Build

  • Introduction
  • Foundation
  • Framing
  • Windows and Doors
  • Insulation
  • Roof
  • Siding and Trim
  • Mechanicals
  • Interior Finishes
  • Kitchen and Baths
  • Outdoor Spaces
  • Completed Home

Behind the Build

  • New York 2023
  • Kansas 2022
  • Wisconsin 2021
  • Nebraska 2021
  • Connecticut 2020
  • Kentucky 2019
  • California 2018
  • Vermont 2017
  • Rhode Island 2016
  • Twitter
  • Facebook
  • LinkedIn
  • Pinterest
  • Email

View Comments

  1. Ewan | May 12, 2017 01:36pm | #1

    Mike,
    Really enjoyed following this build... thanks!

    Related to this range exhaust article, I'm wondering where you terminated the make-up air duct (with the Cape damper installed) that you've referred to in other ProHome writeups? Did you run the make-up air duct into the kitchen near the OTR microwave somewhere? I'm curious if you tried to do some "passive tempering" of the incoming make-up air... perhaps exiting the make-up air duct up high on the wall so it could mix with ambient indoor air.
    I have a similar OTR microwave in my home and currently don't have any dedicated make-up air duct. Cracking a window in the winter (in Ottawa, Ontario) for make-up air isn't my preferred long-term solution.

    Cheers,
    Ewan

  2. User avater
    mike_guertin | May 25, 2017 07:56pm | #2

    Reply to Ewan

    See https://www.finehomebuilding.com/2017/05/12/make-air-range-hood#comment-12963

    No passive tempering other than delivering the air to the toekick space beneath the cabinet next to the range.

  3. User avater
    AlbertSJames | Nov 06, 2018 12:30am | #3

    Excellent work

  4. User avater
    AlbertSJames | Nov 06, 2018 12:34am | #4

    Good working for you

  5. User avater
    JaniceWHilliard | Jan 23, 2019 07:01am | #5

    Thanks for your article.

Log in or create an account to post a comment.

Sign up Log in

Become a member and get full access to FineHomebuilding.com

More Rhode Island 2016

View All
  • Makeup Air for the Range Hood
  • Finishing the Basement
  • A Look at the Finished Home
  • Range Exhaust
View All

Fine Homebuilding House - Rhode Island 2016 Sponsors

  • AdvanTech Logo
  • American Standard Logo
  • AMVIC Logo
  • Boral_CulturedStone Logo
  • Boral_Flag Logo
  • Boral_TruExterior Logo
  • CertainTeed Logo
  • Coravent Logo
  • Dryerbox Logo
  • DXV Logo
  • Flir Logo
  • Gladiator Logo
  • MAXUSA Logo
  • ProtectoWrap Logo
  • Roxul Logo
  • Sikkens Logo
  • Weyerhaeuser Logo
  • Integrity Logo
  • SoftPlan Logo
  • Tamarack Logo
  • TiteBond Logo
  • TrusJoist Logo
  • Whirlpool Logo
  • Zehnder Logo
  • ZipSystem Logo
  • Feeney Logo

Up Next

Video Shorts

Featured Story

Double Dormer Transformation

This historic schoolhouse was transformed into a stunning four-bed, three-bath home with ocean views and a modern open-concept design.

Featured Video

Video: Build a Fireplace, Brick by Brick

Watch mason Mike Mehaffey construct a traditional-style fireplace that burns well and meets current building codes.

Related Stories

  • Podcast 608: Members-only Aftershow—High-performance Building with Mainstream Methods and Materials
  • Eight Myths About Electrification
  • Maximize HVAC Efficiency
  • Locating Bathroom Outlets

Discussion Forum

Recent Posts and Replies

  • |
  • |
  • |
  • |
  • |
  • |
View More Create Post

Highlights

Fine Homebuilding All Access
Fine Homebuilding Podcast
Tool Tech
Plus, get an extra 20% off with code GIFT20

"I have learned so much thanks to the searchable articles on the FHB website. I can confidently say that I expect to be a life-long subscriber." - M.K.

Get home building tips, offers, and expert advice in your inbox

Signing you up...

This site is protected by reCAPTCHA and the Google Privacy Policy and Terms of Service apply.
See all newsletters
See all newsletters

Video

View All Videos
  • Podcast Episode 99 — Working with Wood
  • Podcast Episode 89 — Gross Stories
  • Make Up Air For Commercial Exhaust Fans in Homes
  • Gaggenau Lift Oven
View All

Appliances

View All Appliances Articles
  • Understanding Toilet Design and Efficiency
  • Editorial Note: What About Water Conservation?
  • Statement Range Hood for a Modern Kitchen
  • Refrigerators Can Look Good, Too
View All Appliances Articles

BOOKS, DVDs, & MERCH

Shop the Store
  • 2023 Fine Homebuilding Archive
    Buy Now
  • Code Check Complete 3rd Edition
    Buy Now
  • 2024 Tool Guide
    Buy Now
  • Pretty Good House
    Buy Now
  • Shop the Store

Fine Homebuilding Magazine

  • Issue 320 - Dec 2023/Jan 2024
    • How to Reuse Salvaged Wood
    • Chainsaw Retrofit and Energy Performance
    • Maximize HVAC Efficiency
  • Issue 319 - November 2023
    • Nearly Net-Zero ADU
    • An Easy Approach to Coffered Ceilings
    • Understanding Types of Roof Vents
  • Issue 318 - October 2023
    • Make Mudsills Square and Level
    • Turn Up the Heat With Induction Cooktops
    • The Fine Homebuilding Interview: Lloyd Alter
  • Issue 317 - Aug/Sept 2023
    • Finishing Drywall With Seamless Results
    • A Flat Roof in a Cold Climate
    • Compact Cordless Shop Vacs
  • Issue 316 - July 2023
    • Timber-Framed Solar Canopies
    • Build a Transom Above a Stock Door
    • Understanding Toilet Design and Efficiency

Fine Homebuilding

Follow

  • YouTube
  • instagram
  • facebook
  • pinterest
  • Tiktok
  • twitter

Newsletter

Get home building tips, offers, and expert advice in your inbox

Signing you up...

This site is protected by reCAPTCHA and the Google Privacy Policy and Terms of Service apply.
See all newsletters
See all newsletters

Membership & Magazine

  • Online Archive
  • Start Free Trial
  • Magazine Subscription
  • Magazine Renewal
  • Gift a Subscription
  • Customer Support
  • Privacy Preferences

Taunton Network

  • Green Building Advisor
  • Fine Woodworking
  • Fine Gardening
  • Threads
  • About
  • Contact
  • Advertise
  • Careers
  • Copyright
  • Terms of Use
  • Site Map
  • Do not sell or share my information
  • Privacy Policy
  • Accessibility
  • California Privacy Rights

© 2023 The Taunton Press, Inc. All rights reserved.

X
X
This is a dialog window which overlays the main content of the page. The modal window is a 'site map' of the most critical areas of the site. Pressing the Escape (ESC) button will close the modal and bring you back to where you were on the page.

Main Menu

  • How-To
  • Design
  • Tools & Materials
  • Video
  • Blogs
  • Forum
  • Project Guides
  • Reader Projects
  • Magazine
  • Members
  • FHB House

Podcasts

  • FHB Podcast
  • ProTalk

Webinars

  • Upcoming and On-Demand

Podcasts

  • FHB Podcast
  • ProTalk

Webinars

  • Upcoming and On-Demand

Popular Topics

  • Kitchens
  • Business
  • Bedrooms
  • Roofs
  • Architecture and Design
  • Green Building
  • Decks
  • Framing
  • Safety
  • Remodeling
  • Bathrooms
  • Windows
  • Tilework
  • Ceilings
  • HVAC

Magazine

  • Current Issue
  • Past Issues
  • Magazine Index
  • Subscribe
  • Online Archive
  • Author Guidelines

All Access

  • Member Home
  • Start Free Trial
  • Gift Membership

Shop the Store

  • Books
  • DVDs
  • Taunton Workshops

More

  • FHB Ambassadors
  • Reader Projects
  • Podcast
  • FHB House
  • Customer Support

Account

  • Log In
  • Join

Newsletter

Get home building tips, offers, and expert advice in your inbox

Signing you up...

This site is protected by reCAPTCHA and the Google Privacy Policy and Terms of Service apply.
See all newsletters
See all newsletters

Follow

  • YouTube
  • instagram
  • facebook
  • pinterest
  • Tiktok
  • twitter

Join All Access

Become a member and get instant access to thousands of videos, how-tos, tool reviews, and design features.

Start Your Free Trial

Subscribe

FHB Magazine

Start your subscription today and save up to set_percent%

Subscribe

We hope you’ve enjoyed your free articles. To keep reading, become a member today.

Get complete site access to expert advice, how-to videos, Code Check, and more, plus the print magazine.

Start your FREE trial

Already a member? Log in