Avoiding Numbers When Building or Remodeling a Home
"Mark your work in place whenever possible" is just one of several tips seasoned carpenter Scott McBride offers in this guide to measuring more efficiently and accurately on the job site.
Synopsis: For many builders, numbers are a necessary evil. If you want to avoid errors with measurements, Scott McBride describes a few tips and tricks for trimming a jack, determining stud length, and mitering door and window trim. He also recommends using a story pole to mark instead of measure, and employing a spring divider for stepping off repetitive increments.
I once read that the artist Pablo Picasso had trouble with arithmetic because he was incapable of interpreting the numeral 7 as anything other than a human nose in profile. “Ah, a kindred spirit,” I thought. Yes, numbers are an indispensable part of the building trades, but for some of us they’re a necessary evil, with emphasis on the word “evil.” Whenever there’s a way to take the measure of a thing without resorting to those slippery little bugs called “numbers,” I’m the first to try it. If you happen to be a math wiz, I envy you, and you can skip this story. But if you’re numerically challenged like the rest of us, here are a few tricks that might help keep you straight.
The simplest way to avoid measuring is to mark your work in place whenever possible. That may sound obvious, but I often see experienced journeymen pulling measurements that seem unnecessary. For instance, when framing walls flat on a deck, the jack studs need to be trimmed to compensate for vagaries in the header width (due to crooked lumber, misalignment, etc.). The simplest way to trim a jack is to butt its top against the header and strike a mark on the bottom end flush with the king stud. Reach for a nearby circular saw and buzz it, and you’re done.
Striking a mark rather than measuring is also useful when the target is above eye level. Suppose you need to determine the stud length for a garage wall that steps down from the main subfloor, and you already have a regular 8-ft. wall standing adjacent to the garage. You could measure from the garage slab to the top of the regular wall and subtract 4 1/2 in. for the thickness of three plates. You’ll need a tall stepladder to get your eyeball high enough for an accurate measurement—and you’ll need to hope you got the math right. Or, you could stack three scraps of 2x on the slab, stand a 10-ft. 2×4 on top of the stack, and strike a mark flush with the top of the regular wall.
A similar trick is useful for mitering door and window trim. First, chop all the legs in the room to rough length, using a stop on the saw so you don’t have to measure each one. Use the leftovers to make head casing. Tack all the head casing in place and miter all the legs. Set the chopsaw square and leave it there. Then mark each leg by standing it upside down—point to the floor for doors and point to the stool for windows. Tick a mark by feel at the top of the head casing and chop it square. You could also stand the leg right-side up and mark the long point of it’s miter, but a square cut is visually easier to zero in than an oblique cut. Believe me, when you’re an old wood butcher with bifocals sliding off the end of your nose, you’ll appreciate the difference.
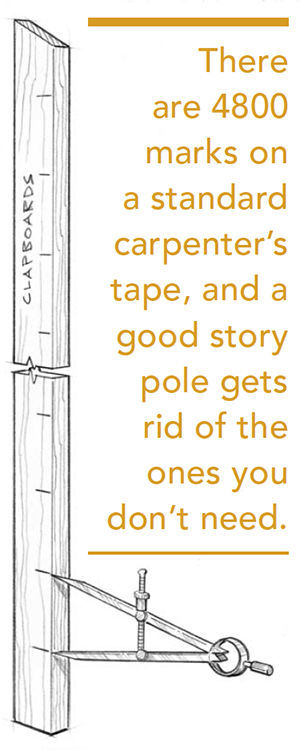
The best way I know to avoid errors and keep your tape in your pouch is to make a story pole. Think of a story pole as a ruler with only the marks you need for the job at hand. There are 4800 marks on a standard carpenter’s tape, and a good story pole gets rid of the ones you don’t need. I make story poles for siding, stairs, millwork—anything with repeatable increments. So, for instance, if I’m building a set of winder steps and I need to plot the elevation of the winders on the wall framing, I refer to a single story pole instead of multiplying the riser height at each location.
Fortunately, being a woodworker, I have an inexhaustible supply of rip offcuts and leftover boards from which to make story poles. A light- colored fine-grained wood works best. One end of the pole usually represents a starting point of some kind, such as the subfloor or soffit. I cut this end square and write its meaning as clearly as possible. I cut the other end at an angle to quickly identify it as the non-reference end of the pole.
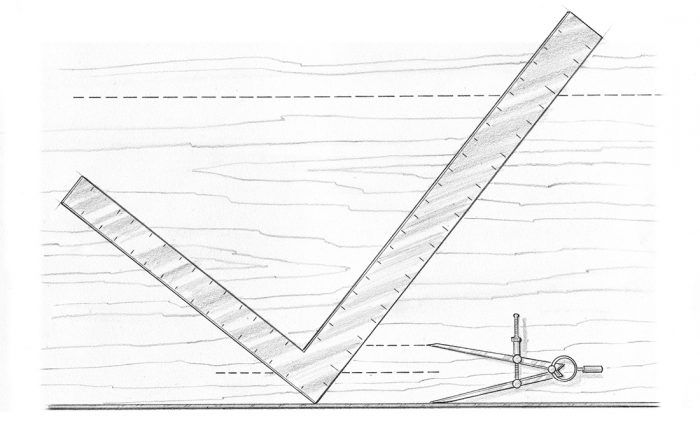
Laying out a story pole starts with marking a few given dimensions, such as the width of a frieze. I do this carefully because a mistake on the pole will be reproduced wherever the pole is applied. Then, for stepping off repetitive increments such as risers or siding courses, I put away my tape and use a spring divider. A spring divider is a compass with a steel point on both legs instead of a pencil. Spring pressure on the legs affords very fine adjustments. It takes some practice to divide, say, 108 3/16 in. into 14 equal increments. If you fall short on the first try, there’s a tendency to open the legs too much and thus overshoot on the next try. Practice makes perfect. Sure, there are calculator functions that can generate a list of measurements and will round them off to whatever degree of accuracy you require. But transferring all those fractions to the pole risks error. The pin pricks left by a pair of dividers are idiotproof as long as you start and stop in the right place.
The final step in preparing a story pole, or “rod” as the British call it, is to label it clearly. This is particularly important on a complex job such as a paneled library, where you might have height rods and width rods for each wall. Writing “north wall/height” with a bold marker will make it easier to pull the desired rod from the bundle when you need it. If I’m using a 2×4 as a story pole on a framing job, I flag it with blasts of spray paint; otherwise it’s liable to end up as fire blocking, or I’ll lose it among the hundreds of identical 2x4s lying around the site. Please don’t ask if this has happened to me before.
Sticks can be useful for measuring even without marks. We once rebuilt a Victorian cornice with heavy corbels. Between the corbels were multiple short moldings requiring hundreds of inside measurements. By sliding two slender sticks alongside each other and pinching them between thumb and fingers, we were able to transfer the lengths needed to the trim stock. Sliding sticks also come in handy to extend one’s reach, such as when measuring the height of a tall ceiling. This is an awkward task with a tape alone, but you can make the job easier and more accurate by sliding a pair of sticks from floor to ceiling, clamping them, and then lowering the combined sticks to be measured.
A spring divider lets me step off long story poles with no numbers whatsoever, but for dividing shorter distances there’s a hybrid trick that is part numerical and part graphic. The numerical part is easy and reliable because it bypasses fractions. Imagine that you need to find the center of a board that is 7 5/16 in. wide. Lay your framing square diagonally across the board so that the corner (0) touches one edge and the 8 touches the opposite edge. The center of the board will be at 4, and a line gauged through that point will be the centerline.
The same trick works when dividing something into multiple parts. Suppose I have to apply lattice to a frame opening of 29 1/8 in. I’m using 1 1/2-in.- wide lattice strips and I want all the intervening spaces to be equal. Ideally, the width of the spaces would also be 1 1/2 in. to create a perfect on-center spacing of 3 in. (lattice + space). That doesn’t work out, though, because 29 1/8 divided by three gives me nine units with 2 1/8 in. left over. I want a space at both edges of the panel, so there will be nine strips and ten spaces. The aggregate width of all the strips is 13 1/2 in. (9 x 1 1/2), and the remaining aggregate width of all the spaces comes to 15 5/8 in. (29 1/8 – 13 1/2). The width of a single space will therefore be one-tenth of 15 5/8.
I would rather avoid this numerical equation—there’s way too much room for error. So I gauge a line on a sheet of plywood 15 5/8 in. from the edge. I lay my square on the plywood with the corner (0) on the edge and the 20 on the line, and I tick a mark at 2 (one-tenth of 20 in.). The distance from the tick mark to the edge is the unit space, so I set my dividers to unit space plus lattice width to step off the layout on the frame.
There’s no avoiding math in carpentry —it comes with the territory. But let’s face it: Building in today’s complex environment is a constant battle to maintain focus. Don’t clutter your head with unnecessary numbers that can turn around and bite you in the butt.
From Fine Homebuilding #284
Fine Homebuilding Recommended Products
Fine Homebuilding receives a commission for items purchased through links on this site, including Amazon Associates and other affiliate advertising programs.

A Field Guide to American Houses
Code Check 10th Edition: An Illustrated Guide to Building a Safe House

A House Needs to Breathe...Or Does It?: An Introduction to Building Science