Looking Out for Future Roofers
When building new or re-roofing and re-siding at the same time, think ahead to the next reroof and make step flashing easier to remove and replace.

I’m re-siding the gable end of a two-story house. A lower roof intersects this wall, so the new siding will meet the lower roof. Figuring that the roof shingles will need to be replaced long before the wall is re-sided again, how can I detail the siding over the top of the existing step flashing to make it easier to replace the step flashing when the time comes?
—John Davis via email
Editorial advisor Mike Guertin replies: I wish every siding installer thought ahead like you. Often the siding crew nails through the wall leg of the step flashing and traps it in place. Not only does this make it harder to remove the old step flashing, but even after they’re cut or driven through the siding, the fasteners make it hard to install new step flashing. Usually the roofers have to remove some siding, replace the step flashing, and then reinstall the siding.
There are a couple of details you can use so the existing step flashing can be removed and new installed without removing the siding. A simple option is to install a 1×6 just above the roof plane and over the step flashing. First, lap the new water-resistive barrier (WRB) over the top of the step flashing. If you are using a self-adhering WRB, install a strip of slip sheet such as tar paper over the step flashing first to keep the adhesive from sticking to it. Then apply the self-adhering WRB over the slip sheet.
Install the 1x material over the WRB and step flashing using stainless-steel screws. To make it easier for the future roofer to remove this piece to replace the step flashing, don’t countersink and putty the screws. Space the 1x off the roof by the manufacturer’s or industry association’s guidelines, or at least 1/2 in. to encourage drainage.
Apply a drip cap on top of the trim piece. You’ll probably have to bend your own—I recommend a minimum of a 2-in. wall leg and a 1-in. drip leg with a bottom bend that kicks away from the trim board. Instead of bending the inside corner at 90°, bend it with a 10° downslope to promote draining and reduce the chance that water will run down the top of the drip cap and leak into a joint at a corner board. Fasten the drip cap over the surface of the WRB—this is important. Some people think it is better to tuck the drip cap under the WRB. In this case the WRB continues behind the trim and over the step flashing, and you don’t want to break its continuity. The drip cap and 1x are installed over the WRB, the same way the siding overlaps each successive course.
When the roof is replaced, the roofers can remove the trim and leave the cap flashing in place, then lift up the WRB, replace the step flashing, and reinstall the trim.
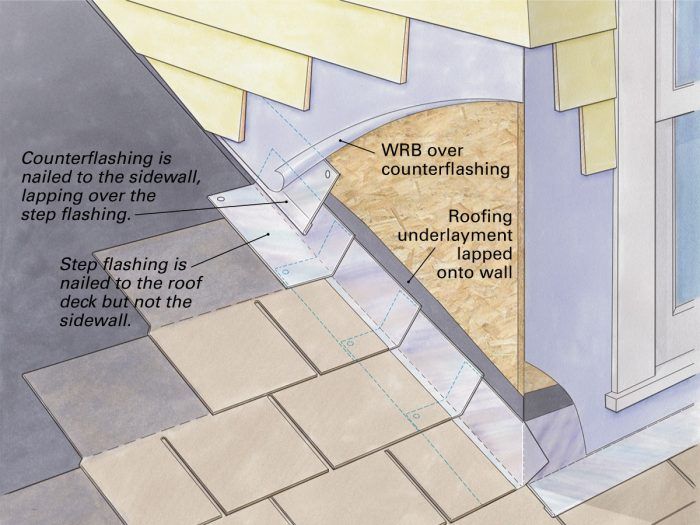
If a trim board isn’t compatible with the house’s details, there’s another option. Before applying the WRB, install a metal counterflashing over the top of the step flashing. The metal should be the same as the step-flashing metal to avoid galvanic corrosion. Make the counterflashing 7 in. or more wide and hem the bottom edge 1/2 in. to keep it straight. Position the counterflashing at least 1/2 in. above the surface of the roofing and fasten it to the wall along the top edge with roofing nails. Then apply the WRB over the top of the counterflashing. Install the siding at the manufacturer’s or association’s minimum off the roof surface, keeping the fasteners at least 6 in. off the deck so they don’t hit the step flashing. During the next reroof, the roofer can tug the old step flashing out from behind the counterflashing and tuck new behind.
Some installers skip the counterflashing and just install siding directly over the step flashing, keeping their fasteners high enough to not penetrate the step flashing. This can work, but the back of the siding may not be smooth and the step flashing may snag, and it’s difficult to tell if the new step flashing is tucked behind the WRB.
The counterflashing system also works well when installing step flashing to a wall sheathed with a WRB-coated sheathing such as ZIP. Many installers apply the sheathing manufacturer’s seam tape over the top of the step flashing, but this makes it impossible for a future roofer to remove the old flashing. Instead of taping the step flashing, apply a counterflashing strip, then seal its top edge to the sheathing with tape. Then the step flashing isn’t stuck to the wall and can be removed.
Drawing: Dan Thornton
From Fine Homebuilding #300
RELATED LINKS
Fine Homebuilding Recommended Products
Fine Homebuilding receives a commission for items purchased through links on this site, including Amazon Associates and other affiliate advertising programs.

Roofing Gun

Fall Protection

Shingle Ripper


