
A Smarter Way to Flash
Removable two-part counterflashing allows access to roof flashings without digging in to the wall.
Synopsis: The best way to stop leaks from happening is to prevent them in the first place. Architect Harrison McCampbell recommends removable two-part counterflashing. Although it’s more expensive and more time-consuming to install, it saves time and money in the long run by protecting the bottom course of siding and by being easy to remove and reinstall when the roof is reshingled.
My work as an architect focuses on providing solutions to troublesome moisture-related problems with houses. Too often, this work involves finding and analyzing leaks rather than preventing them in the first place.

brick. The two-piece counterflashing on this chimney functions just like the flashing shown in the drawings. The main difference is that the top half of the counterflashing
extends into the mortar joints between bricks.
Because most leaks occur at edges and penetrations of the building enclosure (roof, walls, windows, doors), flashing plays a critical role in protecting a home against water damage. In a nutshell, flashing should tuck under what’s above it and over what’s below it, always with the aim of directing water toward the exterior.
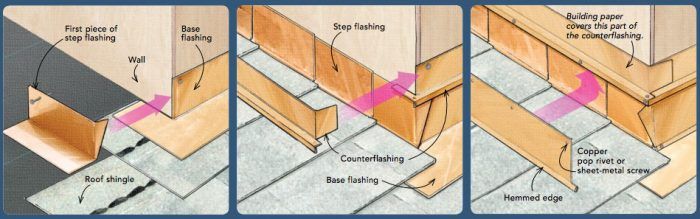
On roofs, step flashing should tuck under sidewall building paper or housewrap, or water will leak into the house along that wall. Finished siding should be kept off the roof at least an inch to prevent rot in wood siding and to make flashing replacement easier. Too often, when a roof has to be replaced, the wall system has to be breached to do it. This is cumbersome at best with wood siding, but it’s difficult and expensive wit masonry sidings such as brick, stone, stucco, or even synthetic stucco. Worse yet, in an attempt to minimize damage to the siding, new step flashing is slid in without being tucked under the building paper. This shortcut is tantamount to a guaranteed leak.
One way to minimize damage to siding during a reroof is to use a two-piece counterflashing that covers the step and base flashing. Counterflashing (also called cap flashing) often consists of a single piece of sheet metal integrated permanently into the wall to protect the top of the step flashing. Counterflashing is frequently integrated into masonry walls and chimneys, but it’s a good idea to integrate counterflashing into all siding styles. Although a one-piece design is better than no counterflashing at all, it can be impractical during a roof replacement: The counterflashing must be bent up to get to the step flashing below, but it can’t be bent back down easily to match its original position.
For a little more money, you can install a two-piece counterflashing that permits endless removal and reuse. One piece of the flashing is integrated permanently into the wall system; the other is removable for easy access. The two pieces are held in place with pop rivets or sheet-metal screws. Counterflashing that sits directly on the roof shingles (rather than an inch or so above) looks better and stops windblown rain better; a two-piece design makes this detail more maintainable. It’s a little more labor up front, but it saves a ton of work later on.
For Counterflashing, two pieces are better than oneAlthough it requires more time and money to install, two-piece counterflashing pays off in the long run. The bottom course of siding lasts longer because it’s well above moisture and debris on the roof surface. Counterflashing prevents windblown rain from getting behind base, top, and step flashings. And when roof shingles are replaced, the lower half of the counterflashing can be removed so that the flashing beneath can be properly installed without removing or damaging the siding.
Installation Guide 
|


Harrison McCampbell, AIA, specializes in building-envelope moisture issues. He lives and works in Brentwood, Tenn.
Drawings: John Hartman
From Fine Homebuilding #193
Fine Homebuilding Recommended Products
Fine Homebuilding receives a commission for items purchased through links on this site, including Amazon Associates and other affiliate advertising programs.
Fall Protection

Hook Blade Roofing Knife

Ladder Stand Off

View Comments
A good but incomplete article.