FHB Logo Facebook LinkedIn Email Pinterest Twitter Instagram Plus Icon Close Icon Navigation Search Icon Navigation Search Icon Arrow Down Icon Video Guide Icon Article Guide Icon Modal Close Icon Guide Search Icon Skip to content
Subscribe
Log In
  • How-To
  • Design
  • Tools & Materials
  • Videos
  • Blogs
  • Forum
  • Magazine
  • Members
  • FHB House
  • Podcast
Log In
How-To

PVC for a Rot-Proof Fence

Built with rot-proof material with traditional tools and techniques, this classic border is engineered to never sag.

By Jeff Nixon Issue 314 - April/May 2023

Synopsis: Jeff Nixon is an avid woodworker, but he decided to build his most recent project—a privacy fence around his property—with PVC. The material is rot-proof, low-maintence, and able to be cut with woodworking tools. In this article, he explains step by step the process of installing the PVC pipe posts, building the three-part posts sleeves, and putting together the two-part fence-panel sections. Detail drawings show the dimensions and connections of the posts and fence panels.


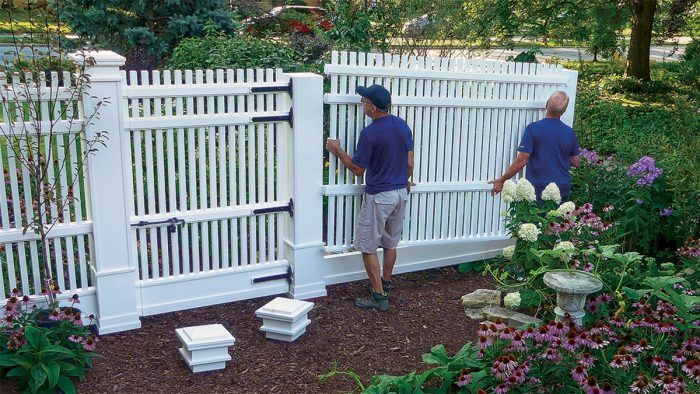
After building two additions on our home in Munster, Ind., a suburb of Chicago, and after years of other projects around the house, it was finally time to build the fence I had ­ designed many years ago. I have been an avid woodworker my entire life and in addition to major remodeling projects I have built our kitchen cabinets, doors, coffered ceiling, and much of the furniture in our home. I have even taken on a few commissioned pieces. So, while the notion of building a wood fence seemed natural, I wasn’t crazy about the idea of peeling paint or providing dinner for pesky insects and rot, nor was I keen on working with the bowing, cupping, twisting, and warping, which seems to be the dominant characteristics of exterior-grade lumber these days. All things considered, a PVC fence made the most sense.

While my budget had limits, it wasn’t my primary concern. If it was, I would not have chosen PVC. Compare the price of a 12-ft. 1×10: PVC at $78, cedar at $70, and pressure-treated wood at $20. Just like most building materials, the price of PVC has gone way up. At the time of writing this article, it costs about 30% more than when I started this project. Right now, each one of these fence posts would cost approximately $330 to build, and each fence section about $780. Of course, that’s the up-front price. Because PVC lasts so long with little or no maintenance, the cost-per-year comparison would likely be a better indicator of overall value. The way this fence is constructed, I’m confident that it will last decades with no more than the occasional pressure washing.

I’ve been a creative director in the advertising world for most of my adult life, so design and attention to detail are in my blood. The proportions and aesthetics of this fence were specifically created to complement my particular house. Even if this exact design isn’t the perfect fit for you or your customer, the majority of the cutting, assembly, and fastening tips and techniques apply to nearly all PVC projects. Whatever kind of fence you decide to build, make sure you check on the height and setback restrictions with your local municipality and always call 8-1-1 to have your utilities located before you dig your post holes.

Working with PVC

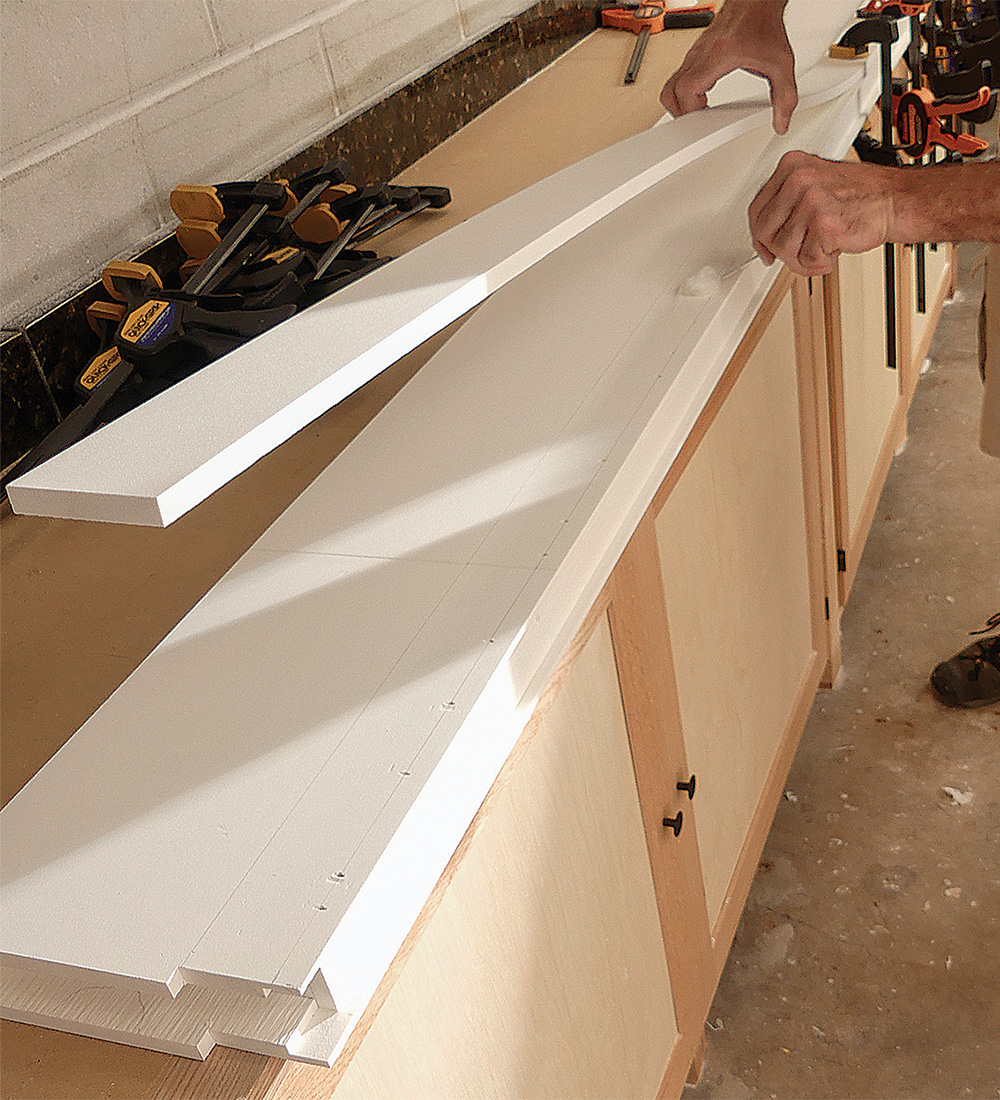
Most of the components in this fence are made out of 1/2-in.-thick 4×8 sheets of PVC. I also milled parts out of 12-ft. 1×10 PVC trim boards. To make transporting easier, I had the home center rip off an 18-3/4-in. piece for the fence sections and cut other sheets down to 52-1/4 in. for the posts. The PVC pickets and the corner trim on the posts are the only factory parts. While I wanted all the components on both the posts and fence to be smooth, the sheets and the boards are only readily available with a woodgrain texture on one side. To hide the grain, I kept the texture side facing down on the lower parts and had them face up on the trim details above eye level. The sheets, trim boards, and pickets were not all made by the same manufacturer, but they all must use similar manufacturing techniques because I found little difference between them.

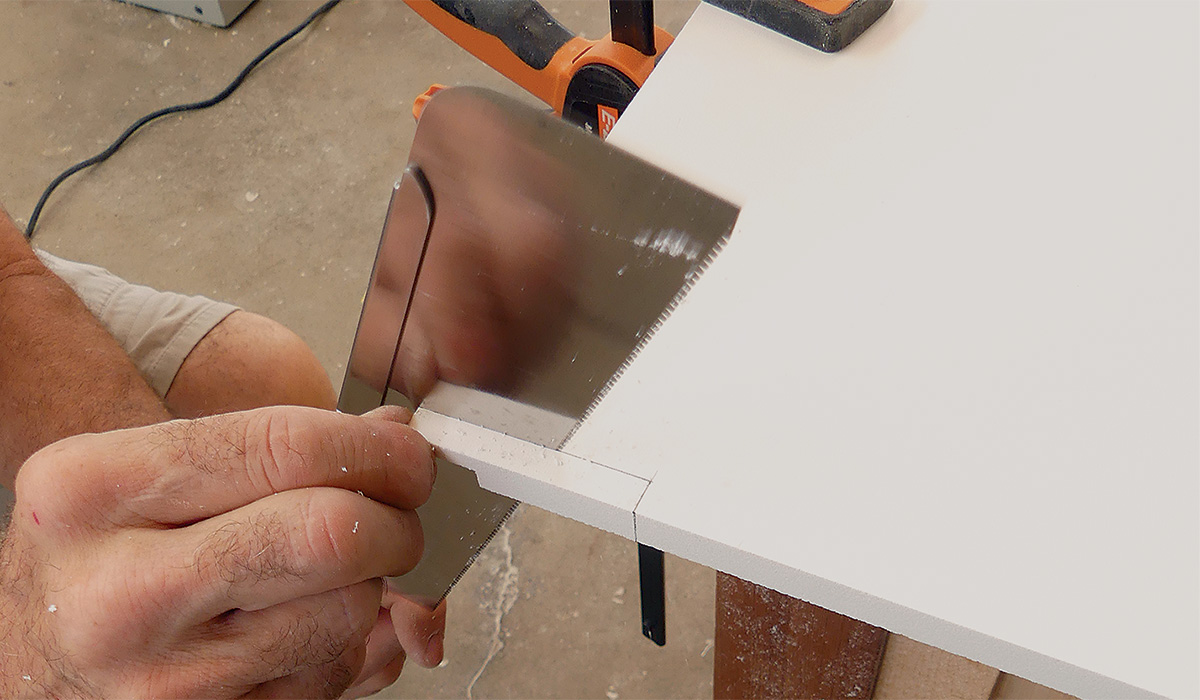
I was well-equipped to tackle this project because the same carbide-tipped cutting tools that work for wood also work well for PVC. I wanted clean edges throughout, so I used no factory edges, which were too rough. And in order to keep cut surfaces as smooth as possible, every exposed cut edge on this project was shaved with a block plane. With no knots, splits, or checks to deal with, it was satisfying to produce unbroken, tissue-paper-thin shavings with every pass.

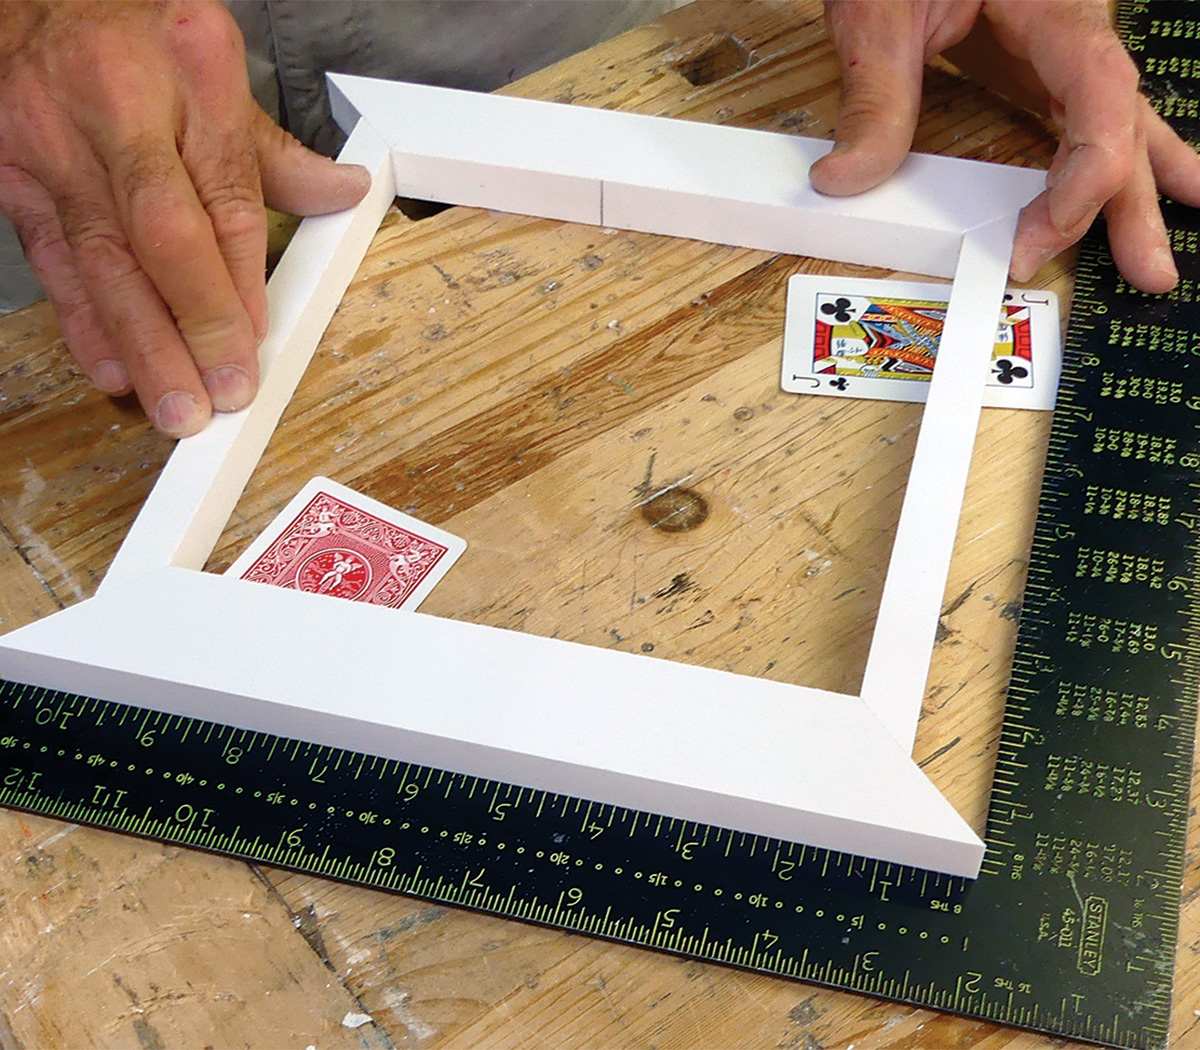
Dealing with the inconsistencies in the width and thickness of PVC was a challenge. When creating a butt joint or miter, it’s not uncommon for two boards to differ in thickness by 1/32 in. Even for an outdoor project like a fence, the difference is noticeable, especially to someone who’s accustomed to cabinetry and furniture-building tolerances. Because the thickness often varies from one end to the other in the same board, I could sometimes get a better match by simply spinning one or both boards around and using the opposite end. On other occasions, I used playing cards to bring the visible side of the connection into plane.


A PVC post will never rot

plumbing, bracing, and aligning PVC fence posts
Plumb and brace, then align with a story pole and string. Check that the post is plumb using a level and keep it in place with two braces fastened to ground stakes. Hold the braces on the post with clamps or screws. Use a string to keep the structural posts in line and a story pole to keep them spaced evenly apart.

One of the main purposes of building a PVC fence was to avoid rot, so I decided to use structural posts made out of 4-in. Schedule 40 PVC pipes instead of wood. I started by locating and installing the corner posts first. I then measured the distance between the corner posts and divided the space so that each fence section would be the same size and as close to 9 ft. as possible. I chose 9 ft. mostly for aesthetic reasons having to do with the proportions of the finished post in relation to the composition of the fence sections.

anchoring PVC fence post with concrete
Anchor with concrete. Once a post is lined up, plumb, and braced in place, check and recheck its position as you fill the hole with concrete. Photo: Jeff Nixon

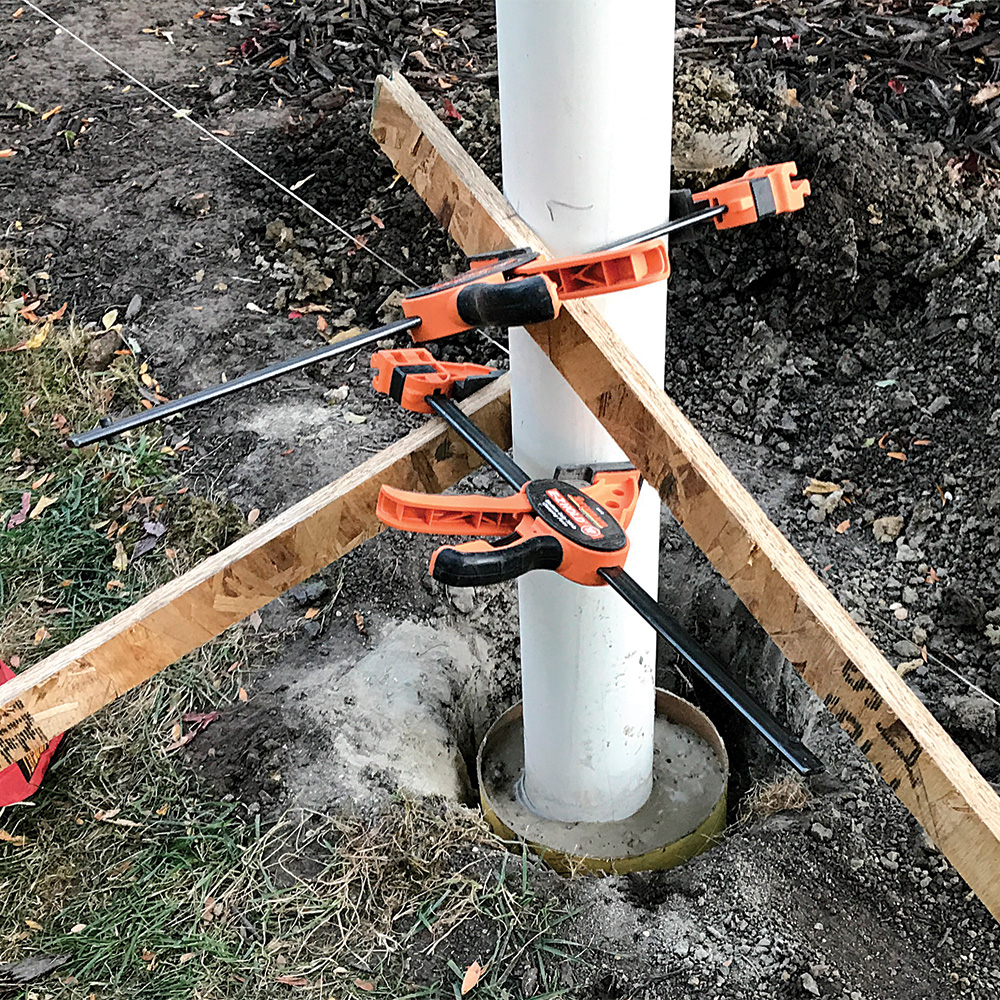
I ran a string between the corner posts to make sure the holes were in a straight line and cut a story pole so that they were all spaced the same distance apart. I dug the holes 10 in. wide and 34 in. deep. I also flared the bottoms to add support and prevent heaving. If a new hole ended up near a hole left behind from an old fence post, I dropped in a concrete-form tube. The holes required about two-and-a-half 80-lb. bags of concrete to fill, and the PVC pipes required an additional one-and-a-half bags. I ran the posts long and trimmed them to height after they were installed, and then filled the inside of the pipes with concrete.

I decided to build a water level to locate the top height of the posts. I could have used a laser, but a water level is just as accurate, is fun to build and use, and does not require clear sightlines, which was a bonus given the dense vegetation in parts of my yard. I made the stand from scrapwood and T-nuts, and the level is nothing more than 75 ft. of 3/8-in. tubing, a barbed splicer adapter fitting, and a water reservoir made out of an animal cracker container from Costco. My yard is relatively flat, so only two different heights were needed for the entire run of fencing. I marked a reference line with a pencil on the side of my house that I used to re-calibrate the level for every batch of poles that needed trimming.

determining the height of PVC fence posts with the use of water
Find the post height. Determine the desired height of the posts and create a reference line or lines that can be used for all the posts. Then eliminate any air pockets in the hose and line up the water level in the hose with the reference line by adding or subtracting water. Once the water level is calibrated, plug the end of the hose with a stopper to prevent any water from spilling out while you haul it around the yard, but remove it before using the water level to mark the height of the posts. Photos: Jeff Nixon
cutting PVC fence posts to height with a handsaw
Cut and fill. A Dozuki handsaw makes quick work of cutting the posts, and building a jig will keep the tops square and even. If the cut runs awry, trim it down with a hand plane. Once trimmed, fill each pipe with concrete. Photo: Jeff Nixon

Cementing connections

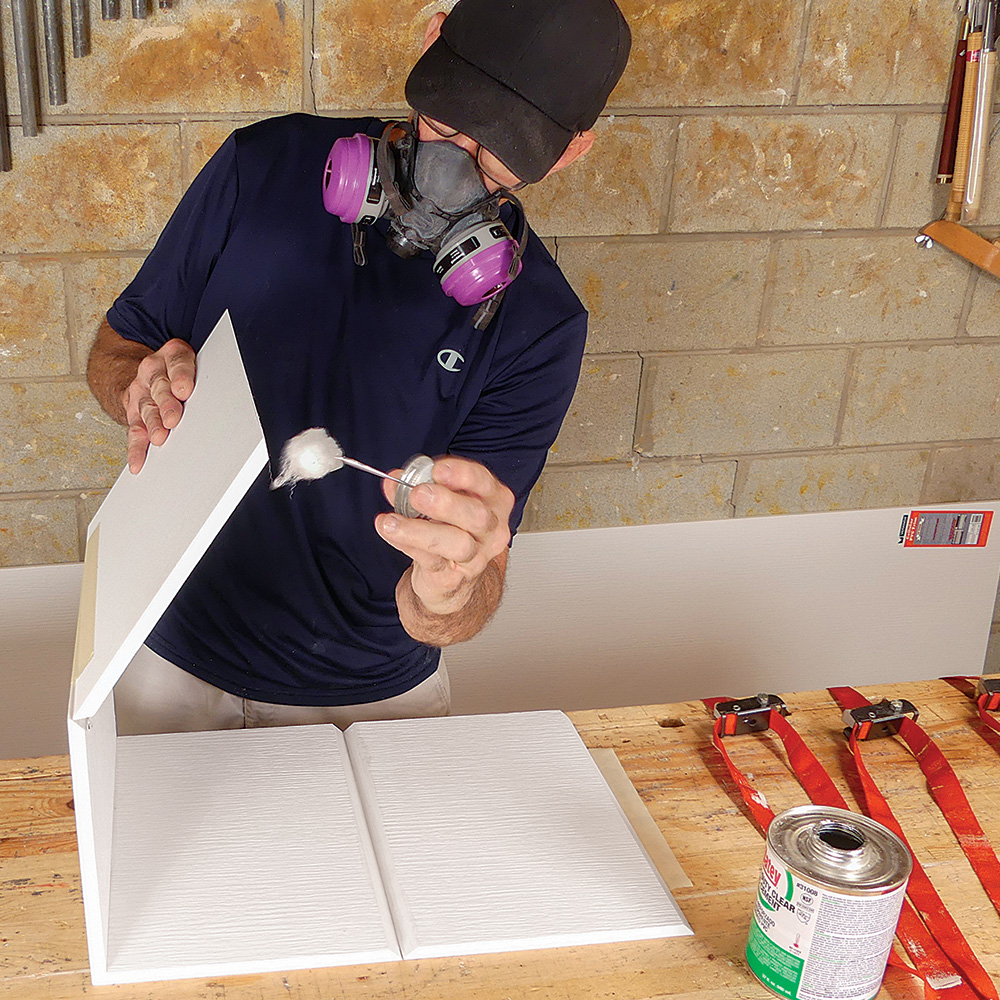
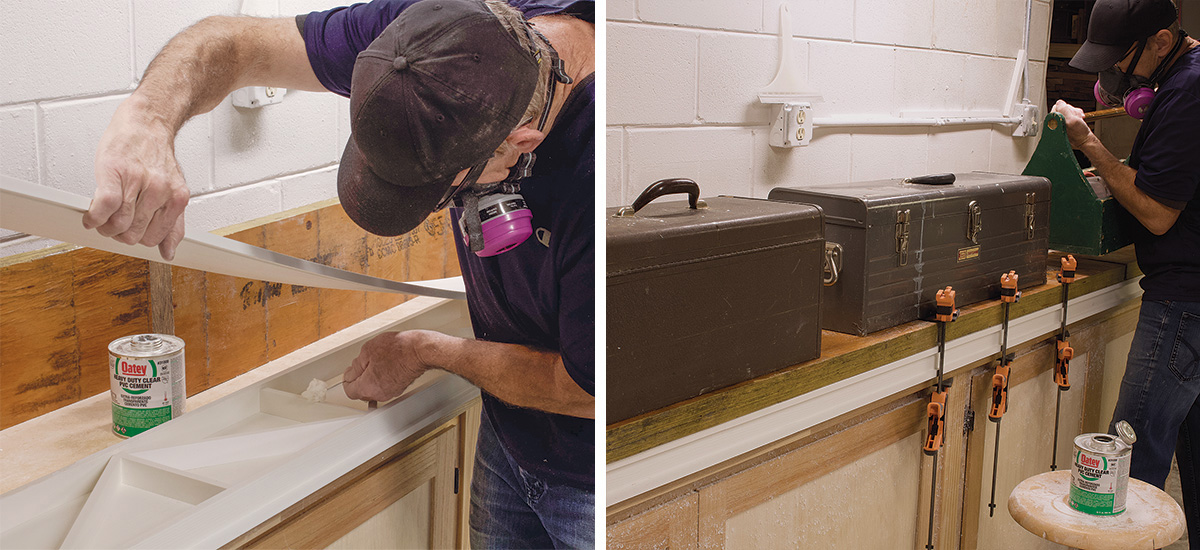
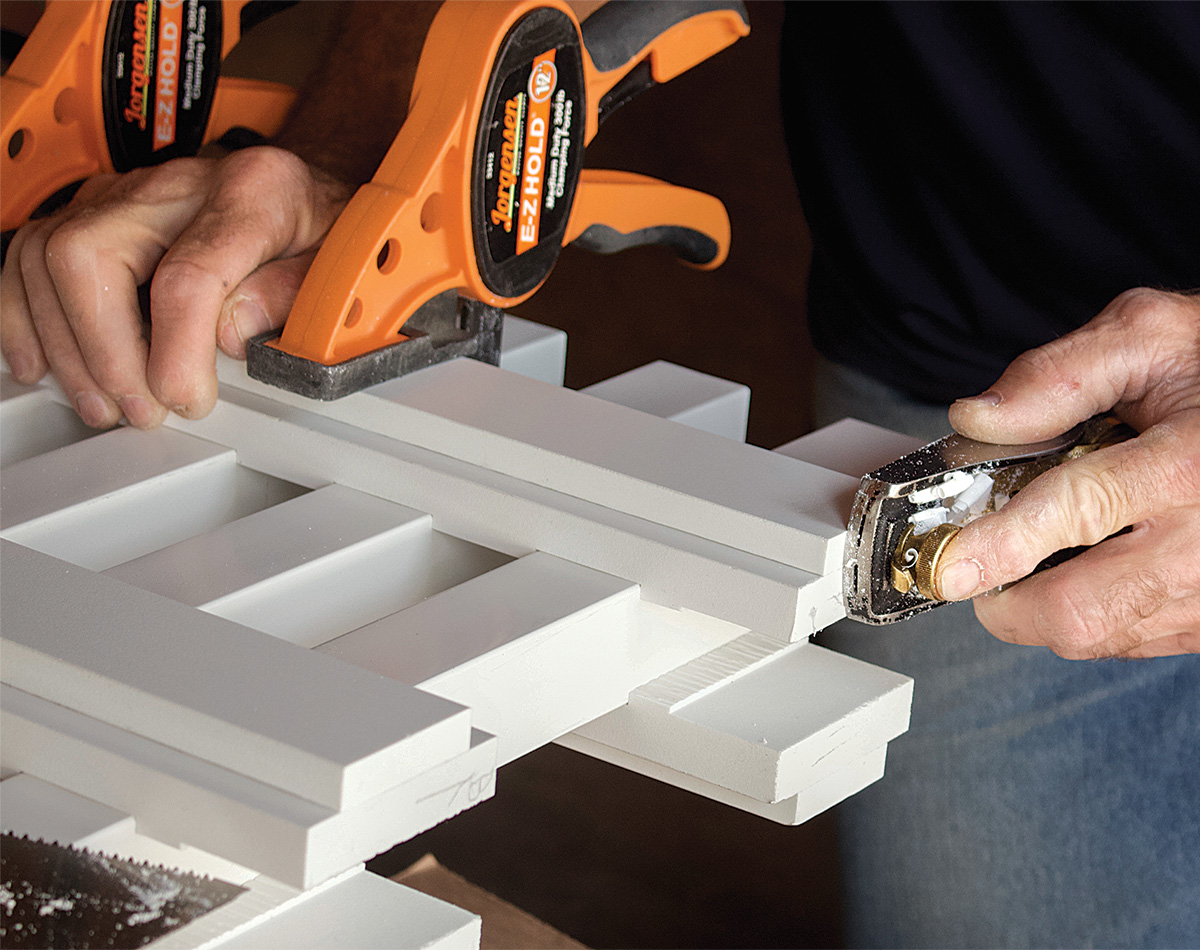
To avoid the purple mess, I decided not to use primer, but I’ve worked with enough PVC in the past and have done enough research to feel confident that every joint on this project will hold up as long as the PVC itself. I refer to the process of using PVC cement as “gluing” for the purposes of this article, but it’s really more accurate to call it “solvent-based welding.” The PVC holds together well and has no end grain, so you can create strong joints that you could never pull off with wood. This also translates into an amazingly small amount of waste, which is beneficial for both the budget and the local landfill.

When working with any PVC cement, eye protection is important, and wearing a HEPA- and vapor-rated respirator is absolutely essential. I would also recommend installing a fan in a window or working outdoors whenever possible.

You have to be prepared and move fast when working with PVC cement, and it helps to work out of a full can. I constantly combined cans to create full ones. At first, I used Oatey Heavy Duty Clear PVC Cement on every connection because of its superior holding power, but eventually I started using PVC TrimWelder (slow cure) to give myself more working time on the larger glue-ups. With that large applicator, it’s all too easy to get cement where you don’t want it. Even though it’s clear, excess cement has a noticeable sheen and creates smudges if smeared with a dirty finger, so I kept a roll of paper towels on hand to wipe squeeze-out, drips, and dribbles as fast as possible. If I missed a spot and the cement started to set, I would wait for it to dry and scrape it off with a razor blade. I also found that Mr. Clean Magic Erasers work well for removing grimy fingerprints and general blemishes.

This fence build required a lot of planning, time, and energy, and I’m happy with how it turned out. Though it’s been finished for a while, when I pull up the driveway or glance out a window, I’m still surprised at just how much it has enhanced our entire property.


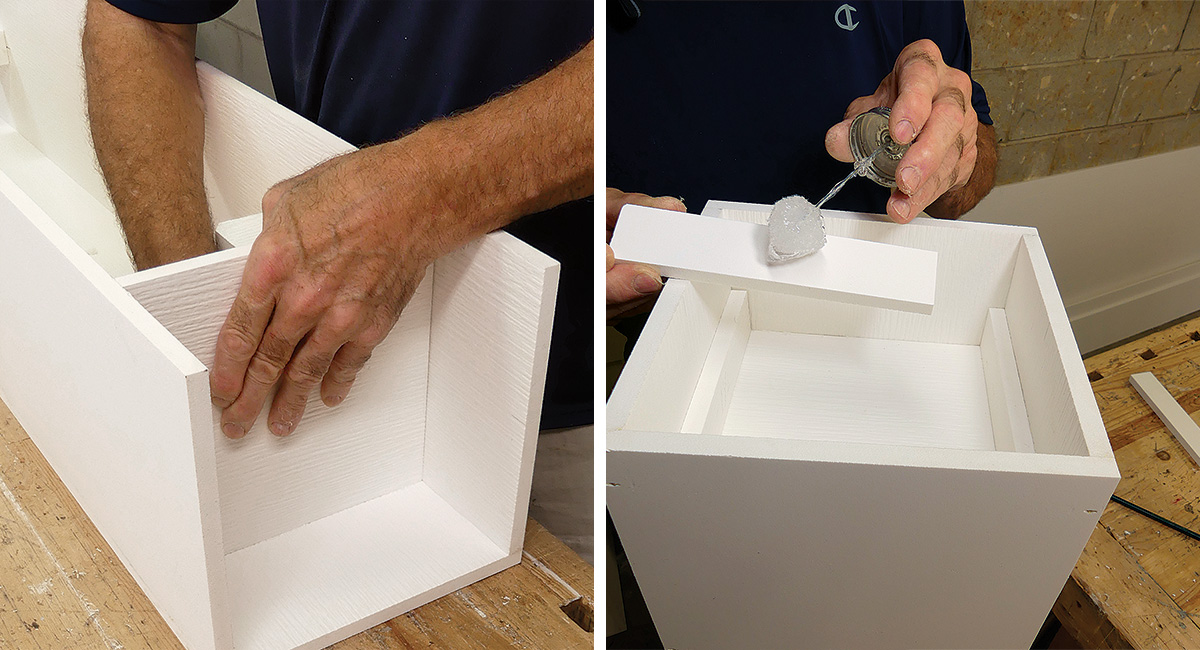
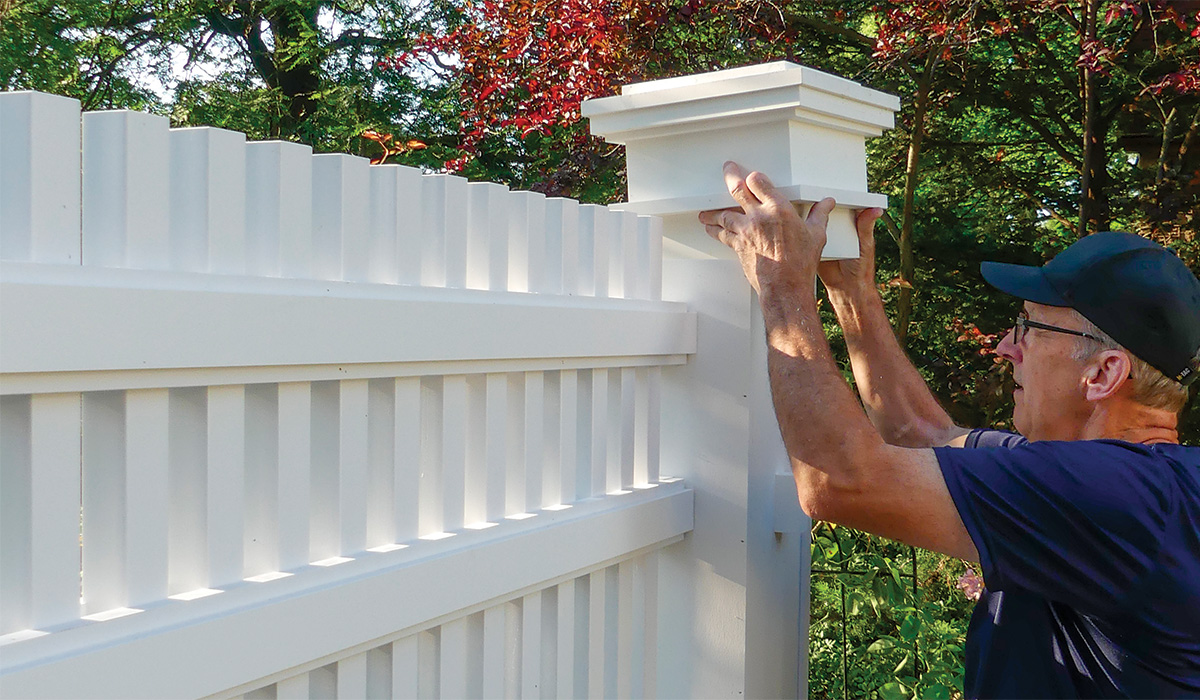
A Three-Part Sleeve Mimics Traditional Post Design
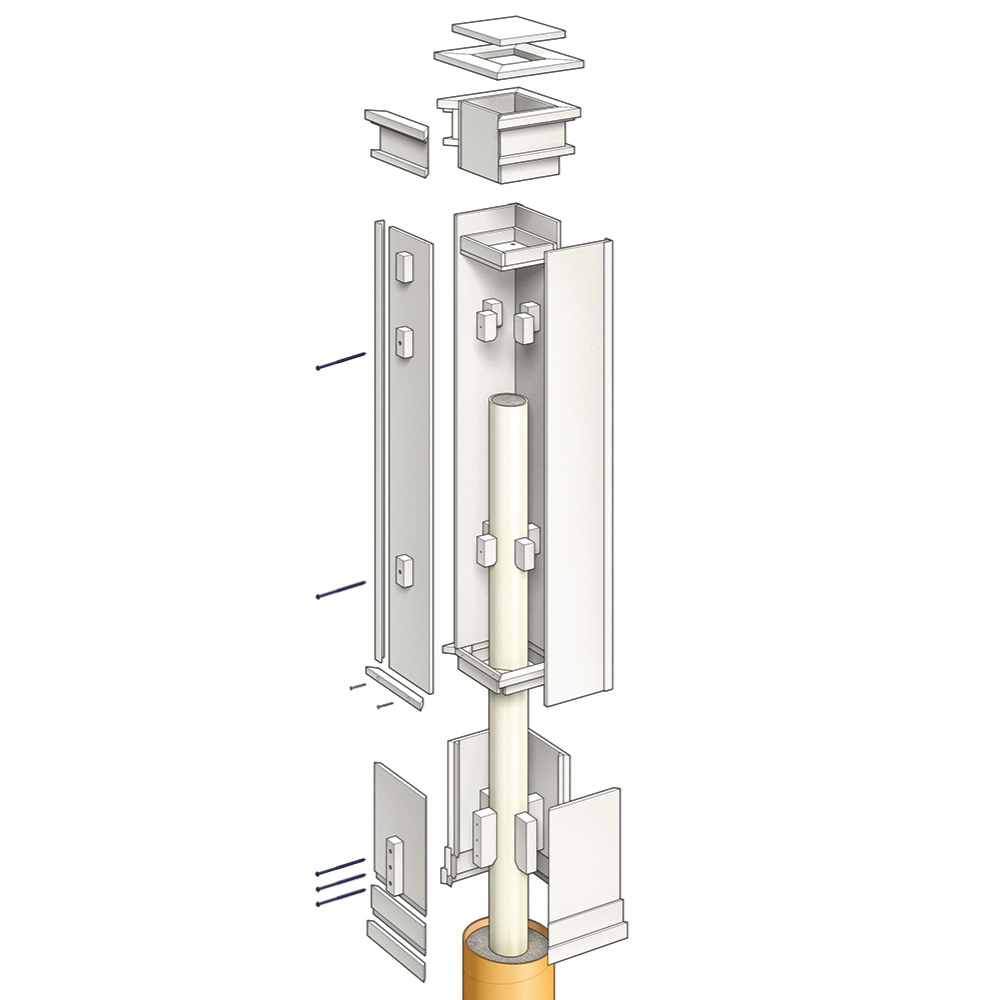
illustration of a three-part sleeve over PVC fence post

Build the post base

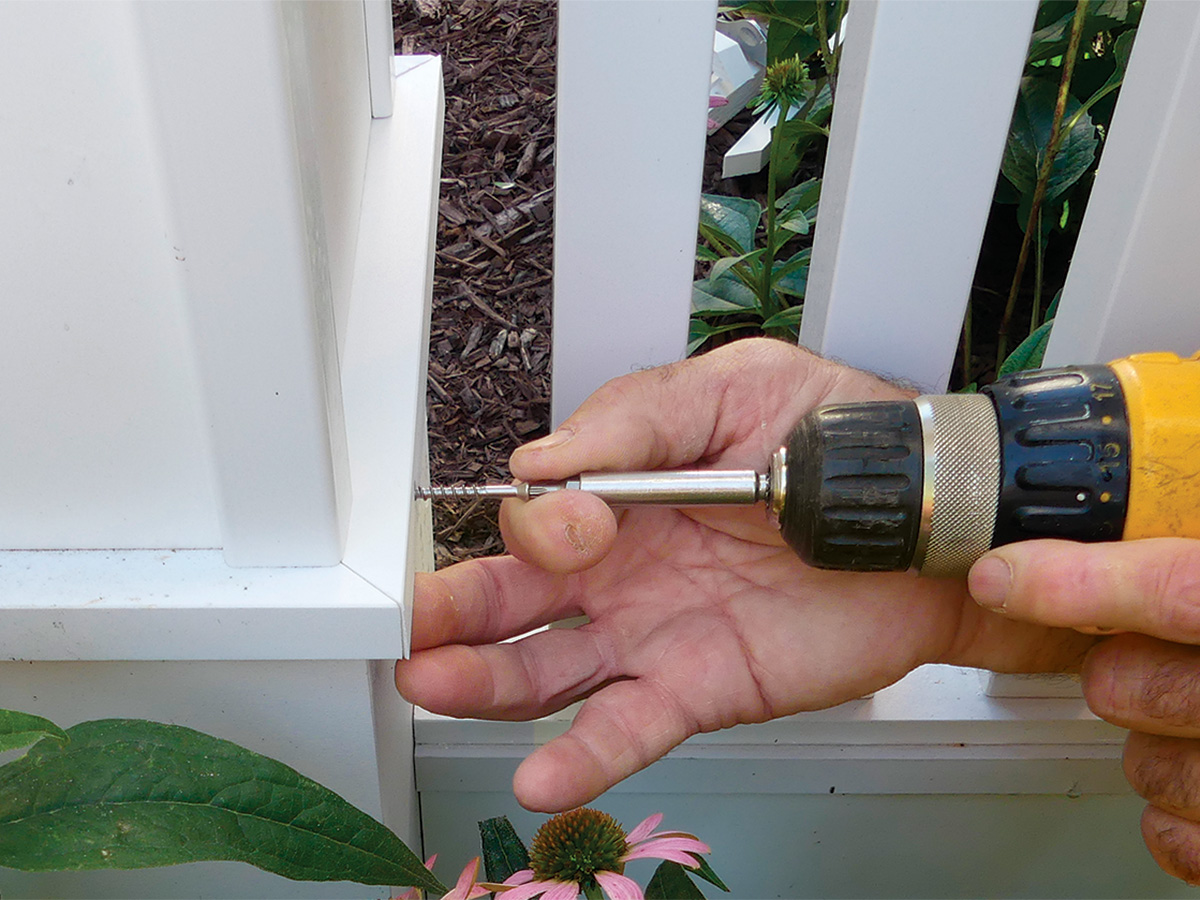
Building and handling the post sleeves is easier to do in sections, so each post is made up of three parts: a base, a middle, and a cap. There are support blocks on the inside of the base and middle that secure it to the structural post and keep it plumb. There are also fence-rail support blocks on the outside of the base and middle that hold up the fence sections. The bases do not rest on the ground, but are held to the concrete-filled PVC support posts with long concrete screw anchors, ten per post. The screws pass through both the post support blocks and the fence-rail support blocks.

illustration of PVC fence post base

applying PVC cement to assemble fence post base
Assemble the base. Cut the base sides on a tablesaw. Use masking tape to hold them in place after applying PVC cement, and then clamp them together with straps.

using block plane to smooth edges
Smooth edges. Use a sharp block plane to smooth rough or uneven edges.

cutting rabbets in fence post base on tablesaw
Cut in rabbets. Cutting the rabbets for the upper base trim on a tablesaw after the base has been assembled is faster and easier, and it results in near-perfect uniformity.

reinforce corners of fence post base
Reinforce the corners. Use the scraps created when cutting the miters on the base panels to reinforce the inside corners.

installing base trim on fence post base
Install the base trim. Cut and glue the upper layer of base trim in place, and then cut rabbets into the upper trim with a tablesaw to accommodate the lower trim.

gluing down the structural-post support blocks
Attach inside blocks. Glue down the structural-post support blocks. A small miter cut at the bottom of the block makes it easier to slide the base over the post.

predrill holes through outer blocks
Add outer blocks. Glue the outer blocks in place, and then predrill holes through both the blocks and side panels to accommodate the concrete screws.

check fit of PVC pipe in fence post base
Check the fit. Slide a scrap piece of PVC pipe into the post base to test the fit. The pipe should be snug. Trim the blocks with a hand plane if needed.

Build the middle section

This middle section is friction-fit into the post base with flanges, and the flanges are glued in place using the base as a guide. Glue only three of the middle section panels together at first; the last panel is dry-fit in place so that the structural-post support blocks can be fine-tuned to fit around the post. In order to maintain enough clearance to squeeze a fence section between two posts, two sides of the astragal trim and two corner moldings need to be installed after the fence sections are set in place.

illustration of PVC fence post middle section

applying PVC cement to support blocks
Fasten the inside blocks. The post support blocks need to be installed before the middle section panels are assembled. Mark the locations with a story pole.

nailing sides of fence post together
Glue and nail three sides. The cement alone is more than strong enough to hold the panels together. The 1-1/2-in. stainless-steel finish nails primarily function as clamps until the cement sets.
gluing and installing fence post support
Install the post support. The piece at the top of the middle section (left) will rest on the structural post. Check to see how a scrap piece of PVC pipe fits between the inner blocks before installing the last panel and adding the fence-rail support blocks. Small cleats made from offcuts (right) add support.
installing trim on fence post
Assemble the lower astragal. Install two sides of the trim to leave enough room to set the fence sections in place. Use cards as shims if needed.
glue and reinforce the fence post flange
Glue the flange to the trim. Use the base as a guide when attaching the flange pieces to the astragal trim detail (left). Then secure the trim/flange section to the middle section (right) and reinforce both the flange and bottom of the section with cut-off scraps.
applying sealant to corner moldings
Use sealant for corner moldings. Install two of the four corner moldings to leave enough room to slide the fence sections in place.

Build the cap

Like the middle section, the cap is friction-fit into the section below it. To achieve the exact proportions I was after, I found it necessary to create custom widths for a couple of these trim details, but the post top is the only section on this whole project that contains parts that are not made from 3⁄4-in. or 1⁄2-in. stock or preformed components.

illustration of PVC fence post cap

applying PVC cement to fence post
Use the middle as a guide. Build the cap box to fit into the middle post section and install the upper astragal while the box is in place.

assembling the cornice trim to fence post cap
Install the upper cornice. Cut and assemble the cornice trim detail before gluing it to the post top.

putting together fence post cap
Install the cap. Use the cap itself to mark the corner locations so that you can quickly get it aligned before the cement sets.

installing trim on fence post cap
Install the lower cornice. This trim detail is created by gluing a 1/2-in. and a 3/4-in. board together and ripping it down to 1 in.

installing frieze board to fence post cap
Install the frieze board. The frieze board does not have to be ripped to fit the entire space. The gap will be covered by molding.

install frieze molding to fence post cap
Install the frieze molding. Rip the molding down to 3/8 in. by 3/4 in. before installing it around the bottom of the cornice.

Install the middle section and the post base

In order to keep the post sleeves in line, I took the straightest 10-ft. 2×4 I could find and ran it over a jointer, then ran it through a planer. I held it against the face of two adjacent posts until it lined up flat on both surfaces. The finished sleeves are held to the structural posts with masonry screw anchors.

secure fence post with masonry screws
Fasten the middle. Slide the bottom on first and then the middle section. At the location of the predrilled holes, drill a hole in the post and secure with masonry screws. Photo: Jeff Nixon
securing fence post base with masonry screws
Fasten the post base. Pull up the post base so that it fits tightly into the middle section and prop it up with scraps of wood before securing it in place with masonry screws. Photo: Jeff Nixon

A Two-Part Panel Prevents Sag

illustration of PVC fence panel

Build the bottom rail

To get the exact length of the fence sections, I measured the distance between the installed post sleeves. These sections are more than 8 ft. long, so the boards that run the full length need to be assembled from multiple pieces. And since PVC does not have the same structural integrity as a dense hardwood, I checked with the manufacturer, who was kind enough to have experts take a look and approve both my truss design and overall assembly approach.

joining multiple pieces of PVC
Build the rail panels. To join multiple pieces of PVC, clamp down one piece and use a jointer push block (I made this one) to put pressure on the butt joint until the cement sets. Cut the panels to length after the two pieces are connected.

routing grooves and rabbets into PVC panel
Rout rabbets and grooves. The guide fence on the router will work for both sides, just remove the material between the groove and the end of the panel to create the rabbets for connecting the picket support board.
notching ends of bottom fence rail
Notch the ends. A dovetail saw is a great tool for notching the ends of the bottom rail panels so that they align with the trim on the base of the post.
installing truss webbing to fence panel rail
Install the truss webbing. Install the top and bottom of the rail, then glue in the vertical truss web members before the diagonal members. Leave the bottom of the rail and the web members short to maintain clearance for the rail to be slid over the support blocks on the posts.
applying PVC cement and holding down panel
Glue the second side. Apply PVC cement and hold the panel down with heavy weights. For larger glue-ups like this one, slow-setting cement/adhesive works better. Photos: Jeff Nixon
gluing and clamping trim onto panel
Add the bottom rail trim. Glue the trim in place flush with the bottom of the panel, and stagger the joints to avoid lining them up with panel joints.

Assemble the pickets and upper panel

Because I took the time to make sure the support posts were the same distance apart, I was able to figure out the picket spacing ahead of time, which meant that all I had to do was find the exact center of the upper rails and then I could be confident that the picket spacing on each end worked out the way I wanted.

Being able to plow the dadoes into six rail sections at once was a huge time saver. Getting this done required two router jigs. The first jig is only used to create the center dado. The second jig has a guide board attached to the bottom that fits into that first dado and all the subsequent dadoes. I used a finished rail as a spacing guide while fastening the pickets.

In order to fasten the pickets to the exact center of the picket support board, I cut spacers to lay the pickets on and had to place shims under a rail. Using a large table makes this fence section assembly process a lot easier.

routing dados on fence panel
Plow rail dadoes. Clamp together two 1×10 boards that have been cut to length. Mark the center, and route out the center dado using the first jig without the guide board. Then switch to the second jig with a guide board underneath that fits into the previous dado, and keep moving down the line.

ripping rails out of one board on a tablesaw
Rip down rails on a tablesaw. Using a thin-kerf blade, you can get three 3-in. rails out of one 1×10 board.

cutting and assembling additional pickets
Cut and assemble pickets. Cut two pickets out of the 12-ft. factory pickets and join the scraps to create additional pickets. Hide the seams behind the rails.
routing grooves into picket support board
Cut grooves into the picket support board. After making the grooves, dry-fit the picket support board onto the top of the bottom rail before adding the trim board.

nailing pickets to support board
Fasten pickets. After joining the trim board onto the picket support board, fasten the pickets with 1-1⁄2-in. stainless-steel finish nails to the support board. Use a rail to guide the proper spacing. Photo: Jeff Nixon

Fasten upper rails. Carefully tap the rails in place. Start with the lowest rail and use a story pole or spacers to maintain consistent spacing. Hold the upper rails in place with cement and two finish nails driven in at angles. Photo: Jeff Nixon
gluing and clamping rail trim to fence panel
Secure rail trim. Glue and clamp down the rail trim boards. Photo: Jeff Nixon
using block plane to align rail and trim boards
Even up the ends. Use a block plane to make sure the ends of the rail and trim boards are perfectly aligned. Photo: Jeff Nixon

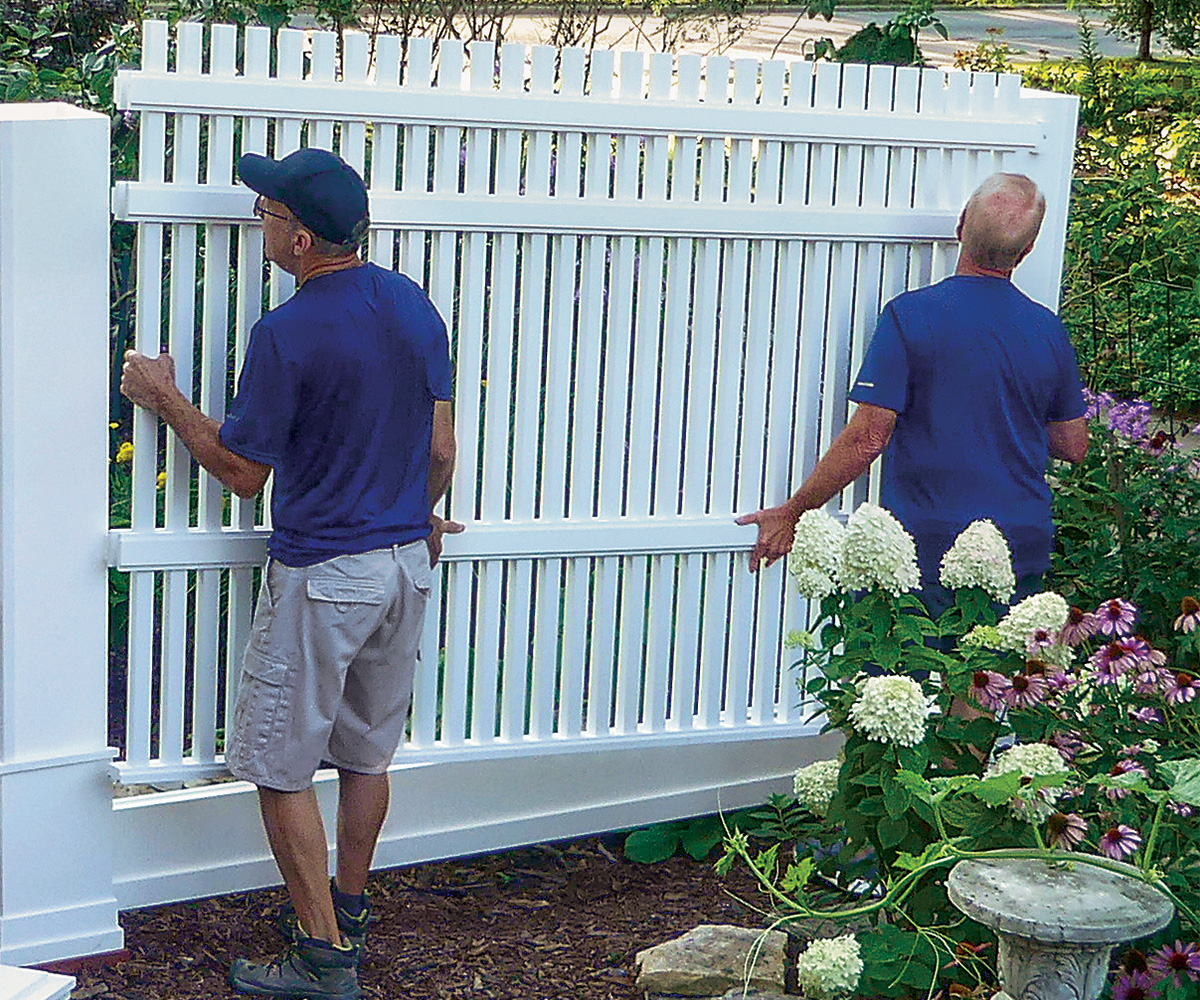
Install the complete panel

You will need an extra set of hands to lift the fence sections because they’re heavy, but if your measurements and cuts were accurate, each section should slide into place with little effort. Because the bottom rail is fully supported by the rail support blocks, I decided adding screws was not necessary. I fastened the upper rails to the rail support blocks with the FastenMaster Cortex Hidden Fastening System, which didn’t require predrilled holes and came with PVC plugs that match perfectly.

installing bottom rail of fence
Install the bottom rail first. Slide the rail up, over, and onto the support blocks.
installing fence panel on top of bottom rail
Add the upper panel. With the post caps off, lift the middle fence section over the support blocks and down onto the bottom rail. Make sure the grooves in the picket support board fit tightly over the bottom rail panels.
securing upper rail of fence with cortex screws and plugs
Fasten the upper section. Secure each side of each upper rail with Cortex screws and plugs.
securing trim with stainless-steel screws
Install the missing trim. To prevent bulging the trim with thick Cortex screws, I used stainless-steel screws with a thinner profile and made a hole for the caps with a Forstner bit.
installing caps onto PVC fence posts
Cap it off. The last step of the process is to slide on the post cap—no cement or fasteners necessary.

Jeff Nixon is a freelance art director. Photos by Mark Petersen, except where noted. Drawings: Christopher Mills.


RELATED STORIES

  • How to Install a Vinyl Privacy Fence: Layout Post Holes
  • A Privacy Fence With Appeal
  • A Look at Three Fence Gates

Sign up for eletters today and get the latest how-to from Fine Homebuilding, plus special offers.

Signing you up...

This site is protected by reCAPTCHA and the Google Privacy Policy and Terms of Service apply.
See all newsletters
See all newsletters
×

Get home building tips, offers, and expert advice in your inbox

Signing you up...

This site is protected by reCAPTCHA and the Google Privacy Policy and Terms of Service apply.
See all newsletters
See all newsletters

New Feature

Fine Homebuilding Forums

Ask questions, offer advice, and share your work

View Comments

  1. user-6836512 | Mar 22, 2023 03:16pm | #1

    While I applaud the care of layout and detailing that you have done, I would highly encourage a rethinking of using PVC as a building material, especially when careful detailing and construction of a wood (or other natural product) fence can yield a beautiful and long lasting result (especially in such capable hands) without using as many harmful chemicals.

    Polyvinyl Chloride, commonly abbreviated PVC, is the world’s third-most widely produced synthetic plastic polymer. PVC is largely used in construction because it can be more effective in weight, cost, and performance than traditional materials such as copper, iron or wood in pipe applications.
    • The production of PVC results in the release of toxins including dioxins. The burning of PVC results in the release of dioxins. Additives of PVC can be toxic to users. The manufacturing and incineration of PVC also creates and releases dioxins, which cause a wide range of health effects including cancer, birth defects, diabetes, learning and developmental delays, endometriosis, and immune system abnormalities. One type of dioxin present in PVC is the most potent carcinogen ever tested. These toxin’s primary pathway into the human body is through inhalation.
    • The chemicals present in PVC are known as persistent bio-cumulative toxins (PBT’s) which mean they will persist in the environment and species around the world indefinitely. These are also commonly referred to as “forever chemicals.” PVC never completely breaks down in the environment, it cannot be recycled and interferes with the recycling of other plastics.

    Thanks,
    Jake LaBarre, AIA
    architect, builder, and educator.
    The source for my information is linked below

    https://healthybuilding.net/uploads/files/environmental-impacts-of-polyvinyl-chloride-building-materials.pdf

Log in or create an account to post a comment.

Sign up Log in

Become a member and get full access to FineHomebuilding.com

Up Next

Video Shorts

Featured Story

Double-Duty Large-Jaw Pliers

Klein's 10-in. plier wrench has a toothed V-jaw for grabbing pipe and conduit, or can be flipped around for a parallel, smooth grip.

Featured Video

How to Install Cable Rail Around Wood-Post Corners

Use these tips to keep cables tight and straight for a professional-looking deck-railing job.

Related Stories

  • Podcast 549: Energy Upgrades, Chimney Inspections, and Questions About a Home You Might Buy
  • Podcast 547: Basement Insulation, Historic Preservation Resources, and Shipping Container ADUs
  • A Look at Three Fence Gates
  • Behind the Scenes of a Concrete Batch Plant

Discussion Forum

Recent Posts and Replies

  • |
  • |
  • |
  • |
  • |
  • |
View More Create Post

Highlights

Fine Homebuilding All Access
Fine Homebuilding Podcast
Tool Tech
Plus, get an extra 20% off with code GIFT20

"I have learned so much thanks to the searchable articles on the FHB website. I can confidently say that I expect to be a life-long subscriber." - M.K.

Get home building tips, offers, and expert advice in your inbox

Signing you up...

This site is protected by reCAPTCHA and the Google Privacy Policy and Terms of Service apply.
See all newsletters
See all newsletters

Video

View All
  • Podcast 549: Energy Upgrades, Chimney Inspections, and Questions About a Home You Might Buy
  • Podcast 547: Basement Insulation, Historic Preservation Resources, and Shipping Container ADUs
  • Podcast 545: Mystery Fasteners, Basement-Ceiling Insulation, and Mixed-Use Malls
  • Podcast 543: Affordable Flooring, Replacing Replacement Windows, and Low-Flow Fans
View All

Outdoor Spaces

View All Outdoor Spaces Articles
  • installing a PVC fence
    PVC for a Rot-Proof Fence
  • Illustration of a small house surrounded by lots of green space
    6 Ways to Make a Small Lot Live Big
  • Image of a wood fence in a backyard
    Rainwater Storage and Fence in One
  • Podcast 511: Members-only Aftershow
    Podcast 511: Members-only Aftershow
View All Outdoor Spaces Articles

BOOKS, DVDs, & MERCH

Shop the Store
  • 2023 Tool Guide
    Buy Now
  • Code Check Building 4th Edition
    Buy Now
  • 2022 Fine Homebuilding Archive
    Buy Now
  • Pretty Good House
    Buy Now
  • Shop the Store

Fine Homebuilding Magazine

  • Issue 314 - April/May 2023
    • 7 Options for Countertops
    • Tool Test: Wood-Boring Bits
    • Critical Details for Ductless Heat Pumps
  • Issue 313 - Feb/March 2023
    • Practical System for a Seismic Retrofit
    • Fine Homebuilding Issue #313 Online Highlights
    • Practical System for a Seismic Retrofit
  • Issue 312 - Dec 2022/Jan 2023
    • Tool Test: Cordless Tablesaws
    • Gray-Water System for a Sustainable Home
    • Insulate a Cape Roof to Avoid Ice Dams
  • Issue 311 - November 2022
    • 7 Steps to a Perfect Exterior Paint Job
    • Options for Smarter Home-Energy Tracking
    • The Fine Homebuilding Interview: James Metoyer
  • Issue 310 - October 2022
    • Choosing a Tile-Leveling System
    • Choosing Between HRVs and ERVs
    • Custom Built-in Cabinets Made Easy

Fine Homebuilding

Follow

  • twitter
  • facebook
  • instagram
  • pinterest

Newsletter

Get home building tips, offers, and expert advice in your inbox

Signing you up...

This site is protected by reCAPTCHA and the Google Privacy Policy and Terms of Service apply.
See all newsletters
See all newsletters

Membership & Magazine

  • Online Archive
  • Start Free Trial
  • Magazine Subscription
  • Magazine Renewal
  • Gift a Subscription
  • Customer Support
  • Privacy Preferences

Taunton Network

  • Green Building Advisor
  • Fine Woodworking
  • Fine Gardening
  • Threads
  • About
  • Contact
  • Advertise
  • Careers
  • Copyright
  • Terms of Use
  • Site Map
  • Do not sell or share my information
  • Privacy Policy
  • Accessibility
  • California Privacy Rights

© 2023 The Taunton Press, Inc. All rights reserved.

X
X
This is a dialog window which overlays the main content of the page. The modal window is a 'site map' of the most critical areas of the site. Pressing the Escape (ESC) button will close the modal and bring you back to where you were on the page.

Main Menu

  • How-To
  • Design
  • Tools & Materials
  • Video
  • Blogs
  • Forum
  • Reader Projects
  • Magazine
  • Members
  • FHB House

Podcasts

  • FHB Podcast
  • ProTalk

Webinars

  • Upcoming and On-Demand

Podcasts

  • FHB Podcast
  • ProTalk

Webinars

  • Upcoming and On-Demand

Popular Topics

  • Kitchens
  • Business
  • Bedrooms
  • Roofs
  • Architecture and Design
  • Green Building
  • Decks
  • Framing
  • Safety
  • Remodeling
  • Bathrooms
  • Windows
  • Tilework
  • Ceilings
  • HVAC

Magazine

  • Current Issue
  • Past Issues
  • Magazine Index
  • Subscribe
  • Online Archive
  • Author Guidelines

All Access

  • Member Home
  • Start Free Trial
  • Gift Membership

Shop the Store

  • Books
  • DVDs
  • Taunton Workshops

More

  • FHB Ambassadors
  • Reader Projects
  • Podcast
  • FHB House
  • Customer Support

Account

  • Log In
  • Join

Newsletter

Get home building tips, offers, and expert advice in your inbox

Signing you up...

This site is protected by reCAPTCHA and the Google Privacy Policy and Terms of Service apply.
See all newsletters
See all newsletters

Follow

  • twitter
  • facebook
  • instagram
  • pinterest

Join All Access

Become a member and get instant access to thousands of videos, how-tos, tool reviews, and design features.

Start Your Free Trial

Subscribe

FHB Magazine

Start your subscription today and save up to 70%

Subscribe

We hope you’ve enjoyed your free articles. To keep reading, become a member today.

Get complete site access to expert advice, how-to videos, Code Check, and more, plus the print magazine.

Start your FREE trial

Already a member? Log in