Today I took a few pictues of some of the techniques I use when I tune-up old windows.
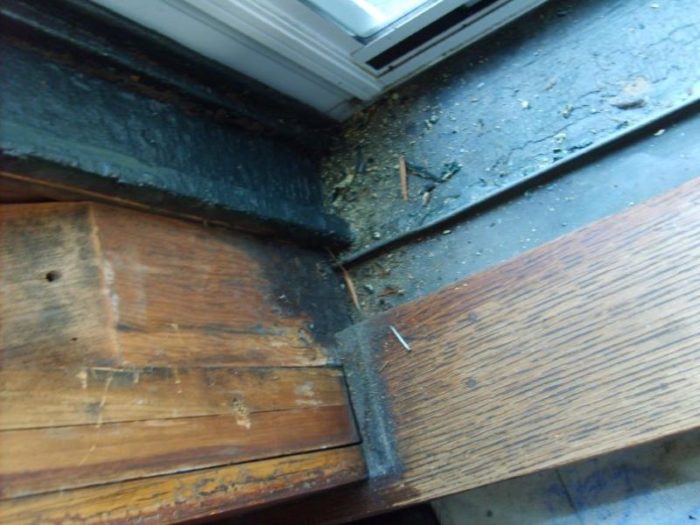
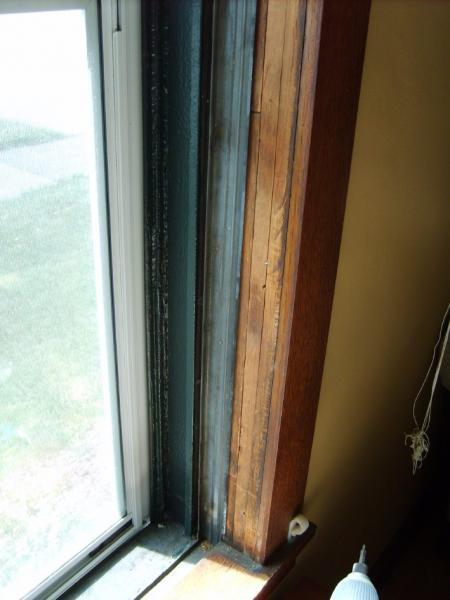
As you might expect, these windows were painted shut, screwed shut, and had a “retrohack” metal window track added at sometime in the past. I’ll spare you the putty knife and flat bar drama, but after getting the windows moving again I had to get rid of the saw kerf groove and metal tongue system to gain access to the sash weight pocket.
The metal window track/weather stripping not only blocked access to the sash weights, but the saw kerfs they required weakened the window. The sill “flashing” directed water into the jamb and the folded metal at the meeting rail unfolded and scraped up the other sash. A bad system.


Replies
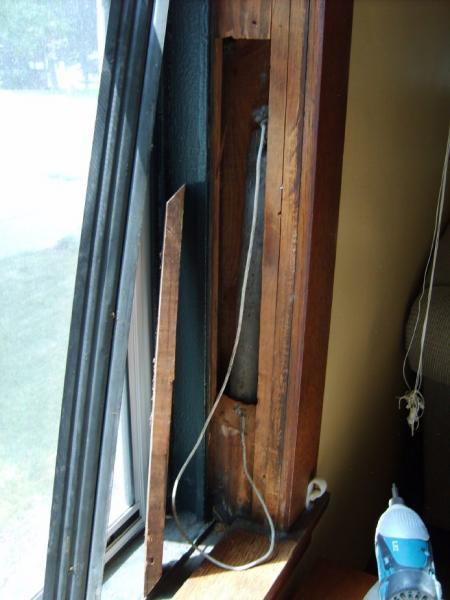
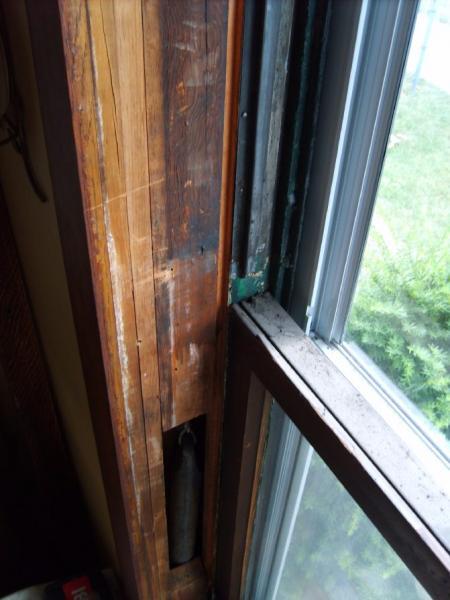
After removing the lower sash, one parting stop, and the upper sash...I pulled the pulleys. These were a friction fit version with little dawgs that grab the top and bottom of the opening.
I clean and lube them with Telfon...just like in the good old days.
I drop a plumb bob down the pulley opening and tie a new sash cord onto the string and fish it up through the pocket.
I use a Figure 8 knot about a foot from the lower end of the cord, pass the tail hanging below the knot through the eye of the weight, and reweave the figure 8.
The rewoven figure 8 is easy to learn, and it will not come untied. Any force that attempts to loosen part of the knot, tightens the other part.
Interestingly, these windows had iron weights with Arabic numbers, Roman numbers, and lead weights without any numbers to indicate weight.I seldom see lead sash weights, but this one had no rust, would not hold a magnet and could be dented with a fingernail.
I use a figure 8 on the sash end of the cord too. I shove the 8 into a tight "stopper" as used in sailing and add an overhand knot to the tail, then I shove the knot into the hole on the sash and for insurance run a Kreg brand (pocket hole) screw through the overhand tail knot and into the sash.I did the windows on several houses before I found a good system for getting the sash cords to be the proper length.I rest the bottom of the sash weight on the bottom of the weight access, measure the distance from the top of the sash to the "knot hole" on the side of the sash frame (in this case 11") then I put a piece of blue tape that distance down from the window head jamb.That is the place I tie the fig. 8 stopper knot.
Edited 7/17/2007 10:11 pm ET by basswood
basswood: sometimes I remove the casings to gain access to weights and a bowline knot on the weight. Cast iron weights make great wind chimes.
You are right that on some windows, removing the casing provides access to the pocket...not on these windows...solid lath and plaster right up to the window jamb.The bowline works too. I opt for the rewoven figure 8 because it is even more secure than a bowline and is almost impossible to tie wrong. It is easy to make a small mistake with a bowline and get a knot that looks like a bowline, but can come undone.The rewoven figure 8 is common in rock climbing, having largely replaced the bowline. It is also handy in sailing and fishing.
There is a formula for the length of a sash rope. I'm having to do this from memory but I believe it is height of sash plus distance from knot hole to top plus 2"(for the pulley) minus the height of the weight. I believe this is the distance between knots. Jane Powell knows it for sure, and you should be able to find it on the Old House Journal forum.The advantage to the formula is that you don't have to put the weight in the pocket to determine the length, and if you have multiple sashes of the same size to do, you can cut all the lengths at once.BTW, I wouldn't dis the metal weatherstripping. It is very effective at blocking wind infiltration.
Your formula sounds about right for equal 1 over 1 double hungs. These windows were 1/3 ht. over 2/3 ht. with a larger lower sash. Though the sash heights are different the sash cord lengths are a function of the total window unit height - weight ht. + pulley and top of sash to "knot hole."Anywhoo, I precut all my cord at twice the total unit height to allow for my knot tying and to have a couple of extra feet to work with.Metal weatherstipping is OK with me...on these windows it seemed to cause more problems than it was worth. I like felt for a historic look and a weather stripped storm too (with weep holes to deal with some infiltration/condensation).
Actually, cord length is a function of travel, but that is a function of height. I've often wondered about units of different heights, but I think it still works, though I messed up.Height of sash plus height of knot hole (usually 12") plus 2 inches for the knot. After tying to the weight.
"There is a formula for the length of a sash rope..."The most important thing in my opinion is to get the length just right so that the sash are allowed maximum travel and that the weights never "bottom out". Allowing the top sash to travel all the way to the sill is especially important so that the parting bead may be more easily re-inserted.I've read enough of your posts to get the feeling you really know your way around traditional sash -- the above information is probably something you already know, but may be beneficial for others here.Regards,Ragnar
The rewoven figure 8 is easy to learn, and it will not come untied. Any force that attempts to loosen part of the knot, tightens the other part.
Basswood,
Do you find this knot superior and/or easier than a bowline (sp?)?
Edit: after having read the rest of the thread, I got my answer. Maybe you can post a few pics of how you actually go about tying it. Like others here, I'm an old boy scout at heart and still like learning new knots.
Edited 7/19/2007 7:44 pm ET by Ragnar17
Here is the figure 8 knot in a series of 3 pics:
Now you just have to make a fig.8 with a longer tail, for reweaving. Pass the tail through the weight eye (I used a piece of climbing hardware for the pics) and follow the 8 back around as this series of pics illustrates:The last pic #10 is a close up of the rewoven 8...it really is a bombproof knot.
Thanks for the excellent series of pictures, Basswood. It was very easy to follow.I can just about tie a bowline in my sleep, so I'm very comfortable with it and will probably just stick with it when hanging weights. It's faster for me and takes less time and less cord.I've actually used a figure-8 knot to insert into the rope pocket in the side of the sash before -- I'll keep the double-8 knot in the back of my mind for when an extra large knot is required.Thanks again,Ragnar
--"I can just about tie a bowline in my sleep"Glad you found the photos helpful. Here is a bowline I tied one-handed (while I held the camera in my left hand and took some pics).This is only a practical skill for mountain rescue, but you might have fun attempting it. The second/third steps (under & twist around) is difficult (think contortionist), as is getting the tension of the loop around the wrist just right for the final "pull back through" step.A short video would really help. The one-handed bowline can take just a couple of seconds to tie once you get it down. I used to tie it in knot tying contests faster than people using two hands.Impress all your friends at parties. ;o)
Looking good! Especially like that knot. I've done the old windows in my personal house, but never for "gain" - I figure to totally redo a window and frame and inner and outer and reglaze and prime and paint takes 30-40 hours
Who's gonna' pay for that?
Forrest
That is the knot for sash cords! It does look cool too.I get hired to restring and tune-up old windows a couple of times a year...only by the hour. I just free up the sashes, scrap and sand the jambs, stops and sashes, restring the pulleys/weights...no painting included.It takes 3 or 4 hours per double hung unit to get them working nice.I tell customers that it costs about the same as a replacement window to rework the old window and let them choose Old or New. I think the old windows are usually worth restoring and I tell that to the customers, some are even persuaded.
Edited 7/17/2007 10:22 pm ET by basswood
I've done a number of sash weight windows, including making my own frame/sill for an old DH window. If I'm not mistaken there is a different traditional knot for hanging sash weights (similar to bowline) that not only won't pull out - it allows the weights to hang 'more plumb'. I'll post a pic.
By the way, Phelps Window hardware - http://www.phelpscompany.com/ carries very good pulleys and similar hardware.
Jeff
Edited 7/18/2007 8:00 am ET by Jeff_Clarke
I would be interested in learning the traditional knot you mentioned. I am a "knot head"...this stems from my Boy Scout experience (Eagle Scout) and some rock climbing and tree climbing as an arborist. I have some old books of knots that are fun to experiment with.I can tie a bowline, with one hand, in about two seconds...if you want to see pics of that trick.Thanks for the pulley link.
Here you go - all the 1932 weights in our house are tied with this knot. I've opened it up a little so you can see how it's tied. The other photo shows that the weight hangs very plumb (important!) with this knot and it seems to help it hang from the centerline of the weight, too - also important in a weight pocket where the weights may 'clunk' against each other or the jamb if not hung properly.
Jeff
Edited 7/22/2007 11:04 pm ET by Jeff_Clarke
Yup, those knots of Jeff Clarke's look just like mine - now.
I had to redo all my windows in my '31 house. No entry to the sash pockets except to get the outside or inside trim off.
I also do it for money, and like you, time only. Only with me, I usually end up routing the sashes and install Resource Conservation's gasketing, and sometimes even have to mill 1/16" or 1/8" sheet stock to close in the gap so the wind won't whistle through.
Thanks for the thread.Quality repairs for your home.
AaronR ConstructionVancouver, Canada
Jeff --Please post a picture of the old knot you mentioned.The one I've seen in old work was essentially a slip knot. Is yours different?
The windows on our 1923 house had those metal tracks. I suspect they were original to the window since I am fairly sure no one had ever done any work on our windows. We had the original storms on all of our windows, so that prevented the damage that you found.
Have you ever made replacement storms? I have never seen the blades you would need to route new material to match.
You could be correct about your windows. I doubt it on these...the metal must be removed to both access the pocket and to remove the parting stop for restringing. It is my experience that the metal gets bent too much being removed to be reused.The metal on these windows was already in questionable shape in places and I doubt it would be easy to find now. I am building two storm windows for another house this week. The last set of storm windows I built were arch topped. I built 9 of those, I think...assorted sizes, all arched.
Cool!
The storms we had on ours were removable from the inside, and each had a number engraved on the window which corresponded to the number engraved on the storm window frame. Many of the windows had two inserts, one with a screen and one with glass. The ones that did not were glass, but had a louvered section on the bottom that was covered with screening, and then an upswinging window that you could open to get ventilation. Never seen anything like that since.
I don't think I could make storms like those you describe...they sound nifty!
One source of metal weatherstripping is Accurate Metal,http://www.weatherstrip.thomasregister.com/
Why no just use chain? Never worry about broken ropes ever again... Yes, it costs more, but then the oohs and aaahs from visitors is worth it.
...I shudder to think how much that Phelps hardware costs. Nice stuff, though.
F.Y.I. The metal "tracks" are not tracks, but, they were the original attempt to weatherstrip the 'ol rope & weight double hungs. You can still buy this material from the Architectural Resource Center. A great source of supply for old windows. http://www.aresource.com
The metal window track/weather stripping...
It's called interlock weatherstripping. I know of a a specialty contractor who still installs it in my area.
It's supposed to be a good system in reducing air infiltration. However, like you, I've been frustrated by it. It makes it much more difficult to get to the window sash, weakens the sash, makes it more difficult to secure the sash cord, etc. It also seems to be extremely tempermental -- just a little bend or sloppy paint and the mechanics of the window can get messed up.
When my clients want to weatherstrip, I prefer cutting small kerfs into the sash itself and installing a barbed teflon leaf.
As mentioned, the metal track is not track at all but rather interlocking weatherstripping and the metal in your picture is zinc.
When installed properly it is the best and longest lasting stuff there is. I used to install it when I worked on the brownstones of Brooklyn and the Victorians along the Hudson.
It can be removed to get to the sash weights, you just have to work very carefully to remove the little flat head nails that are exposed along the sides. Most of the time the installers of the stuff only nailed the tops and the bottoms of the tongue track for accessibility they knew the sash cord or chain would eventually give out and need replacing.
It's a very picky job, but removing interlocking weatherstripping and restoring it can be done.
If you can, it's better to get sash chain as it doesn't wear out as easily.
Installing interlocking weatherstripping used to be much more common and was a whole trade unto itself. Stanley used to make sets of planes for cutting the grooves, now these tools are highly valued as collector pieces. The trade has pretty much disappeared.
The Old House Journal has much material in their archives on this, how to restore and install new. I used Accurate Metal as my supply.
Good job
...you just have to work very carefully to remove the little flat head nails that are exposed along the sides.
Jer,
An old-timer taught me to just punch those nails through with a nailset. It's easier (and more predictable) than trying to pull them out. Give it a try if you ever have the opportunity and see what you think.
Yes, I have punched the nails through and that's fine if you're not going to reuse the weatherstripping. I use that technique in a lot of my reno-restoration work. It's so much easier.