FHB Logo Facebook LinkedIn Email Pinterest Twitter Instagram Plus Icon Close Icon Navigation Search Icon Navigation Search Icon Arrow Down Icon Video Guide Icon Article Guide Icon Modal Close Icon Guide Search Icon Skip to content
Subscribe

In every issue you'll find...

  • Expert insights on techniques and principles
  • Unbiased tool reviews
  • Step-by-step details to master the job
  • Field-tested advice and know-how
Subscribe Now!
Subscribe
  • How-To
  • Design
  • Tools & Materials
  • Videos
  • Blogs
  • Forum
  • Magazine
  • Members
  • FHB House
  • Podcast
  • Join
  • Log In
Subscribe

Fine Homebuilding Project Guides

Finish & Trim Carpentry

Guide Home
Chapter
  • Trim Design
  • Tools and Materials
  • Interior Trim Basics
  • Window and Door Casings
  • Baseboard and Crown Molding
  • Wainscot and Paneling
  • Mantels and Fireplace Surrounds
  • Coffered Ceilings
Job Site Diaries

How to Lay Out a Paneled Fireplace Wall

Remodeler Tyler Grace explains how he designs and measures for paneling around a fireplace.

By Tyler Grace

When I am hired to design/install custom trim, built ins, wall paneling, or wainscoting my approach is always the same. Plan, plan, and then plan some more. The process usually starts with a site visit or consultation. I take some basic measurements, ask the homeowners if they have a specific designs in mind, and then get a basic layout in order.

Mockup of paneled fireplace

Once the customer and I have agreed upon a budget, material selections, finishes, and scale, I work to finalize the design. Another site visit with a laser level, tape measurer, and a computer provides me the information I need to draft up a scaled layout of the existing space. Using the existing dimensions I’m able to develop an exact, final layout and design. Below I will outline how I go about creating a rough layout, please keep in mind that proportions also greatly impact my design process, but we’ll need to save that portion of the process for a future story!

fireplace wall before paneling

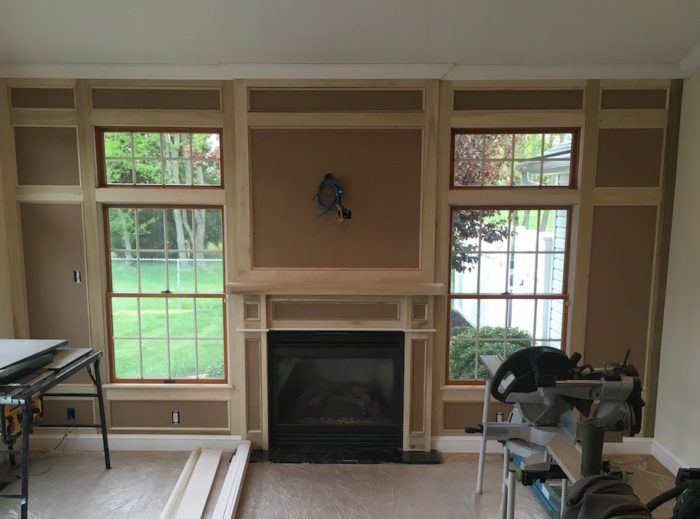
I always start by focusing on the existing elements that will dictate the future design and layout. In this case it was the fireplace and windows. I started by dimensioning my vertical stiles for the paneled walls. I knew I wanted them to be 3.5″, and I wanted them to be installed where the window casing would be. Once I drew them in, I added two more vertical stiles to the sides of the wall. Now I was left with the maximum width that I had available to design the mantel and mantel legs.

For the mantel I needed to finalize the leg design first, which then allowed me to determine my proportions for the rails, stiles, breastplate, and mantel shelf. The legs were the most crucial to size, because of code requirements, fireplace manufacturer requirements, and the location of the windows (these elements basically created the maximum leg width for me).

Once I had the verticals laid out and the mantel proportioned I laid out all of the horizontal rails. The windows once again created the layouts for the majority of the horizontal elements, especially below the windows, above the windows, and between the transom windows. Lastly, I did my best to match the exposure on the top rail and bottom rail that had the baseboard and crown moulding installed on top of it.

completed paneled fireplace wall before paint

With the proper planning and measurements this wall virtually laid itself out. I knew what I wanted it to look like, and the size constraints and placement of the windows and fireplace really set all of my lines/boxes for me. The fireplace proportions are set with some basic guidelines and rules, but a lot of it is feel and experience. For example, I originally wanted a thin mantel shelf, but decided to go with something heavier to ground the television that was above it. Upon initial installation I was unsure about the decision, but once it got painted I absolutely loved the outcome!

completed paneled fireplace wall with white paint

Sign up for eletters today and get the latest how-to from Fine Homebuilding, plus special offers.

Signing you up...

This site is protected by reCAPTCHA and the Google Privacy Policy and Terms of Service apply.
See all newsletters
See all newsletters
Previous: A Simple Approach to a Paneled Passageway

Guide

Finish & Trim Carpentry

Chapter

Wainscot and Paneling

Log in or create an account to post a comment.

Sign up Log in

Become a member and get full access to FineHomebuilding.com

Finish & Trim Carpentry

Finish & Trim Carpentry

Trusted, comprehensive guidance from the pros for creating perfect trim details in any room of the house

View Project Guide

View All Project Guides »

Become a member and get unlimited site access, including the Finish & Trim Carpentry Project Guide.

Start Free Trial

Trim Design
  • Trim Style and Design
Tools and Materials
  • Tools
  • Materials
Interior Trim Basics
  • Tips and Tricks
  • Techniques
  • Using Jigs
Window and Door Casings
  • Windows
  • Doors
Baseboard and Crown Molding
  • Baseboard
  • Crown Molding
  • Specialty Crown Situations
Wainscot and Paneling
  • Beadboard Wainscot
  • Paneled Wainscot
  • Chair Rails
  • Wall Treatments
Mantels and Fireplace Surrounds
  • Design
  • Installing Mantels and Surrounds
Coffered Ceilings

Fine Homebuilding

Follow

  • twitter
  • facebook
  • instagram
  • pinterest

Newsletter

Get home building tips, offers, and expert advice in your inbox

Signing you up...

This site is protected by reCAPTCHA and the Google Privacy Policy and Terms of Service apply.
See all newsletters
See all newsletters

Membership & Magazine

  • Online Archive
  • Start Free Trial
  • Magazine Subscription
  • Magazine Renewal
  • Gift a Subscription
  • Customer Support
  • Privacy Preferences

Taunton Network

  • Green Building Advisor
  • Fine Woodworking
  • Fine Gardening
  • Threads
  • About
  • Contact
  • Advertise
  • Careers
  • Copyright
  • Terms of Use
  • Site Map
  • Do not sell my information
  • Privacy Policy
  • Accessibility
  • California Privacy Rights

© 2022 The Taunton Press, Inc. All rights reserved.

X
X
This is a dialog window which overlays the main content of the page. The modal window is a 'site map' of the most critical areas of the site. Pressing the Escape (ESC) button will close the modal and bring you back to where you were on the page.

Main Menu

  • How-To
  • Design
  • Tools & Materials
  • Video
  • Blogs
  • Forum
  • Reader Projects
  • Magazine
  • Members
  • FHB House

Podcasts

  • FHB Podcast
  • ProTalk

Webinars

  • Upcoming and On-Demand

Account

  • Log In
  • Join

Podcasts

  • FHB Podcast
  • ProTalk

Webinars

  • Upcoming and On-Demand

Popular Topics

  • Kitchens
  • Business
  • Bedrooms
  • Roofs
  • Architecture and Design
  • Green Building
  • Decks
  • Framing
  • Safety
  • Remodeling
  • Bathrooms
  • Windows
  • Tilework
  • Ceilings
  • HVAC

Magazine

  • Current Issue
  • Past Issues
  • Magazine Index
  • Subscribe
  • Online Archive
  • Author Guidelines

All Access

  • Member Home
  • Start Free Trial
  • Gift Membership

Shop the Store

  • Books
  • DVDs
  • Taunton Workshops

More

  • FHB Ambassadors
  • Reader Projects
  • Podcast
  • Customer Support

Account

  • Log In
  • Join

Newsletter

Get home building tips, offers, and expert advice in your inbox

Signing you up...

This site is protected by reCAPTCHA and the Google Privacy Policy and Terms of Service apply.
See all newsletters
See all newsletters

Follow

  • twitter
  • facebook
  • instagram
  • pinterest

Join All Access

Become a member and get instant access to thousands of videos, how-tos, tool reviews, and design features.

Start Your Free Trial

Subscribe

FHB Magazine

Start your subscription today and save up to 70%

Subscribe

We hope you’ve enjoyed your free articles. To keep reading, become a member today.

Get complete site access to expert advice, how-to videos, Code Check, and more, plus the print magazine.

Start your FREE trial

Already a member? Log in