FHB Logo Facebook LinkedIn Email Pinterest Twitter Instagram Plus Icon Close Icon Navigation Search Icon Navigation Search Icon Arrow Down Icon Video Guide Icon Article Guide Icon Modal Close Icon Guide Search Icon Skip to content
Subscribe

In every issue you'll find...

  • Expert insights on techniques and principles
  • Unbiased tool reviews
  • Step-by-step details to master the job
  • Field-tested advice and know-how
Subscribe Now!
Subscribe
  • How-To
  • Design
  • Tools & Materials
  • Videos
  • Blogs
  • Forum
  • Magazine
  • Members
  • FHB House
  • Podcast
  • Join
  • Log In
Subscribe

Fine Homebuilding Project Guides

Finish & Trim Carpentry

Guide Home
Chapter
  • Trim Design
  • Tools and Materials
  • Interior Trim Basics
  • Window and Door Casings
  • Baseboard and Crown Molding
  • Wainscot and Paneling
  • Mantels and Fireplace Surrounds
  • Coffered Ceilings
How-To

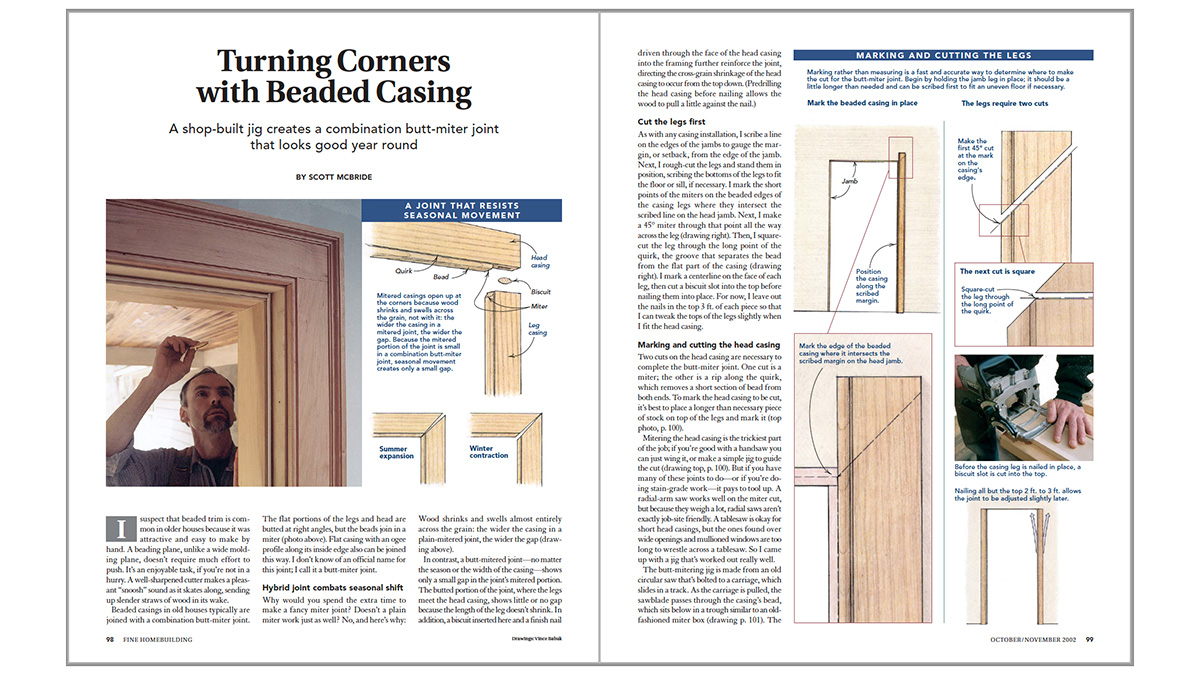
Turning Corners with Beaded Casing

A shop-built jig creates a combination butt-miter joint that looks good year round.

By Scott McBride Issue 150
Cut the head casing long, place it atop the legs, and mark it in place.

Synopsis: Beaded door and window casings offer an attractive and traditional look, but mitered corners open up with seasonal expansion and contraction. Here the author describes his techniques for cutting combination butt-miter joints that stay snug year-round.


I suspect that beaded trim is common in older houses because it was attractive and easy to make by hand. A beading plane, unlike a wide molding plane, doesn’t require much effort to push. It’s an enjoyable task, if you’re not in a hurry. A well-sharpened cutter makes a pleasant “snoosh” sound as it skates along, sending up slender straws of wood in its wake.

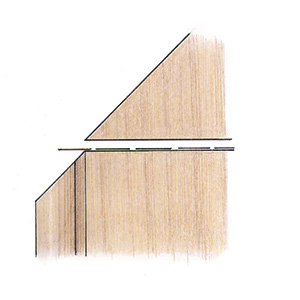
Beaded casings in old houses typically are joined with a combination butt-miter joint. The flat portions of the legs and head are butted at right angles, but the beads join in a miter. Flat casing with an ogee profile along its inside edge also can be joined this way. I don’t know of an official name for this joint; I call it a butt-miter joint.

Hybrid joint combats seasonal shift

Why would you spend the extra time to make a fancy miter joint? Doesn’t a plain miter work just as well? No, and here’s why: Wood shrinks and swells almost entirely across the grain: the wider the casing in a plain-mitered joint, the wider the gap.

inspecting door frame

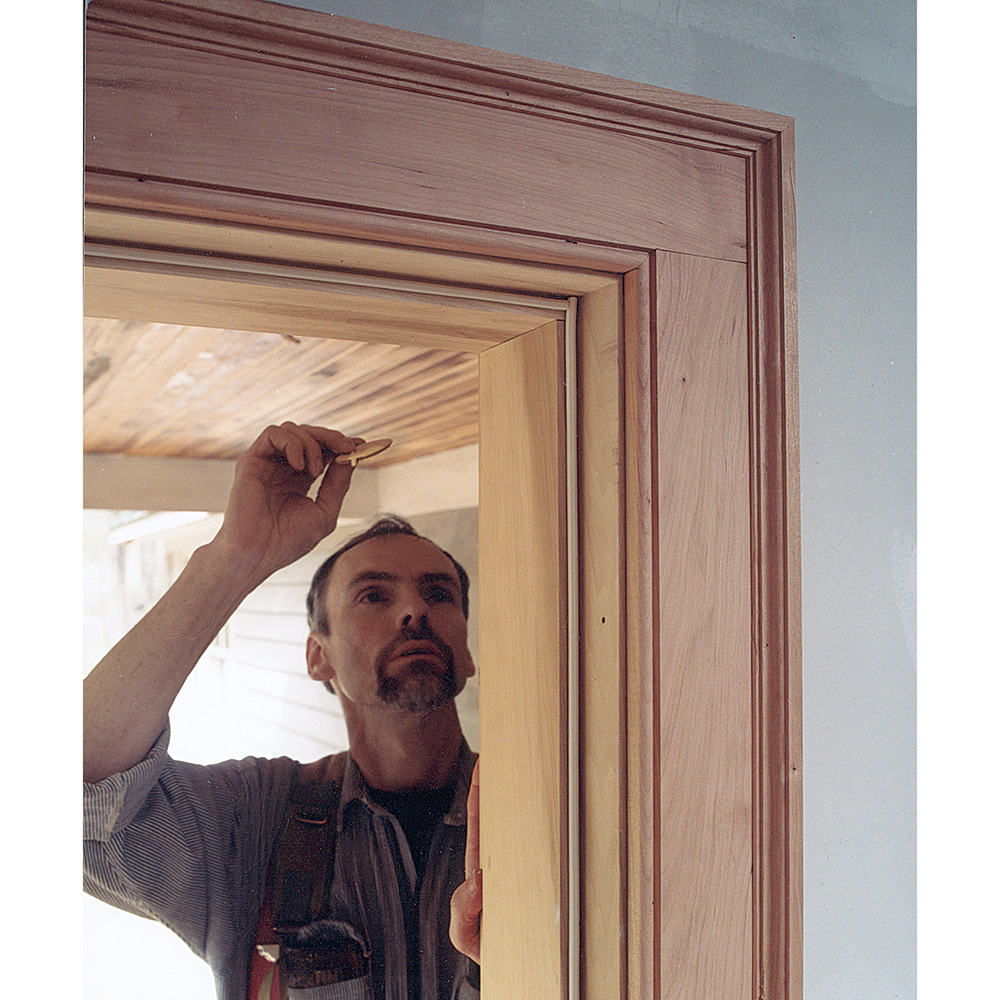
In contrast, a butt-mitered joint — no matter the season or the width of the casing — shows only a small gap in the joint’s mitered portion. The butted portion of the joint, where the legs meet the head casing, shows little or no gap because the length of the leg doesn’t shrink. In addition, a biscuit inserted here and a finish nail driven through the face of the head casing into the framing further reinforce the joint, directing the cross-grain shrinkage of the head casing to occur from the top down. (Predrilling the head casing before nailing allows the wood to pull a little against the nail.)
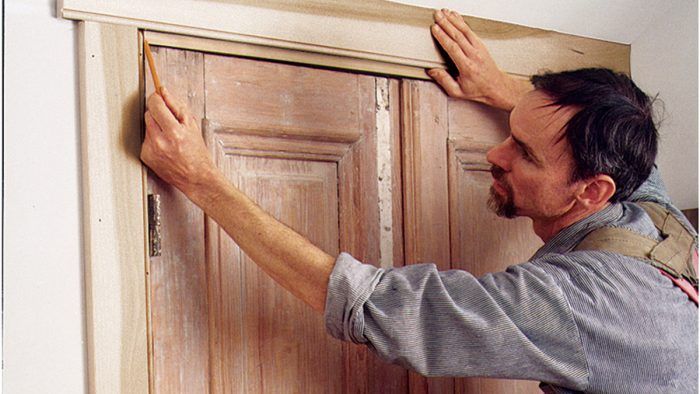
Cut the legs first

square cut in leg illustration
Square-cut the leg through the long point of the quirk.

As with any casing installation, I scribe a line on the edges of the jambs to gauge the margin, or setback, from the edge of the jamb. Next, I rough-cut the legs and stand them in position, scribing the bottoms of the legs to fit the floor or sill, if necessary. I mark the short points of the miters on the beaded edges of the casing legs where they intersect the scribed line on the head jamb. Next, I make a 45° miter through that point all the way across the leg. Then, I square-cut the leg through the long point of the quirk, the groove that separates the bead from the flat part of the casing. I mark a centerline on the face of each leg, then cut a biscuit slot into the top before nailing them into place. For now, I leave out the nails in the top 3 ft. of each piece so that I can tweak the tops of the legs slightly when I fit the head casing…


Turning Corners PDF spreadsheet

To read the entire article, click the View PDF button below.

From Fine Homebuilding #150


Sign up for eletters today and get the latest how-to from Fine Homebuilding, plus special offers.

Signing you up...

This site is protected by reCAPTCHA and the Google Privacy Policy and Terms of Service apply.
See all newsletters
See all newsletters
View PDF
Previous: 10 Rules for Finish Carpentry Next: How to Scribe Trim to Fit Against a Wall

Guide

Finish & Trim Carpentry

Chapter

Interior Trim Basics

Log in or create an account to post a comment.

Sign up Log in

Become a member and get full access to FineHomebuilding.com

Finish & Trim Carpentry

Finish & Trim Carpentry

Trusted, comprehensive guidance from the pros for creating perfect trim details in any room of the house

View Project Guide

View All Project Guides »

Become a member and get unlimited site access, including the Finish & Trim Carpentry Project Guide.

Start Free Trial

Trim Design
  • Trim Style and Design
Tools and Materials
  • Tools
  • Materials
Interior Trim Basics
  • Tips and Tricks
  • Techniques
  • Using Jigs
Window and Door Casings
  • Windows
  • Doors
Baseboard and Crown Molding
  • Baseboard
  • Crown Molding
  • Specialty Crown Situations
Wainscot and Paneling
  • Beadboard Wainscot
  • Paneled Wainscot
  • Chair Rails
  • Wall Treatments
Mantels and Fireplace Surrounds
  • Design
  • Installing Mantels and Surrounds
Coffered Ceilings

Fine Homebuilding

Follow

  • twitter
  • facebook
  • instagram
  • pinterest

Newsletter

Get home building tips, offers, and expert advice in your inbox

Signing you up...

This site is protected by reCAPTCHA and the Google Privacy Policy and Terms of Service apply.
See all newsletters
See all newsletters

Membership & Magazine

  • Online Archive
  • Start Free Trial
  • Magazine Subscription
  • Magazine Renewal
  • Gift a Subscription
  • Customer Support
  • Privacy Preferences

Taunton Network

  • Green Building Advisor
  • Fine Woodworking
  • Fine Gardening
  • Threads
  • About
  • Contact
  • Advertise
  • Careers
  • Copyright
  • Terms of Use
  • Site Map
  • Do not sell my information
  • Privacy Policy
  • Accessibility
  • California Privacy Rights

© 2022 The Taunton Press, Inc. All rights reserved.

X
X
This is a dialog window which overlays the main content of the page. The modal window is a 'site map' of the most critical areas of the site. Pressing the Escape (ESC) button will close the modal and bring you back to where you were on the page.

Main Menu

  • How-To
  • Design
  • Tools & Materials
  • Video
  • Blogs
  • Forum
  • Reader Projects
  • Magazine
  • Members
  • FHB House

Podcasts

  • FHB Podcast
  • ProTalk

Webinars

  • Upcoming and On-Demand

Account

  • Log In
  • Join

Podcasts

  • FHB Podcast
  • ProTalk

Webinars

  • Upcoming and On-Demand

Popular Topics

  • Kitchens
  • Business
  • Bedrooms
  • Roofs
  • Architecture and Design
  • Green Building
  • Decks
  • Framing
  • Safety
  • Remodeling
  • Bathrooms
  • Windows
  • Tilework
  • Ceilings
  • HVAC

Magazine

  • Current Issue
  • Past Issues
  • Magazine Index
  • Subscribe
  • Online Archive
  • Author Guidelines

All Access

  • Member Home
  • Start Free Trial
  • Gift Membership

Shop the Store

  • Books
  • DVDs
  • Taunton Workshops

More

  • FHB Ambassadors
  • Reader Projects
  • Podcast
  • Customer Support

Account

  • Log In
  • Join

Newsletter

Get home building tips, offers, and expert advice in your inbox

Signing you up...

This site is protected by reCAPTCHA and the Google Privacy Policy and Terms of Service apply.
See all newsletters
See all newsletters

Follow

  • twitter
  • facebook
  • instagram
  • pinterest

Join All Access

Become a member and get instant access to thousands of videos, how-tos, tool reviews, and design features.

Start Your Free Trial

Subscribe

FHB Magazine

Start your subscription today and save up to 70%

Subscribe

We hope you’ve enjoyed your free articles. To keep reading, become a member today.

Get complete site access to expert advice, how-to videos, Code Check, and more, plus the print magazine.

Start your FREE trial

Already a member? Log in