FHB Logo Facebook LinkedIn Email Pinterest Twitter Instagram Plus Icon Close Icon Navigation Search Icon Navigation Search Icon Arrow Down Icon Video Guide Icon Article Guide Icon Modal Close Icon Guide Search Icon Skip to content
Subscribe

In every issue you'll find...

  • Expert insights on techniques and principles
  • Unbiased tool reviews
  • Step-by-step details to master the job
  • Field-tested advice and know-how
Subscribe Now!
Subscribe
  • How-To
  • Design
  • Tools & Materials
  • Videos
  • Blogs
  • Forum
  • Magazine
  • Members
  • FHB House
  • Podcast
  • Join
  • Log In
Subscribe

Fine Homebuilding Project Guides

Finish & Trim Carpentry

Guide Home
Chapter
  • Trim Design
  • Tools and Materials
  • Interior Trim Basics
  • Window and Door Casings
  • Baseboard and Crown Molding
  • Wainscot and Paneling
  • Mantels and Fireplace Surrounds
  • Coffered Ceilings
How-To

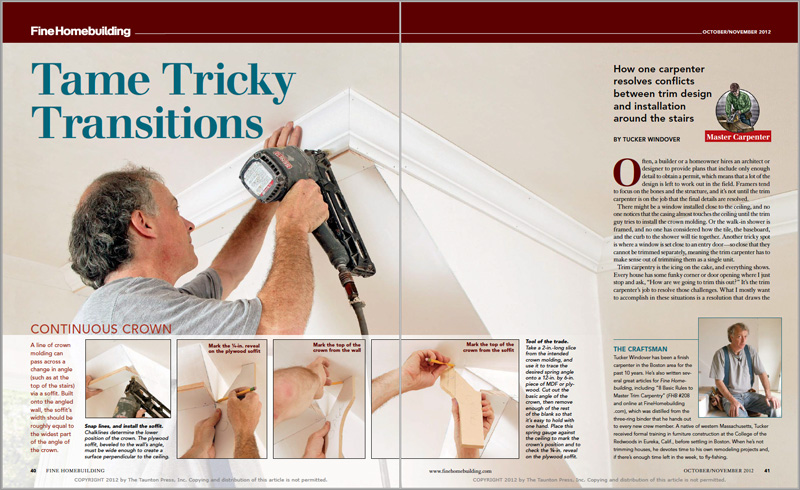
Tame Tricky Transitions

Learn how one carpenter resolves conflicts between trim design and installation around the stairs.

By Tucker Windover Issue 230 - Oct/Nov 2012

Synopsis: After the framing is done, it’s time for the trim carpenters to do their work inside the house. Frequently, they’re called on to do work to compensate for places where the framing is unsightly. In this “Master Carpenter” article, Boston-area finish carpenter Tucker Windover outlines his process for resolving issues when installing trim around stairs and when trim designs conflict. Windover illustrates how to do continuous crown and how to use a continuous cap to tie a stringer to a baseboard. This article also includes sidebars about how to level a wall so that the chair rail can be installed properly and how to use a miter-saw jig for cutting obscure angles.


Often, a builder or a homeowner hires an architect or designer to provide plans that include only enough detail to obtain a permit, which means that a lot of the design is left to work out in the field. Framers tend to focus on the bones and the structure, and it’s not until the trim carpenter is on the job that the final details are resolved.

There might be a window installed close to the ceiling, and no one notices that the casing almost touches the ceiling until the trim guy tries to install the crown molding. Or the walk-in shower is framed, and no one has considered how the tile, the baseboard, and the curb to the shower will tie together. Another tricky spot is where a window is set close to an entry door — so close that they cannot be trimmed separately, meaning the trim carpenter has to make sense out of trimming them as a single unit.

trimming and lining up wood
To make the respective base caps of the stringer and the baseboard intersect equally, you have to split the angle formed at the inside intersection in half. The tricky part comes when you try to cut the angle, which is somewhere in the vicinity of 109°. I clamp a 90° jig onto the miter-saw fence, hold the stock against the jig, eyeball the marks on the stock, and cut the correct angle, which ends up at about 19°.

Trim carpentry is the icing on the cake, and everything shows. Every house has some funky corner or door opening where I just stop and ask, “How are we going to trim this out?” It’s the trim carpenter’s job to resolve those challenges. What I mostly want to accomplish in these situations is a resolution that draws the least amount of attention to the problem. I usually can accomplish this either by showing a clear termination point or by maintaining a clean, continuous line. These kinds of problems show up at the staircase in almost every house.

Maintain continuous lines

Running trim refers to those elements such as baseboard, chair rail, or crown that travel around a room. Whenever I run trim, I try to maintain a continuous flow of lines and to avoid choppy alignments that seem arbitrary or illogical.

For example, in most situations, a chair rail should be aligned with the window stools. Unless there’s a major separation between the two (as in the high paneling of the Arts and Crafts style), a slight discrepancy looks like the designer or installer didn’t care.

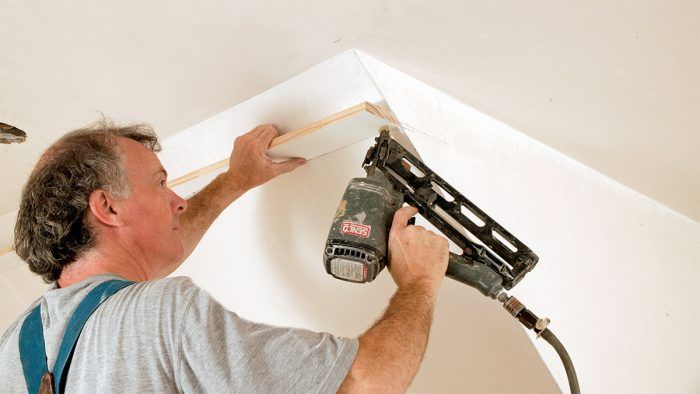
One example I commonly face is when the crown molding intersects with a roofline or the underside of a stairwell. To get around this, I build a soffit onto the angled ceiling that allows the crown to run around the room without changing its relation to the wall.

marking stair trim
Mark lines on the wall. Use a scrap piece to estab­lish the point where the two caps intersect. Hold the first piece in place, transfer the intersection and end points onto the stock, and cut the miter.

The soffit is a piece of 1x stock beveled on one edge to match the angle of the ceiling. Its width is determined by the angles of the ceiling and the crown. It has to be wide enough so that the crown can turn the corner and still maintain its spring angle. I use a plywood gauge that mimics the specific crown angle to set the soffit’s location. That location also should include a 1⁄4-in. reveal at the bottom of the crown. After snapping a reference chalkline, I nail the soffit to the ceiling, then continue the crown installation across the soffit…


tame tricky situations PDF spreadsheet

To read the entire article, click the View PDF button below.

From Fine Homebuilding #230

Also watch the companion video series:
Tricky Trim Transitions

Sign up for eletters today and get the latest how-to from Fine Homebuilding, plus special offers.

Signing you up...

This site is protected by reCAPTCHA and the Google Privacy Policy and Terms of Service apply.
See all newsletters
See all newsletters
View PDF
Previous: A Better Joint for Beaded Casings Next: Getting Casing Miters Tight

Guide

Finish & Trim Carpentry

Chapter

Interior Trim Basics

Log in or create an account to post a comment.

Sign up Log in

Become a member and get full access to FineHomebuilding.com

Finish & Trim Carpentry

Finish & Trim Carpentry

Trusted, comprehensive guidance from the pros for creating perfect trim details in any room of the house

View Project Guide

View All Project Guides »

Become a member and get unlimited site access, including the Finish & Trim Carpentry Project Guide.

Start Free Trial

Trim Design
  • Trim Style and Design
Tools and Materials
  • Tools
  • Materials
Interior Trim Basics
  • Tips and Tricks
  • Techniques
  • Using Jigs
Window and Door Casings
  • Windows
  • Doors
Baseboard and Crown Molding
  • Baseboard
  • Crown Molding
  • Specialty Crown Situations
Wainscot and Paneling
  • Beadboard Wainscot
  • Paneled Wainscot
  • Chair Rails
  • Wall Treatments
Mantels and Fireplace Surrounds
  • Design
  • Installing Mantels and Surrounds
Coffered Ceilings

Fine Homebuilding

Follow

  • twitter
  • facebook
  • instagram
  • pinterest

Newsletter

Get home building tips, offers, and expert advice in your inbox

Signing you up...

This site is protected by reCAPTCHA and the Google Privacy Policy and Terms of Service apply.
See all newsletters
See all newsletters

Membership & Magazine

  • Online Archive
  • Start Free Trial
  • Magazine Subscription
  • Magazine Renewal
  • Gift a Subscription
  • Customer Support
  • Privacy Preferences

Taunton Network

  • Green Building Advisor
  • Fine Woodworking
  • Fine Gardening
  • Threads
  • About
  • Contact
  • Advertise
  • Careers
  • Copyright
  • Terms of Use
  • Site Map
  • Do not sell my information
  • Privacy Policy
  • Accessibility
  • California Privacy Rights

© 2022 The Taunton Press, Inc. All rights reserved.

X
X
This is a dialog window which overlays the main content of the page. The modal window is a 'site map' of the most critical areas of the site. Pressing the Escape (ESC) button will close the modal and bring you back to where you were on the page.

Main Menu

  • How-To
  • Design
  • Tools & Materials
  • Video
  • Blogs
  • Forum
  • Reader Projects
  • Magazine
  • Members
  • FHB House

Podcasts

  • FHB Podcast
  • ProTalk

Webinars

  • Upcoming and On-Demand

Account

  • Log In
  • Join

Podcasts

  • FHB Podcast
  • ProTalk

Webinars

  • Upcoming and On-Demand

Popular Topics

  • Kitchens
  • Business
  • Bedrooms
  • Roofs
  • Architecture and Design
  • Green Building
  • Decks
  • Framing
  • Safety
  • Remodeling
  • Bathrooms
  • Windows
  • Tilework
  • Ceilings
  • HVAC

Magazine

  • Current Issue
  • Past Issues
  • Magazine Index
  • Subscribe
  • Online Archive
  • Author Guidelines

All Access

  • Member Home
  • Start Free Trial
  • Gift Membership

Shop the Store

  • Books
  • DVDs
  • Taunton Workshops

More

  • FHB Ambassadors
  • Reader Projects
  • Podcast
  • Customer Support

Account

  • Log In
  • Join

Newsletter

Get home building tips, offers, and expert advice in your inbox

Signing you up...

This site is protected by reCAPTCHA and the Google Privacy Policy and Terms of Service apply.
See all newsletters
See all newsletters

Follow

  • twitter
  • facebook
  • instagram
  • pinterest

Join All Access

Become a member and get instant access to thousands of videos, how-tos, tool reviews, and design features.

Start Your Free Trial

Subscribe

FHB Magazine

Start your subscription today and save up to 70%

Subscribe

We hope you’ve enjoyed your free articles. To keep reading, become a member today.

Get complete site access to expert advice, how-to videos, Code Check, and more, plus the print magazine.

Start your FREE trial

Already a member? Log in