FHB Logo Facebook LinkedIn Email Pinterest Twitter X Instagram Tiktok YouTube Plus Icon Close Icon Navigation Search Icon Navigation Search Icon Arrow Down Icon Video Guide Icon Article Guide Icon Modal Close Icon Guide Search Icon Skip to content
Subscribe
Log In
  • How-To
  • Design
  • Tools & Materials
  • Restoration
  • Videos
  • Blogs
  • Forum
  • Magazine
  • Members
  • FHB House
  • Podcast
Log In

Fine Homebuilding Project Guides

Finish & Trim Carpentry

Guide Home
  • Trim Design
  • Tools and Materials
  • Interior Trim Basics
  • Window and Door Casings
  • Baseboard and Crown Molding
  • Wainscot and Paneling
  • Mantels and Fireplace Surrounds
  • Coffered Ceilings
How-To

Picture-Frame Window Casing

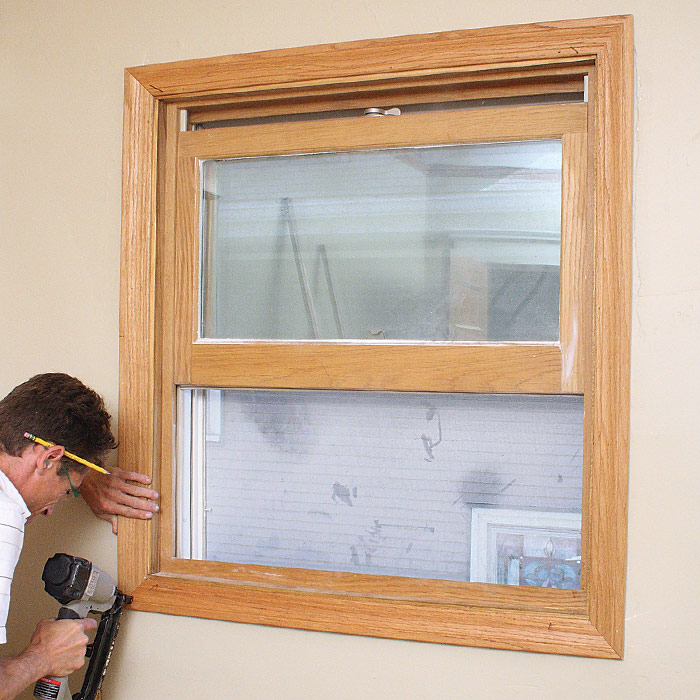
Installing mitered window casing without a stool or an apron is relatively simple, as long as everything is square. If not, you'll need to make some adjustments.

By Steve Cory
  • X
  • facebook
  • linkedin
  • pinterest
  • email
  • add to favorites Log in or Sign up to save your favorite articles

This type of molding has no stool or apron—just four casing pieces that frame the window as if it were a work of art. Picture-frame casing is often used for casement windows, where a stool would not be very usable anyway, but it’s not uncommon for sash windows in a modern house.

In theory, this type of casing is simplicity itself: Just cut four pieces to the correct lengths, all with 45-degree miters, and nail them up. And if your window jamb is perfectly square and your saw cuts perfect miters, installation might go just that smoothly. However, things are rarely perfect in this world, and if an angle is off only slightly, with picture-frame molding the imperfections are multiplied by four. So with the following steps, proceed carefully to ensure you keep all the joints nice and tight.

CHECK FOR SQUARE
1. CHECK FOR SQUARE. As with any casing installation, check the window jamb for square. For picture frame, inspect all four corners especially carefully, noting even tiny imperfections. As much as possible, adjust shims to make the corners square; time spent doing this will save installation time and help produce a neater job.


MARK THE REVEAL
2. MARK THE REVEAL. Use a plywood gauge guide or a sliding square to mark the desired reveal on all sides.


MEASURE FOR ALL FOUR PIECES
3. MEASURE FOR ALL FOUR PIECES. If the measurements for the two sides or the top and bottom differ, adjust the jamb to make them equal.


TEST THE ANGLE
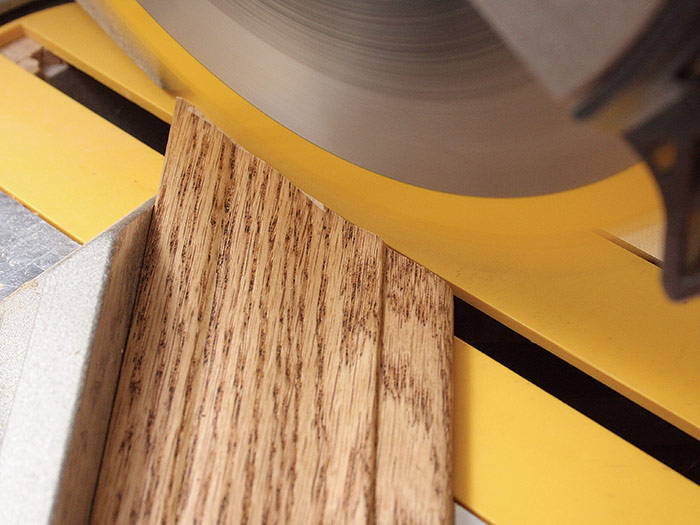
4. TEST THE ANGLE. Cut two scrap pieces of casing at 45 degrees, and hold them at all four corners to be sure they follow the angle of the jamb. If not, you may need to adjust your miter saw.


FIRST PIECE
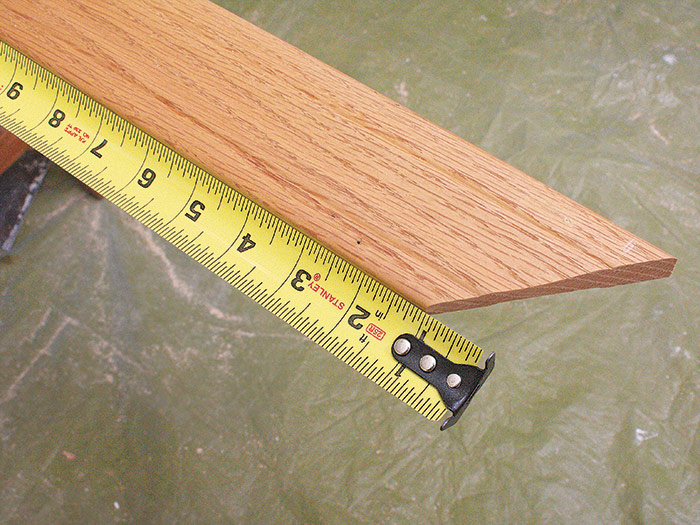
5. FIRST PIECE. Cut one end of a piece for the top or bottom. Measure for cutting the other end by burning an inch, as shown. Test the fit on both the top and the bottom.


SECOND PIECE
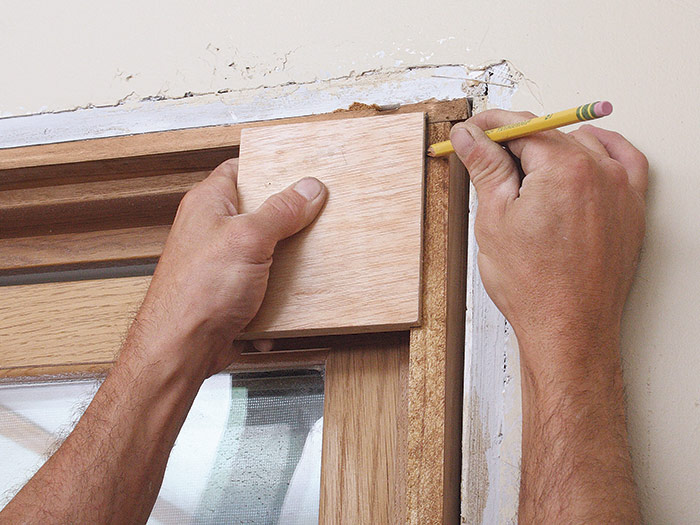
6. SECOND PIECE. If you are satisfied, use the first piece as a template to mark the tip (only the tip) of the second piece.


TACK TOP AND BOTTOM
7. TACK TOP AND BOTTOM. Use a hammer to “tack” the top and bottom pieces in places so they are aligned with the reveal lines. Partially drive two or more nails so you can remove them if you need to adjust the casing.


TIP: Use “hard trim” nails to tack the casing; they make smaller holes than regular finish nails do. Or just use a small gauge pneumatic nailer for tacking trim temporarily.


MEASURE FOR THE SIDE PIECES
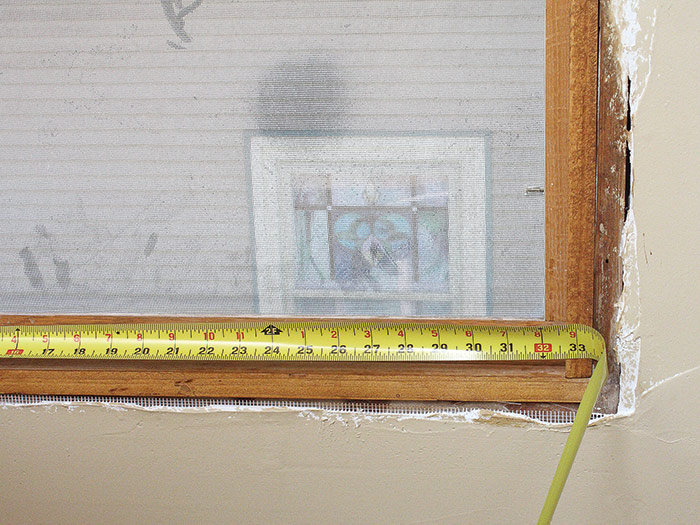
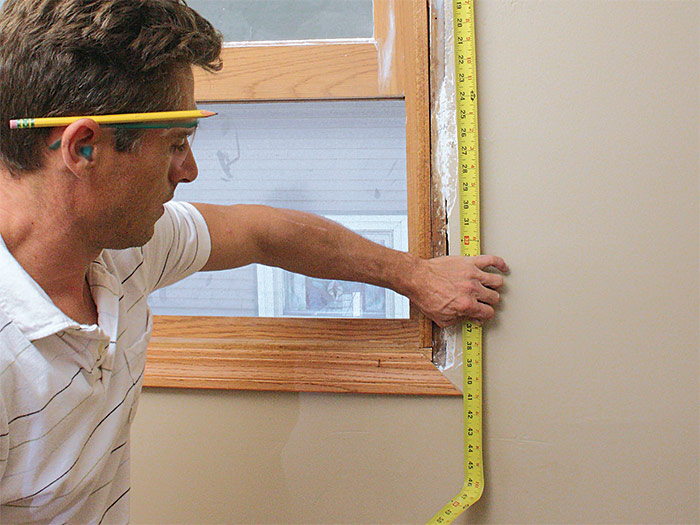
8. MEASURE FOR THE SIDE PIECES. This measurement should be the same on each side.


ADJUSTING THE FIT
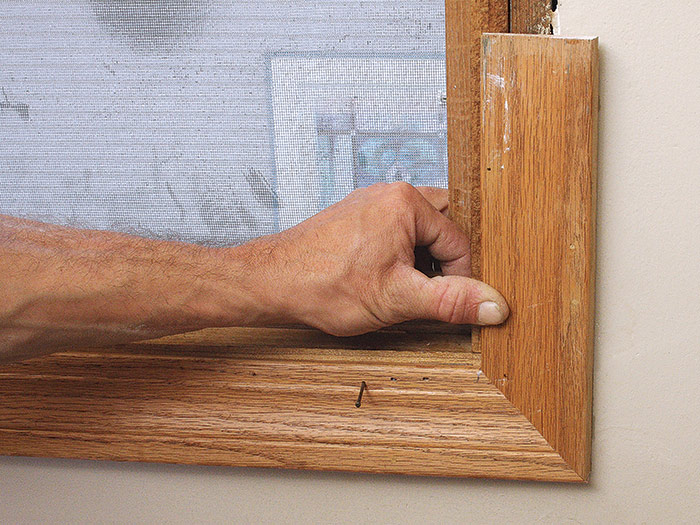
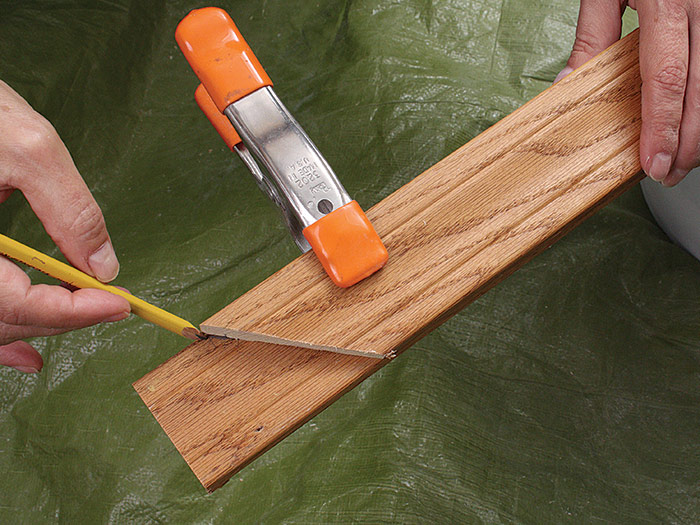
9. ADJUSTING THE FIT. Cut a side piece 1⁄8 in. or 1⁄16 in. longer than your measurement. Hold the board in place and test the fit. You may find that it only needs to have one end cut slightly to length. Or you may see that an angle or two needs to be changed very slightly. Make the adjusting cut with the miter


TIP: If you have a handsaw rather than a power miter saw, making micro-adjustments will be nearly impossible. In that case, it’s best to try to make the first cut accurate. Then make small adjustments with a plane or sander.


attaching to the wall

make a tight joint
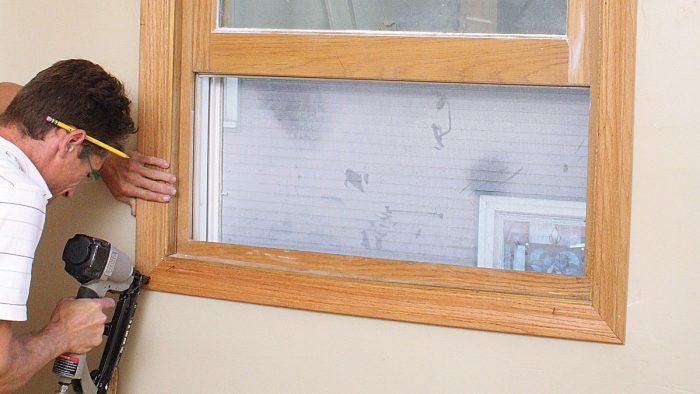
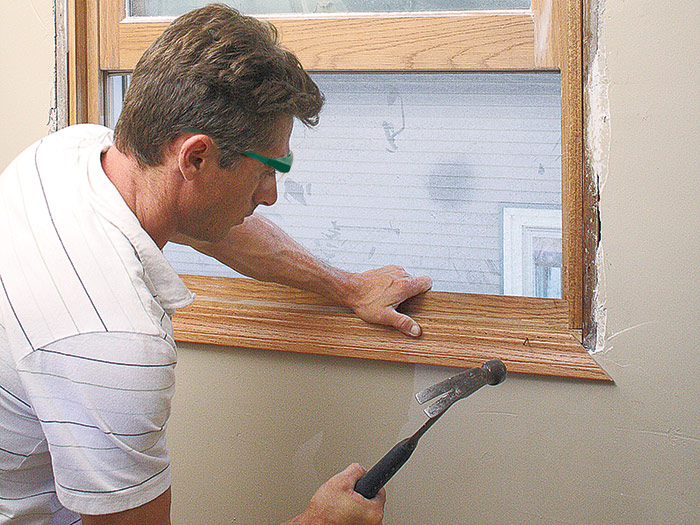
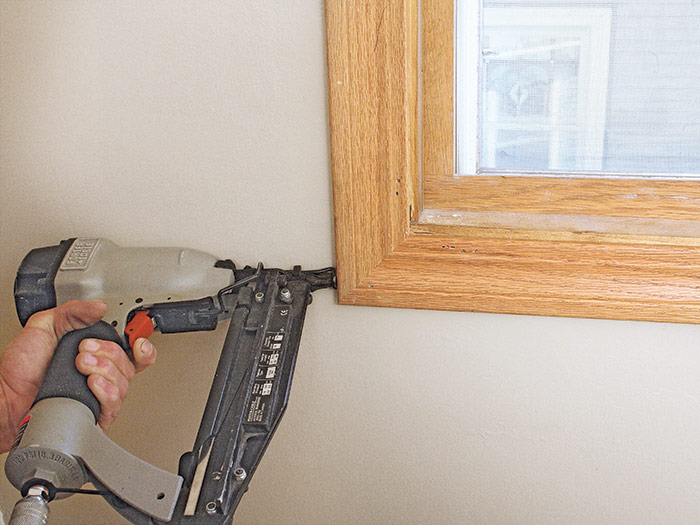
10. INSTALL THE SIDE PIECES. You may need to remove one or more nails to adjust the position of the top or bottom piece in order to make a tight joint. Once you are happy with the joints, drive finish nails to attach the casing all around. Drive a pair of nails, one into the jamb and one into the wall framing, every 16 in. or so. If you are hand nailing, use 3d hard-trim finish nails for attaching to the jamb and 6d nails for attaching to the wall.

Excerpted from Trim (The Taunton Press, 2015) by Steve Cory.

Previous: Craftsman-Style Casing Next: Installing Window Trim with Rosettes

Guide

Finish & Trim Carpentry

Chapter

Window and Door Casings

Sign up for eletters today and get the latest how-to from Fine Homebuilding, plus special offers.

Signing you up...

This site is protected by reCAPTCHA and the Google Privacy Policy and Terms of Service apply.
See all newsletters
See all newsletters

Log in or create an account to post a comment.

Sign up Log in

Become a member and get full access to FineHomebuilding.com

Finish & Trim Carpentry

Finish & Trim Carpentry

Trusted, comprehensive guidance from the pros for creating perfect trim details in any room of the house

View Project Guide

View All Project Guides »

Become a member and get unlimited site access, including the Finish & Trim Carpentry Project Guide.

Start Free Trial

Trim Design
  • Trim Style and Design
Tools and Materials
  • Tools
  • Materials
Interior Trim Basics
  • Tips and Tricks
  • Techniques
  • Using Jigs
Window and Door Casings
  • Windows
  • Doors
Baseboard and Crown Molding
  • Baseboard
  • Crown Molding
  • Specialty Crown Situations
Wainscot and Paneling
  • Beadboard Wainscot
  • Paneled Wainscot
  • Chair Rails
  • Wall Treatments
Mantels and Fireplace Surrounds
  • Design
  • Installing Mantels and Surrounds
Coffered Ceilings

Fine Home Building

Newsletter Sign-up

  • Fine Homebuilding

    Home building tips, offers, and expert advice in your inbox.

  • Green Building Advisor

    Building science and energy efficiency advice, plus special offers, in your inbox.

  • Old House Journal

    Repair, renovation, and restoration tips, plus special offers, in your inbox.

Signing you up...

This site is protected by reCAPTCHA and the Google Privacy Policy and Terms of Service apply.
See all newsletters

Follow

  • Fine Homebuilding

    Dig into cutting-edge approaches and decades of proven solutions with total access to our experts and tradespeople.

    Start Free Trial Now
    • Facebook
    • Instagram
    • X
    • LinkedIn
  • GBA Prime

    Get instant access to the latest developments in green building, research, and reports from the field.

    Start Free Trial Now
    • Facebook
    • YouTube
  • Old House Journal

    Learn how to restore, repair, update, and decorate your home.

    Subscribe Now
    • Facebook
    • Instagram
    • X

Membership & Magazine

  • Online Archive
  • Start Free Trial
  • Magazine Subscription
  • Magazine Renewal
  • Gift a Subscription
  • Customer Support
  • Privacy Preferences
  • About
  • Contact
  • Advertise
  • Careers
  • Terms of Use
  • Site Map
  • Do not sell or share my information
  • Privacy Policy
  • Accessibility
  • California Privacy Rights

© 2025 Active Interest Media. All rights reserved.

Fine Homebuilding receives a commission for items purchased through links on this site, including Amazon Associates and other affiliate advertising programs.

  • Home Group
  • Antique Trader
  • Arts & Crafts Homes
  • Bank Note Reporter
  • Cabin Life
  • Cuisine at Home
  • Fine Gardening
  • Fine Woodworking
  • Green Building Advisor
  • Garden Gate
  • Horticulture
  • Keep Craft Alive
  • Log Home Living
  • Military Trader/Vehicles
  • Numismatic News
  • Numismaster
  • Old Cars Weekly
  • Old House Journal
  • Period Homes
  • Popular Woodworking
  • Script
  • ShopNotes
  • Sports Collectors Digest
  • Threads
  • Timber Home Living
  • Traditional Building
  • Woodsmith
  • World Coin News
  • Writer's Digest
Active Interest Media logo
X
X
This is a dialog window which overlays the main content of the page. The modal window is a 'site map' of the most critical areas of the site. Pressing the Escape (ESC) button will close the modal and bring you back to where you were on the page.

Main Menu

  • How-To
  • Design
  • Tools & Materials
  • Video
  • Blogs
  • Forum
  • Project Guides
  • Reader Projects
  • Magazine
  • Members
  • FHB House

Podcasts

  • FHB Podcast
  • ProTalk

Webinars

  • Upcoming and On-Demand

Podcasts

  • FHB Podcast
  • ProTalk

Webinars

  • Upcoming and On-Demand

Popular Topics

  • Kitchens
  • Business
  • Bedrooms
  • Roofs
  • Architecture and Design
  • Green Building
  • Decks
  • Framing
  • Safety
  • Remodeling
  • Bathrooms
  • Windows
  • Tilework
  • Ceilings
  • HVAC

Magazine

  • Current Issue
  • Past Issues
  • Magazine Index
  • Subscribe
  • Online Archive
  • Author Guidelines

All Access

  • Member Home
  • Start Free Trial
  • Gift Membership

Online Learning

  • Courses
  • Project Guides
  • Reader Projects
  • Podcast

More

  • FHB Ambassadors
  • FHB House
  • Customer Support

Account

  • Log In
  • Join

Newsletter

Get home building tips, offers, and expert advice in your inbox

Signing you up...

This site is protected by reCAPTCHA and the Google Privacy Policy and Terms of Service apply.
See all newsletters
See all newsletters

Follow

  • X
  • YouTube
  • instagram
  • facebook
  • pinterest
  • Tiktok

Join All Access

Become a member and get instant access to thousands of videos, how-tos, tool reviews, and design features.

Start Your Free Trial

Subscribe

FHB Magazine

Start your subscription today and save up to 70%

Subscribe

You have 1 free article remaining.

Get complete site access, including thousands of videos, how-to tips, tool reviews, and design features.

Start your FREE trial

Already a member? Log in

We hope you’ve enjoyed your free articles. To keep reading, become a member today.

Get complete site access to expert advice, how-to videos, Code Check, and more, plus the print magazine.

Start your FREE trial

Already a member? Log in

Privacy Policy Update

We use cookies, pixels, script and other tracking technologies to analyze and improve our service, to improve and personalize content, and for advertising to you. We also share information about your use of our site with third-party social media, advertising and analytics partners. You can view our Privacy Policy here and our Terms of Use here.

Cookies

Analytics

These cookies help us track site metrics to improve our sites and provide a better user experience.

Advertising/Social Media

These cookies are used to serve advertisements aligned with your interests.

Essential

These cookies are required to provide basic functions like page navigation and access to secure areas of the website.

Delete My Data

Delete all cookies and associated data