FHB Logo Facebook LinkedIn Email Pinterest Twitter Instagram Tiktok YouTube Plus Icon Close Icon Navigation Search Icon Navigation Search Icon Arrow Down Icon Video Guide Icon Article Guide Icon Modal Close Icon Guide Search Icon Skip to content
Subscribe
Log In
  • How-To
  • Design
  • Tools & Materials
  • Videos
  • Blogs
  • Forum
  • Magazine
  • Members
  • FHB House
  • Podcast
Log In

Fine Homebuilding Project Guides

Finish & Trim Carpentry

Guide Home
  • Trim Design
  • Tools and Materials
  • Interior Trim Basics
  • Window and Door Casings
  • Baseboard and Crown Molding
  • Wainscot and Paneling
  • Mantels and Fireplace Surrounds
  • Coffered Ceilings
Drawing Board

Well-Proportioned Trim

Getting trim proportions right doesn’t take an experienced designer. All it takes is consideration and use of a few time-tested guidelines.

By Bud Dietrich Issue 253 - Aug/Sept 2015

Interior trim is such an important element of a room’s design that it deserves more than just a few seconds’ thought, yet that’s often all it gets. In particular, there’s often little thought given to one of trim’s most important aspects: its size. Many builders and homeowners head to the local lumberyard or big-box store and buy what they find without thinking through whether it’s the right size or if its proportions will enhance the room. Once it’s installed, they see that rather than dressing up the room, the trim they’ve chosen leaves the room looking flat and dull.

Trim started out with the utilitarian purpose of covering the gaps between walls and floors and between walls and ceilings, as well as the gaps between dissimilar materials such as plaster walls and wood window frames. It quickly evolved into an important design element. Shaped and milled in many different manners and styles, trim has become a way to enrich our experience of a room. But this can happen only when trim is proportioned properly.

The good news is that getting trim proportions right doesn’t take the keen eye of an experienced designer. All it takes is consideration and use of a few time-tested guidelines. The result is a room that provides a richer experience and is more comfortable to live in.

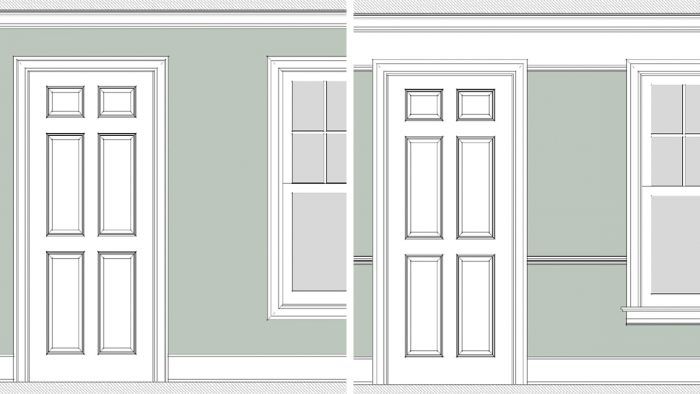
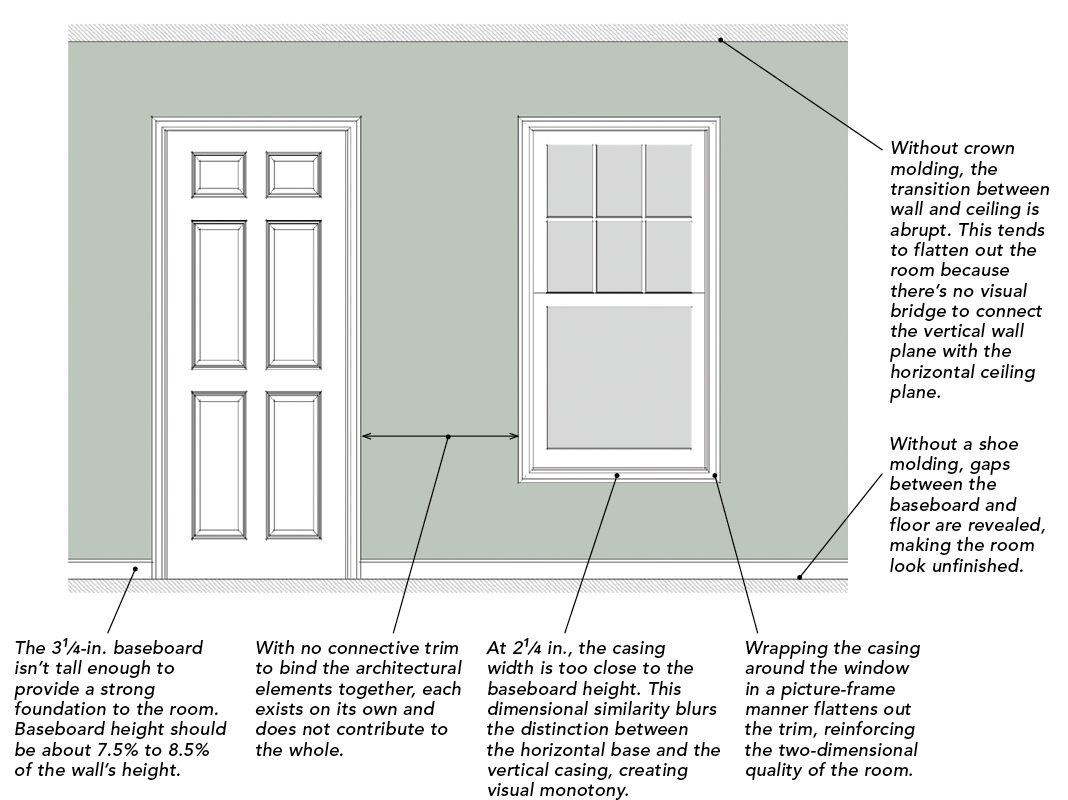
Poorly proportioned trim

Sometimes referred to as “builder’s standard,” this trim package offers just the basics. With 3-1/4-in. base and 2-1/4-in. casing, this is the trim most readily found at big-box retailers. There is no crown molding, and window casing is typically installed in a picture-frame manner. Trim of this size is usually overwhelmed by the room’s other architectural features and appears visually off. With no unifying elements, door and window openings appear as stand-alone features rather than parts of a whole, making the space appear flat and cartoonish.

Poorly Proportioned Trim

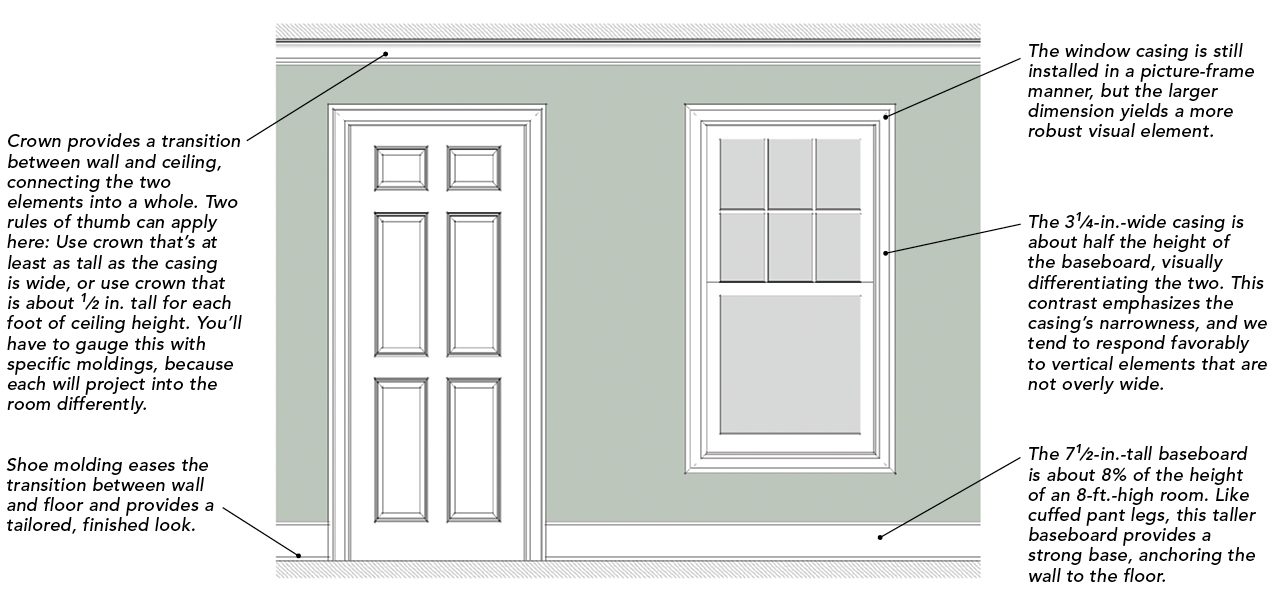
Properly proportioned trim

Simply increasing the size of the trim yields dramatic results. A 7-1/2-in. base, 3-1/4-in. casing, and 3-1/2-in. crown molding creates a more interesting room, with the crown and shoe molding easing transitions from ceiling to wall and from wall to the floor. Even with the window casing installed in a picture-frame manner, this larger, better-proportioned trim results in a more tailored look. This trim package costs more than the builder’s standard, but it’s readily available at most lumberyards and shouldn’t break the bank.

Properly Proportioned Trim

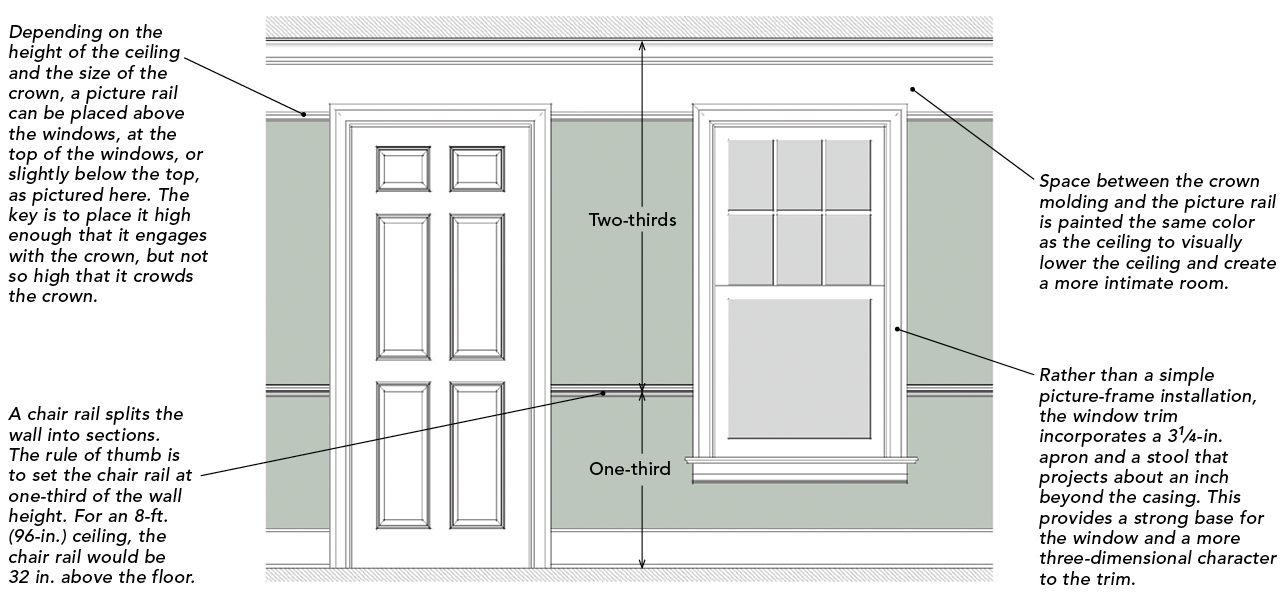
Beyond the basic trim package

In this drawing, two strong horizontal trim elements—a picture rail and a chair rail—have been added to the room with a well-proportioned base, casing, and crown. These horizontal elements unify all of the walls of the room, binding them together like the ribbon that wraps a gift. In addition, the window casing now includes a stool and an apron.

Beyond The Basic Trim Package

Drawings by: Bud Dietrich

From Fine Homebuilding #253

Sign up for eletters today and get the latest how-to from Fine Homebuilding, plus special offers.

Signing you up...

This site is protected by reCAPTCHA and the Google Privacy Policy and Terms of Service apply.
See all newsletters
See all newsletters
Previous: Master Class in Moldings Next: Classical Proportions Make Attractive Trim

Guide

Finish & Trim Carpentry

Chapter

Trim Design

Log in or create an account to post a comment.

Sign up Log in

Become a member and get full access to FineHomebuilding.com

Finish & Trim Carpentry

Finish & Trim Carpentry

Trusted, comprehensive guidance from the pros for creating perfect trim details in any room of the house

View Project Guide

View All Project Guides »

Become a member and get unlimited site access, including the Finish & Trim Carpentry Project Guide.

Start Free Trial

Trim Design
  • Trim Style and Design
Tools and Materials
  • Tools
  • Materials
Interior Trim Basics
  • Tips and Tricks
  • Techniques
  • Using Jigs
Window and Door Casings
  • Windows
  • Doors
Baseboard and Crown Molding
  • Baseboard
  • Crown Molding
  • Specialty Crown Situations
Wainscot and Paneling
  • Beadboard Wainscot
  • Paneled Wainscot
  • Chair Rails
  • Wall Treatments
Mantels and Fireplace Surrounds
  • Design
  • Installing Mantels and Surrounds
Coffered Ceilings

Fine Homebuilding

Follow

  • YouTube
  • instagram
  • facebook
  • pinterest
  • Tiktok
  • twitter

Newsletter

Get home building tips, offers, and expert advice in your inbox

Signing you up...

This site is protected by reCAPTCHA and the Google Privacy Policy and Terms of Service apply.
See all newsletters
See all newsletters

Membership & Magazine

  • Online Archive
  • Start Free Trial
  • Magazine Subscription
  • Magazine Renewal
  • Gift a Subscription
  • Customer Support
  • Privacy Preferences

Taunton Network

  • Green Building Advisor
  • Fine Woodworking
  • Fine Gardening
  • Threads
  • About
  • Contact
  • Advertise
  • Careers
  • Copyright
  • Terms of Use
  • Site Map
  • Do not sell or share my information
  • Privacy Policy
  • Accessibility
  • California Privacy Rights

© 2023 The Taunton Press, Inc. All rights reserved.

X
X
This is a dialog window which overlays the main content of the page. The modal window is a 'site map' of the most critical areas of the site. Pressing the Escape (ESC) button will close the modal and bring you back to where you were on the page.

Main Menu

  • How-To
  • Design
  • Tools & Materials
  • Video
  • Blogs
  • Forum
  • Reader Projects
  • Magazine
  • Members
  • FHB House

Podcasts

  • FHB Podcast
  • ProTalk

Webinars

  • Upcoming and On-Demand

Podcasts

  • FHB Podcast
  • ProTalk

Webinars

  • Upcoming and On-Demand

Popular Topics

  • Kitchens
  • Business
  • Bedrooms
  • Roofs
  • Architecture and Design
  • Green Building
  • Decks
  • Framing
  • Safety
  • Remodeling
  • Bathrooms
  • Windows
  • Tilework
  • Ceilings
  • HVAC

Magazine

  • Current Issue
  • Past Issues
  • Magazine Index
  • Subscribe
  • Online Archive
  • Author Guidelines

All Access

  • Member Home
  • Start Free Trial
  • Gift Membership

Shop the Store

  • Books
  • DVDs
  • Taunton Workshops

More

  • FHB Ambassadors
  • Reader Projects
  • Podcast
  • FHB House
  • Customer Support

Account

  • Log In
  • Join

Newsletter

Get home building tips, offers, and expert advice in your inbox

Signing you up...

This site is protected by reCAPTCHA and the Google Privacy Policy and Terms of Service apply.
See all newsletters
See all newsletters

Follow

  • YouTube
  • instagram
  • facebook
  • pinterest
  • Tiktok
  • twitter

Join All Access

Become a member and get instant access to thousands of videos, how-tos, tool reviews, and design features.

Start Your Free Trial

Subscribe

FHB Magazine

Start your subscription today and save up to 70%

Subscribe

We hope you’ve enjoyed your free articles. To keep reading, become a member today.

Get complete site access to expert advice, how-to videos, Code Check, and more, plus the print magazine.

Start your FREE trial

Already a member? Log in