Blower-Door-Directed Air-Sealing
Tracking down air leaks is a lot easier when you have a blower door to help you.

There are two ways to seal potential air leaks in homes: You can either seal seams that you anticipate will leak, or you can seal leaks that become evident when a blower door is used to depressurize the house. This second method of air-sealing is known as “blower-door-directed air-sealing.”
Blower-door-directed air-sealing is a method that was developed in the 1980s by weatherization specialists supported by the Weatherization Assistance Program (WAP), a 42-year-old federal agency that funds air-sealing and insulation work in the homes of low-income families.
Blower-door-directed air-sealing for new construction
Some builders of new homes perform multiple blower door tests at each home they build, using each blower door test as an opportunity to improve on the previous results. More commonly, a builder will arrange for a single blower door test, to be performed as soon as the home’s primary air barrier is complete.
If a house has a vented unconditioned attic, the primary air barrier usually includes the wall sheathing and the ceiling drywall. Assuming that the drywall contractor can visit the job site to install the ceiling drywall early in the construction process, the blower door test is performed as soon as the following steps are complete: the wall sheathing, roof sheathing, roofing, windows and doors, and ceiling drywall. (If your airtightness target is ambitious, you might conduct a second round of blower-door-directed air-sealing after the electrical and plumbing rough-in, wall insulation, and drywall work is complete.)
If the house has an unvented conditioned attic, the first (perhaps only) blower door test would be performed as soon as the wall sheathing, roof sheathing, roofing, windows, and doors are installed.
If a builder simply wants to know the home’s air-leakage rate, the blower door operator sets up quickly, determines cfm at 50 pascals of depressurization, and leaves.
If, on the other hand, the builder will be performing blower-door-directed air-sealing, the blower door contractor will be informed that the house will need to be depressurized for an hour or more, during which time workers will be on hand with caulk, tapes, canned spray foam, and duct mastic. (Duct mastic is handy to seal the backs of electrical boxes.) In some cases, it’s also useful to have scraps of rigid foam board and cap nails available.
Crank up the fan
Once the blower door has been set up, the house is depressurized, either to 30 or 50 pascals. At that point, workers can begin scurrying around the house looking for air leaks — most will be detectable with a worker’s bare hands — and will do their best to seal the home’s thermal envelope.
Conscientious builders know enough to air-seal hidden areas — for example, the walls behind a tub/shower unit, or the wall behind a metal fireplace — early in the construction process. You certainly want to address these areas before the blower door shows up.
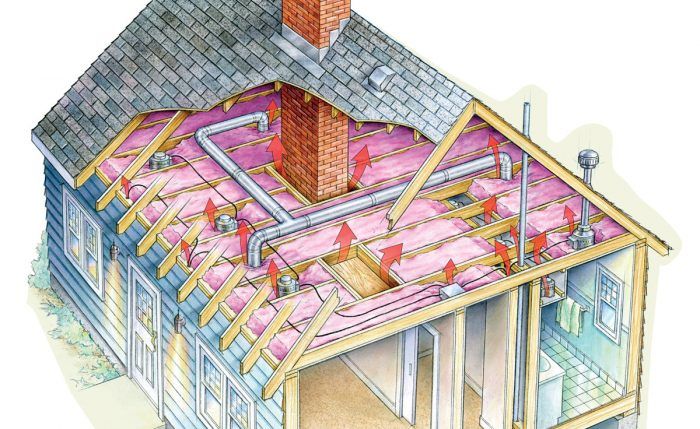
Typical leaks that are addressed by blower-door-directed air-sealing include leaks at penetrations — for example, electrical penetrations, plumbing penetrations, and around linesets for ductless minisplits. Some houses have significant air leaks between double studs and double top plates. If the ceiling has any electrical boxes, it’s especially important to focus on leaks near these boxes.
An online article advises builders to “be fanatical, systematic and persistent in finding and sealing every leak, checking your progress with the blower door as you go.”
Blower-door-directed air-sealing in an old house
If you are part of a weatherization crew, you know that blower-door-directed air-sealing always precedes the installation of attic insulation.
Obvious holes in a home’s thermal envelope can be sealed before a blower door is set up. If an inspection reveals a broken window in the basement, an attic access hatch without weatherstripping, or an unsealed vertical chase that ascends from the basement to the attic, these flaws can be corrected without having a blower door on site. Foil-faced polyiso, drywall, or OSB can be used to seal large holes. Gaping holes that are hard to seal are sometimes stuffed with a garbage bag filled with fiberglass insulation scraps. This type of improvised solution is imperfect, but can go a long ways toward making an older house more comfortable.
Once the obvious leaks are taken care of, it’s handy to have a blower door on site, because depressurization reveals the more subtle leaks that rob the home of heat on a cold winter night.
With the blower door cranked up, workers go from room to room, feeling for air leaks: near baseboards, near electrical boxes, near windows. In an older homes, leaks in finished areas of the home — for example, a leak between the finish flooring and the baseboard — can often be sealed with clear caulk. If weatherization workers plan to fill empty stud bays with dense-packed cellulose, they know that the cellulose insulation will go a long ways toward addressing air leakage through walls. They’ll keep this fact in mind as they decide where to focus their air-sealing efforts.
Although it’s only natural to start at exterior walls, don’t neglect partitions: if electrical boxes on partitions are leaky, it can be a sign of a hidden air pathway (or “bypass”) connecting a partition stud bay with the attic or a leaky rim joist. If you find this type of leak, determining how to address the leak is a matter of experience and judgment.
The most important air-sealing work generally occurs in basements, crawlspaces, and attics, since the stack effect is strongest at the lowest and highest levels of a house. In some older homes, access difficulties prevent weatherization workers from reaching likely air-leakage sites, and that’s unfortunate. Air-sealing work in an older home involves compromises: you start with the big holes that are easy to access, and then you address the small cracks that are easy to access. As the work proceeds, you should periodically check the blower-door fan’s air flow to determine whether the air-sealing work is effective. When the easy work is done, you can make a judgment call on whether it’s worth tackling the hard-to-access leaks.
While many weatherization workers just use their hands to find the air leaks, subtler leaks can often be found using a smoke pencil, a smoke bottle, or an incense stick. In cold weather, an infrared camera can also be used to find air leaks. (For more information on infrared cameras, see “An Introduction to Thermal Imaging.”)
IAQ concerns
If you’re performing air-sealing work in an older home, it’s important to understand how sealing air work affects indoor air quality. Weatherization professionals are trained in safety protocols that cover such issues as how to conduct a worst-case depressurization test of the home’s combustion equipment (to make sure that exhaust fans don’t cause backdrafting), how to determine when a home needs a whole-house ventilation system, and radon testing.
If your understanding of these issues is shaky, you should hire an experienced weatherization crew before you get into trouble.
Originally published on GreenBuildingAdvisor.com.
Old House Journal Recommended Products
Fine Homebuilding receives a commission for items purchased through links on this site, including Amazon Associates and other affiliate advertising programs.

Loctite Foamboard Adhesive

Staple Gun

Great Stuff Foam Cleaner


