
Cold-Climate Attic Air-Sealing
A Minnesota builder shares his method for ensuring a continuous air/vapor control layer.
I work in northern Minnesota, climate zone 7, where we can see delta Ts—the difference between inside and outside temperatures—reach more than 100°F. Many of the blower-door tests I conduct show leakage in the ceiling air-control layer. I wrestled with finding a solution that would not only improve the performance of the air-control layer but also provide vapor control. The latter is less of a concern but it is something I feel needs to be addressed in my climate—perhaps a discussion for another time.

Regional preference for control layers
Let’s start with what is common in my market. Polyethylene sheeting is the standard air/vapor control on both ceilings and walls. It is the product insulators in this area are accustomed to working with and what the building officials accept without any questions. Holes are cut through the poly to accommodate lighting, plumbing vents, and sometimes ductwork for forced-air heating and cooling systems, along with ductwork for heat-recovery ventilators (HRVs). Although contractors use airtight boxes and try to seal the poly around other penetrations, I still see air leaks in these areas during blower-door testing.
Strategies for keeping penetrations to a minimum
A couple years ago, I started designing my air-control layer so that almost all ceiling penetrations could be kept within the building envelope. This requires a few changes to how we typically frame and schedule the electrical, plumbing, HVAC, and insulating contractors.
In terms of the framing, I try to design homes so the entire roof is self-supported on exterior walls. This allows for a continuous air-control layer at the ceiling without any breaks at interior partition walls. I also like having a plenum truss worked into the roof design. Ductwork, venting, and plumbing that would typically be installed in the attic—outside the air-control layer—remains inside.
The ceiling air-control layer (polyethylene sheeting) is continuous to the exterior wall air-control layer (standard OSB sheeting) by extending the connection with tape over the top wall plate and connecting to the exterior wall sheeting. The poly is acting as both the air-control and vapor-control layers.
|
|
|


When installing on a flat, vented roof assembly, I have little concern with polyethylene sheeting in my climate. That said, there are times I may choose to use a product other than poly. For instance, in an unvented cathedral ceiling, or a ventilated attic, or a room where ambient temperatures are below normal—such as a wine-storage room—I may choose to use a smart vapor retarder instead of polyethylene sheeting.
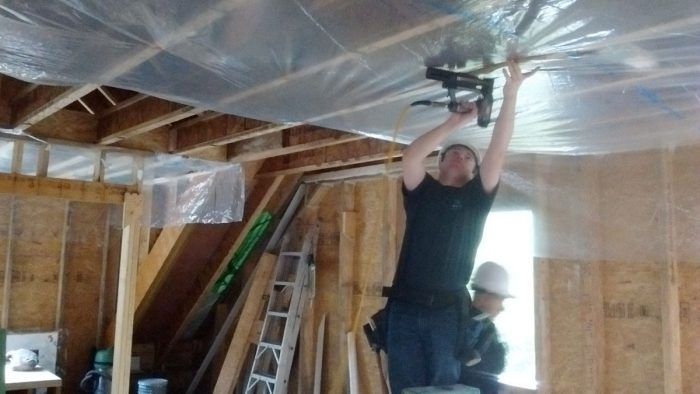
I prefer to build the shell and install the ceiling air control without cutting any of the window or door openings, so that an initial blower-door test can be conducted. The home pictured here achieved a .55 ACH50 rough-framing test result. Satisfied with that number, my crew could move onto the next phase—strapping the ceiling.
Variation on a Northeast detail
Ceiling strapping is common in some areas of North America, particularly in New England, but I have never seen this technique used in my area. The typical ceiling strapping detail includes 1X wood framing on 16-in. or 24-in. centers. I design my projects using 2X strapping. The main reason for doing so is to satisfy the electrical code. Inspectors in my area are stringent about maintaining clearance between framing and electrical wiring. The 2x strapping allows all the ceiling electrical to remain inside the envelope, but still meet the code requirements. Here, electricians use interior walls to chase the wires to the ceiling; because the wall air sealing is finished on the exterior, the exterior walls can be used only as horizontal chases for wires. No wires extend through the exterior wall top plate—that would create a penetration in the air-control layer. After ceiling strapping is complete, we move on to building the interior wall partitions.

Everyone on the same page
Once interior walls are up, the mechanical systems can be installed. In the project featured here, we were lucky that the electrician, plumber, and HVAC contractor were all from the same company—the tradespeople are used to working together and conflicts are kept to a minimum. They all know and understand the air-sealing details I have outlined here. The electrician, for example, knows it’s one hole/one wire for any penetration in the air-control layer. (It is much easier to air seal a hole with one wire, and the hole drilled can be much smaller.)
Similarly, the plumbers need to penetrate the ceiling poly for vent pipes that extend through the roof. So, after the pipes are installed, I come back through and air seal the holes. I prefer conducting my own air sealing after the mechanicals are installed—that way, the blame falls on me if something is missed.
Close-to-final steps
Lastly, in this current build, we had to penetrate the ceiling with a pair of ducts that could not be kept inside the plenum chase. These 4-in. insulated ducts were for the HRV system, which we decided to use as a replacement for bath fans in a pair of bathrooms. Bump switches in each bathroom increase the fan speed of the HRV, maintaining a balanced pressure inside this exceptionally tight home.
To date, the second blower-door test has been completed; windows and doors have been installed; most electrical, plumbing, and HVAC work is done; the insulation is in; and the drywall has been started. The second blower-door test came in at .47 ACH50, which means the home is below Passive House−level airtightness standards—scientific proof that the air-sealing details I designed for this house work.
_________________________________________________________________________
Photos courtesy of the author. Originally published on GBA.com.
Fine Homebuilding Recommended Products
Fine Homebuilding receives a commission for items purchased through links on this site, including Amazon Associates and other affiliate advertising programs.
Respirator Mask
Loctite Foamboard Adhesive
Staple Gun
