
Installing a New Window in an Old Opening
A leak-free installation depends on compatible materials and multiple layers of defense.
Synopsis: The most difficult part of installing a flanged new-construction window in an old opening is ensuring that the window is fully able to resist water infiltration. Builder and worker-training consultant Bill Robinson says that you can avoid water infiltration by keeping in mind the four Ds: deflection, drainage, drying, and durability. Robinson begins a project by removing the old window carefully, making sure that he doesn’t cut through the felt or housewrap. Next, he flashes the rough opening to prevent water from getting inside the building cavity. Robinson stresses the importance of using compatible products for the flashing system. Next, it’s time to install the window, then flash the window. Finally, the window is cased, and then Robinson caulks and air-seals the window, again using products compatible with the flashing system.
A flanged new-construction window in an existing opening can be difficult to install. The difficulty is integrating the new window’s nailing flange into the house’s existing drainage plane so that any water leaks are directed outside the building.
A leak-free installation is important because water in the wall can give mold, rot, and insects a foothold in the wall cavity. In my hot, humid Southern climate, I’ve seen poorly installed windows create major problems in only a few months.
Fortunately, you can install a new window in an existing opening without problems if you just remember the four Ds: deflection, drainage, drying, and durability. Deflection means that rain is naturally moved away from the window and the opening. Drainage allows water that does infiltrate to find its way outside the assembly unimpeded. Drying suggests that any material that does get wet shouldn’t stay wet for long. Durability tells us that the products we use to shed water should last at least as long as the window itself.
You’ll also want to follow the window manufacturer’s installation instructions to the letter. If you can’t find the instructions or if your situation is unusual, follow the guidelines in ASTM E E2112-07, which is titled “Standard Practice for Installation of Exterior Windows, Doors, and Skylights.”
Another important consideration: a properly installed window starts with a unit that’s the right size. You may be able to measure the inside of the existing window and guess the jamb thickness and rough opening, but that’s a potentially expensive mistake. A better approach is to remove the interior casing and measure the actual opening.
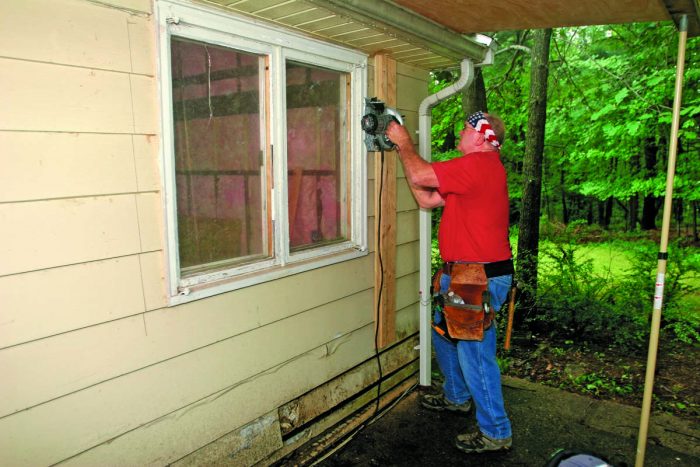
Remove the old window
The first step is to cut back the siding with a circular saw and oscillating multitool so that you can pry out the old window and integrate the new flashing materials into the existing house wrap or felt paper. Keep the cuts straight with a plywood saw guide, and take care not to cut the felt or house wrap.
|
1. Cut the siding. Use a circular saw and a cutting guide (see “Building Skills,” FHB #216) screwed to the house to cut back the siding around the window. The cut allows you to integrate the new flashing into the existing housewrap or felt and makes room for casing that will surround the window. Plan the cuts to account for the height and width of the new window, the width of the casing, and an extra 1⁄2-in. space for a 1⁄4-in. caulk joint on all sides of the window. |
 |
 |
2. Connect the corners. An oscillating multitool is perfect for finishing the cut without overshooting the corner. Plunge the multitool into the sawkerf, and nibble away at the cut. Again, try not to damage the felt paper or housewrap. Once the cuts are complete and the siding is removed, pry out the old window. |
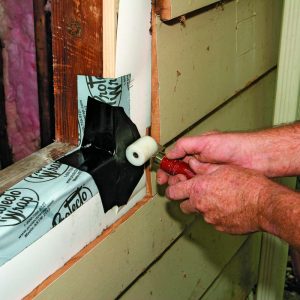
Flash the rough opening
Prepare the opening so that water won’t get inside the wall cavity, where it can cause rot and mold. Start all flashing layers at the bottom of the opening, and work toward the top so that the laps shed rather than catch water.
|
1. Slip in the flashing. Damage or cuts to the felt paper or housewrap are fixed with a 6-in. strip of vinyl coil stock (www.duraflash.net) slipped between the existing felt paper or housewrap and the siding. Start with the bottom piece, and then lap the sides over it. The top will be flashed after the window is installed. |
2. Work from the bottom up. Flexible flashing is installed over the vinyl flashing and lapped inside the opening. Flexible corners are then installed on top. A seam roller is good for applying the self-adhesive materials in corners and other tight spots. |
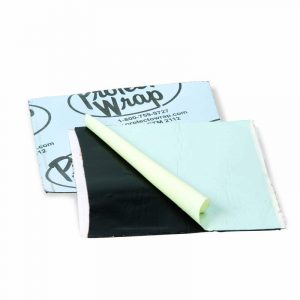
3. Sill pan is next. Protecto Wrap’s Protecto Sill Drainage System is self-adhesive with an integral back dam. Made with a fibrous top layer, it allows water to move through capillary action to the outside, even with the window sitting right on top. |
 |
 |
 |
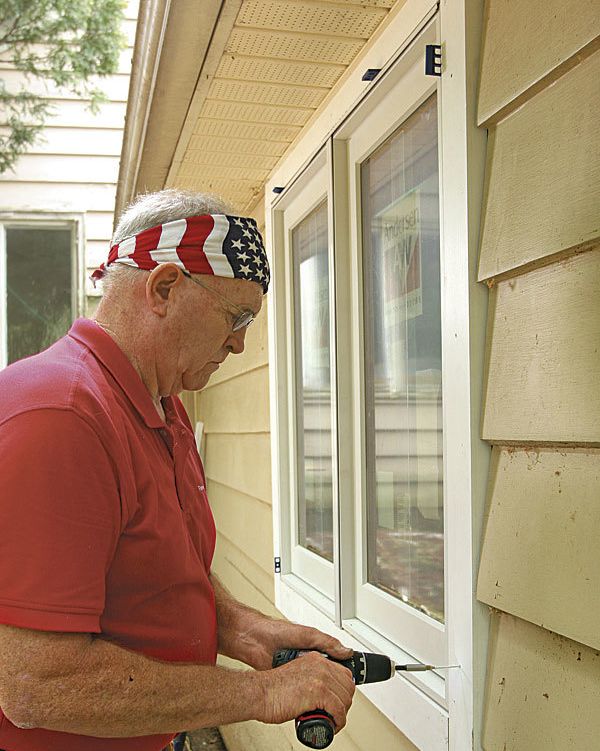
Install the window
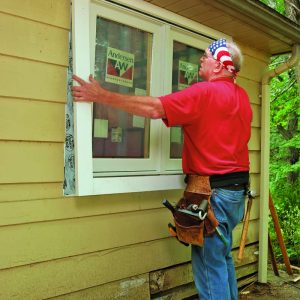
Place the window in the opening, and make sure it can be made plumb, level, and square. Get help lifting heavy units so that you don’t injure yourself or damage the window. You can eliminate the possibility of damaging the window with errant hammer blows by using screws rather than nails for installation. Be sure to follow the manufacturer’s instructions for the number and placement of fasteners.
|
1. Test-fit and seal. After test-fitting the window, remove it, and apply sealant to the top and side nailing flanges. Don’t seal the bottom flange, or water that leaks in will be unable to get out. Sealant should squeeze out the nail holes. |
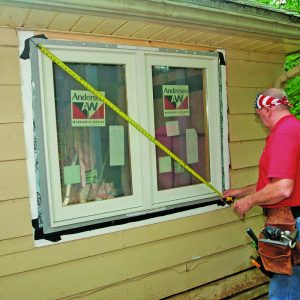
2. Square the window. Check for plumb and level, then use a truss-head screw to secure one of the top corners. With the window in place, pull diagonal measurements to ensure that the window is square. Then go inside and check the window’s operation. If it works correctly, install the rest of the screws according to the manufacturer’s directions. |
 |
 |
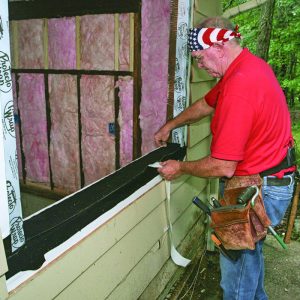
Flash the window
Flexible flashing tape covers the side nailing flanges, while the top is protected by a rigid-aluminum head flashing with the housewrap and flexible flashing layered over it. The bottom nailing flange is left exposed so that water can escape.
|
1. Flash the flanges. Apply a layer of flexible flashing to the side nailing flanges. The flashing should be lapped onto the window frame and rolled vigorously to ensure a good bond. Don’t cover the bottom flange, or it will trap water. |
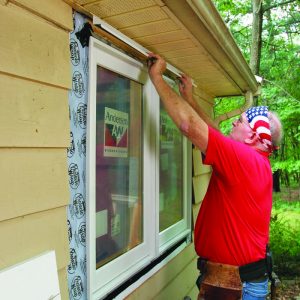
2. Install the head flashing. A rigid aluminum flashing is the window’s first defense against water intrusion. Install the flashing over the top nailing flange with roofing nails or truss-head screws. |
3. Cover the head flashing. A layer of flexible flashing directs water over the aluminum head flashing. When possible, tuck this under the housewrap or felt barrier so that water running down the building is directed away from the window opening. |
 |
 |
 |
Compatible products eliminate problems
The author’s favorite flashing system from Protecto Wrap (www.protectowrap.com) has been tested to ensure all the products work well together.
|
BT25XL Butyl Hybrid Window & Door Sealing Tape Protecto Wrap PSDS Detail Squares |
Protecto Sealant 25XL |
Protecto Sill Drainage System (PSDS) |
 |
 |
 |
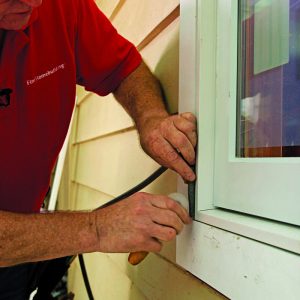
Case the window
New casing hides the window’s nailing flange and fills the gap between the unit and the existing siding. Select casing stock that’s slightly thicker than the siding, and choose a width that complements the house’s other trim elements
|
1. Install an assembled casing. Using pocket screws and glue for assembly, run the head casing over the side casing, and put the bottom between the sides. Remember to make the assembled casing 1⁄2 in. larger than the window so that you can apply a bead of sealant. |
2. Fasten the casing.
Plastic spacers from Handi-shim ensure an even gap that will be caulked later. The author prefers color-matched screws to fasten the casing to the window framing because they eliminate hammer dents |
 |
 |

(www.handi-shim.com)
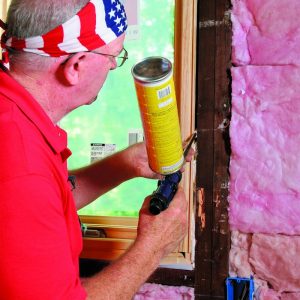
Caulk and air-seal
Paintable polyurethane caulk and spray foam are the last steps in protecting against air and water infiltration. Be sure to use a sealant that’s compatible with the window and the flashing materials.
|
1. Install backer rod. Fill the 1⁄4-in. gap around the window frame with backer rod so that the caulk will be slightly thinner than it is wide. A spline tool used to replace window screening is a great way to force the spongy material into the gap. |
2. Air-seal the inside. Use low-expansion spray foam to fill the gap between the window and the rough opening. A professional spray gun applies a more precise bead, and its high-yield canisters are a better value than straw-dispensed foam. |
 |
 |

For more photos and details, click the View PDF button below:

View Comments
Please remember folks, new windows can ruin the look of your entire house and the neighborhood. Old wood windows before 1940 can last 200 + years as long as they are maintained and not neglected. New window sashes are even with the window casing - not set back creating a nice shadow line as the originals. Also any replacement must be TDL True Divided Light for the snap in grids or between the glass muntins will really trash your house. Let the buyer beware! Best of luck!