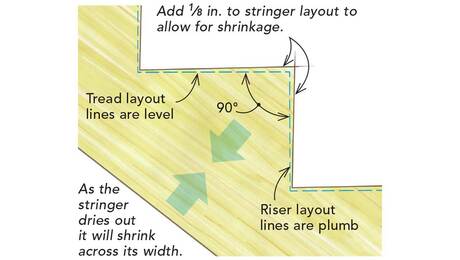
Some carpenters swear by stair gauges for use with a framing square during stairstringer layout. But I’ve encountered problems with stair gauges. First, the cheaper six-sided gauges are difficult to set accurately because the edge of the gauge that contacts the edge of the lumber sits off the edge of the framing square. And while my good Starrett stair gauges align exactly with the edge of the square, they have not solved the problems posed by the lumber. The edges of lumber have defects: nicks, knotholes and wane (sloped edges caused by the rounded edge of the tree). When the gauge falls on one of these imperfections, it throws off the layout.
Another problem occurs when the lumber used for the stringer is just long enough for the layout. In these cases, for the first and/or last step, one of the gauges has nothing to bear against because it’s off the end of the board.
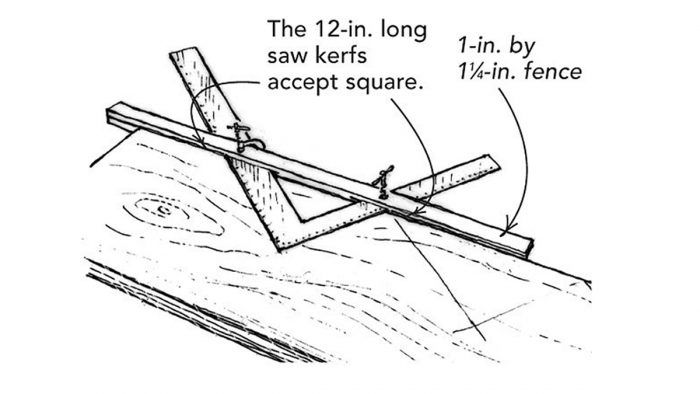
Because of these problems, I’ve stopped using stair gauges to lay out stair stringers. Instead, I use a stair jig with an adjustable fence, as shown in the drawing. The jig consists of a framing square, a fence and two tiny C-clamps. The fence is 32 in. long, a full 1 in. thick and 1-1/4 in. wide.
To make the fence, I ripped a 12-in. long kerf from each end of the fence, with the material standing on edge as I fed it into my tablesaw. I made this kerf in the center of the 1-in. thickness of the board. Stopping the rip at 12 in. left an area of uncut wood about 8 in. long in the center of the fence.
To set up the jig, I slide the fence over the legs of the rafter square, set it to the desired layout and clamp it in place. In use, the fence rides along the board and easily bridges imperfections in the lumber. It also holds the square in the correct position right up to the end of the board. Once the fence is fabricated, it takes no longer to set up this jig than it does to affix stair gauges. This jig also can be used to lay out rafters.
John Carroll, Raleigh, NC
Edited and Illustrated by Charles Miller
From Fine Homebuilding #152


View Comments
Excellent. I had thought, but not enough, about how to make it reversible. But I realized a drilled hole here and there couldn't hurt a square so that a small screw can hold the square and the guide firmly.
I have found the most accurate way to lay out a stair is to calculate the length of the hypotenuse of the rise/run, and mark it on the top edge of the stringer with a tape measure using consecutive marks. This will give you a precise point for the point of intersection for each riser/tread. Lay your square on these points and set your stair gauges to fix he rise/run. Simply move the square along, making sure it aligns with the marks you have made, thus eliminating the inevitable creep that can occur from a dull pencil or a misaligned gauge.