Ceiling Remodel: From Flat to Cathedral
Reframing exploits unused attic space and helps to open up a cramped ranch house.
Synopsis: When builder Mike Guertin was remodeling a ranch-style house in his neighborhood, one of his tasks was to open up the low ceiling of the family room. In doing so, Guertin did a ceiling remodel, turning a flat-ceilinged room into one with a cathedral ceiling. Before Guertin started working, he came up with a ceiling design, then began the demolition, taking care to save (and ultimately recycle) the existing ceiling joists, which saved some money at the lumberyard. Guertin also did some extra work fixing a sagging roof with tapered shims. This article includes a sidebar on determining when it’s necessary to consult an engineer for a remodeling project.
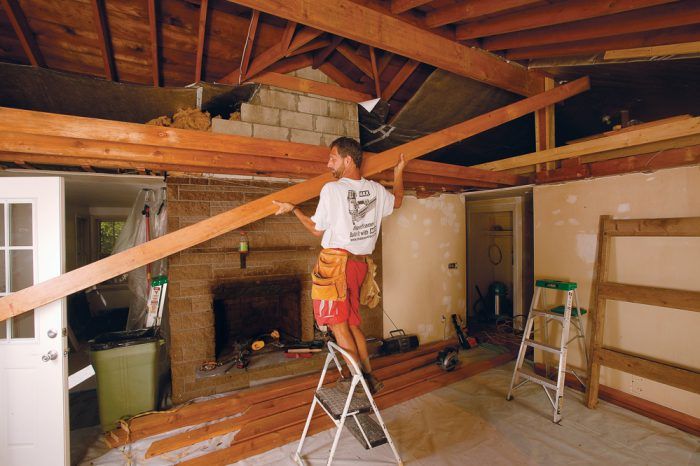
Most of the homes in my neighborhood are ranch style, built in the late ’50s and early ’60s. They all seem to have low ceilings that often measure 88 in. high, which makes them feel cramped and dark. Such a low ceiling is especially out of scale in a 16-ft. by 18-ft. family/living room, as was the case in a ranch I was remodeling. A quick peek in the attic confirmed that the framing was conventional rafters, not trusses. This meant that I could transform the room by adding a structural ridge and reframing the ceiling. The new ceiling would add about 42 in. of height at the center and improve the character of the room. By recycling the existing ceiling joists, I’d need to buy only drywall and a bit of lumber.
Finish the design before starting work on the demolition
I had two options for the ceiling design: a monoslope vault that ran uninterrupted from the exterior wall to the interior bearing wall; or what I would call a gable vault, which created a false ridge in the middle of the room. This second option seemed in keeping with a ranch house, more so than the monoslope of ’80s contemporary-style homes. To gain the greatest height in the new ceiling, I decided to insulate and drywall right to the underside of the existing 2×6 roof rafters.
Before tearing out the plaster ceiling, I moved the rock-wool ceiling insulation to another part of the attic to minimize demolition mess. I also rerouted electrical wiring that crossed the ceiling joists. In the attic, I slipped in a pair of 2x12s long enough to span from the gable end to the bearing wall in the hall that would support the roof once the ceiling joists and strapping were removed. The old ceiling joists act like rafter ties for the roof, resisting the outward thrust of the rafters and preventing the exterior walls from bowing outward. A new structural ridge beam beneath the ridge would accomplish the same goal.
Careful demolition saves both the floor and lumberyard expenses
I covered the hardwood floor with moving blankets, then a layer of 6-mil plastic for protection and for easier cleanup. The old 16-in.-wide gypsum board and 1 ⁄2-in.-thick plaster are easiest to remove by pulling them down along the seams. I usually start by knocking a small hole with a wrecking bar and letting the weight of the plaster assist the removal, working my way across the ceiling. Don’t forget to wear a good respirator and eye protection when doing this kind of work.
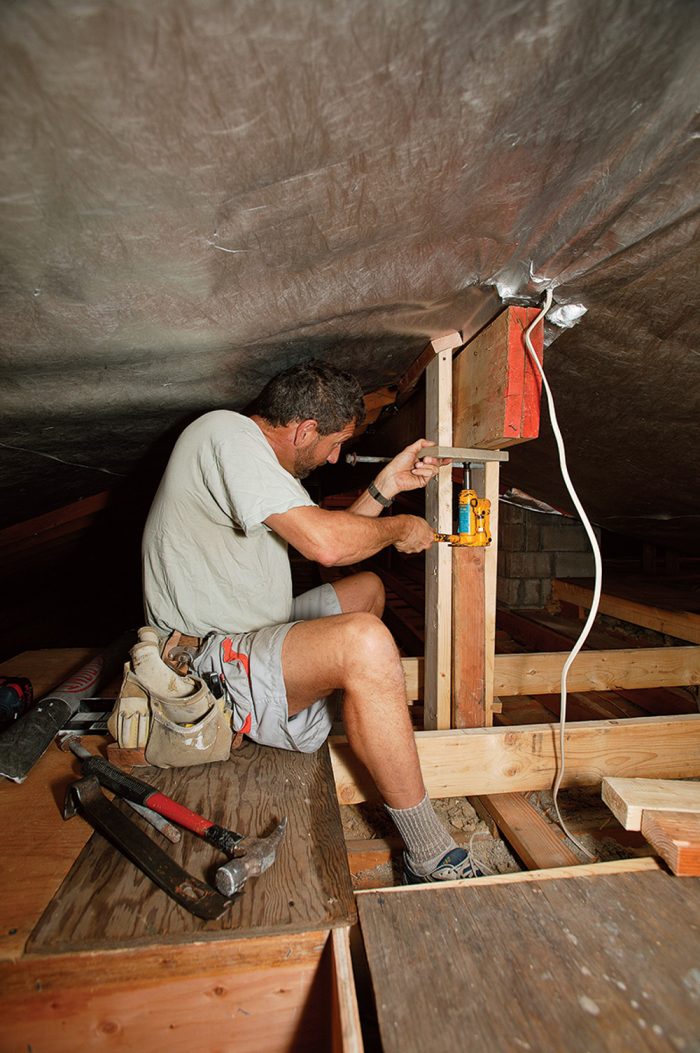
The strapping usually can be pried off the ceiling joists without much of an effort. Rather than beating everything to a pulp with a wrecking bar after I’d cleared the rafters, I used a reciprocating saw fitted with a bimetal blade to cut the toenails pinning the joists to the plates; this process prevented the joist ends from splitting. Once the nails had been removed, the strapping and the joists would provide much of the lumber needed to frame the new ceiling.
Shims correct roof sag, and a new rafters extend to a false ridge
Plans call for two skylights to be installed after the roofing is replaced, so this was the perfect time to frame the roof in preparation. I doubled the rafters on each side, then added the headers above and below the future skylight locations.
The roof rafters had an obvious sag in the middle of the room. Rather than ignoring it, I ripped tapers on some 2x3s and nailed them to the underside of each rafter to create a uniform ceiling plane. I recut the old ceiling joists and used them to frame the other side of the new ceiling at the same 5-in-12 pitch of the existing roof. I side-nailed the false rafters to the roof rafters at the top and toenailed them to a beam at the bottom. The end wall was framed with 2×4 studs and cleated along the top to carry the ceiling drywall. After installing new lighting and air- conditioning registers, I hung and finished the drywall, blew in cellulose insulation, then painted. The results were better than I expected.
Framing for new space

Because I removed the ceiling joists that reinforce the walls against the weight and thrust of the roof, I added a structural ridge. The double 2×12 beam spans from the outer gable wall to an interior bearing wall and is supported at both ends by king and jack studs. I also added new rafters to frame the other half of the gabled ceiling.
Retrofit a structural ridge beam before demolition
Before tearing out the ceiling, I brought a double 2×12 beam to the attic to support the portion of the ridge where I would remove the ceiling. The existing ridge board bears directly on the top edge of the new beam. With the beam’s far end set in a pocket at the gable, I raised the inboard end of the beam into place by using a pair of 2×6 king studs as a lifting jig.


Make the original roof better
Older roofs like this one were underinsulated and underbuilt, so this was a good time to rectify the situation. I also planned to install skylights at some point in the future, so this was my opportunity to add the extra framing.
Frame now for skylights later. Sister rafters without the tails are cut from the old ceiling joists. After the roof nails protruding through the sheathing are bent flat adjacent to the rafters, the top of a sister rafter is aligned alongside the existing one. Oriented this way, the only friction to overcome is at the seat cut and the top cut.

Straighten a sagging roof with tapered shims. The roof above the living room sagged to the point where I couldn’t ignore it. The ridge was bowed, and the rafters had an obvious sag in the middle of the room. To determine the severity of the problem, I set two stringlines as guides, one just above the top wall plate and one at the centerline of the room. Both lines were blocked out 21⁄2 in. from the face of the rafters and strung from opposite sides of the room. After consecutively lettering the rafters, I clamped a long, straight 2×3 to the side of each one. I lettered each 2×3 with the same letter as the rafter and aligned it with the stringlines at each end. After using the edge of the rafter to scribe the shim, I unclamped the 2x3s, ripped them along the scribe lines, and screwed each one to the underside of its rafter. In addition to straightening the interior plane of the roof, the 2x3s added extra depth to the rafter bays for extra insulation. Alternatively, I could have sistered each 2×6 rafter with a 2×8 or 2×10, but that would have used more lumber and also would have reduced the width of the bays and their insulation.

Combine insulation and venting. Custom vent chutes made from 1-in. rigid-foam insulation are fit in each rafter bay;1-in.-wide strips taped along the edges space the panels off the roof sheathing and form the vent channel. Added later, 6 in. of blown cellulose will create a ceiling insulated to R-25.
Recycled ceiling joists make good rafters
Careful demolition saved me a trip to the lumberyard. After finding the centerline, I used the old joists as the new rafters on the gable vault. The open gable end was framed last.
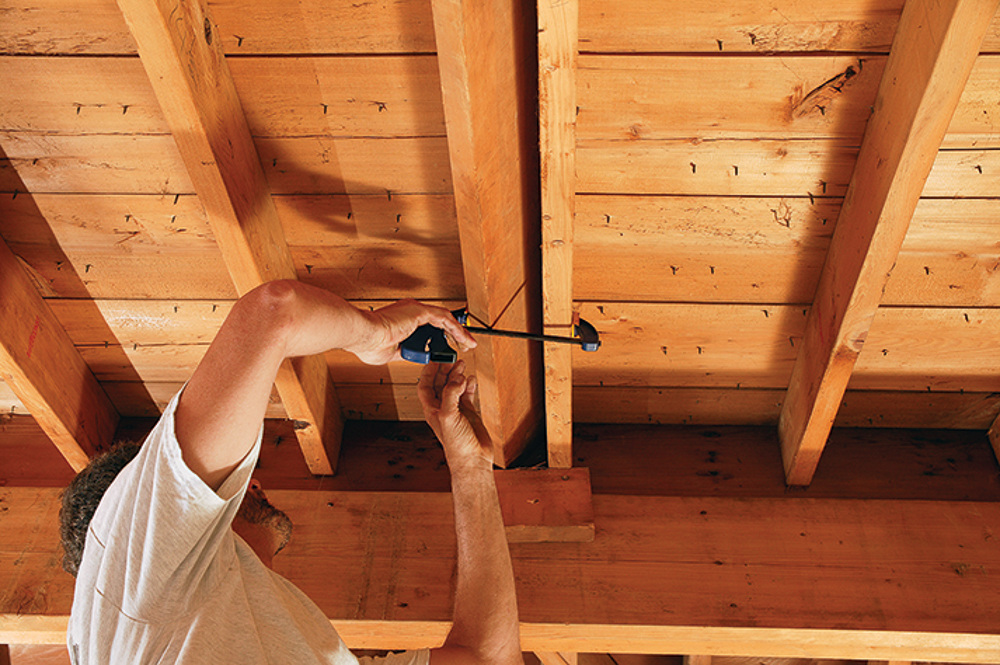
Make a better false ridge with straight lines. I used a plumb bob at both ends of the room to locate the center (1), then snapped a chalkline on the ceiling between them (2). The chalkline indicated where the bottom of the false rafters would cross the existing ones to form the vault. I drove screws into the rafters partially to support the rafter tops (inset photo), and I toenailed the tails into the double 2×6 that supported the old ceiling along the face of the interior fireplace wall (3). Each rafter top then was spiked to the primary rafters with four 12d nails.
Photos by Charles Bickford
Related stories:
- Five Cathedral Ceilings That Work
- Keeping Cathedral-Ceiling Walls From Bowing
- Comfortable Cathedral Ceilings
From Fine Homebuilding #192
For more photos, drawings, and details, click the View PDF button below:
Fine Homebuilding Recommended Products
Fine Homebuilding receives a commission for items purchased through links on this site, including Amazon Associates and other affiliate advertising programs.

Leather Tool Rig

Guardian Fall Protection Pee Vee

Bluetooth Earmuffs