Rigid Foam on the Roof and Walls
This energy smart detail will increase R-value and prevent condensation.
Remodelers who open up fiberglass-insulated walls in the middle of the winter are often surprised to see a thin layer of frost on the interior side of the wall sheathing. The frost indicates that warm, humid interior air is leaking through the all penetrations, leading to condensation on the cold surface of the sheathing.
One way to limit this phenomenon is to keep the sheathing warm by adding a layer of rigid-foam insulation on the exterior side of the sheathing. If there are no cold surfaces in the wall cavities, condensation is unlikely. A layer of exterior foam also makes a house more energy efficient by increasing insulating performance, reducing thermal bridging, and minimizing air leakage.
All three types of rigid-foam insulation—expanded polystyrene (EPS), extruded polystyrene (XPS), and polyisocyanurate—are suitable for use on the exterior of walls and roofs, though they do not perform equally. EPS is the most vapor permeable of the three types; at R-4, it also has the lowest R-value per inch. Foil-faced polyiso is the least vapor permeable and has the highest R-value per inch, at R-6.5. XPS (R-5 per in.) and the denser types of EPS can extend below grade, but polyiso absorbs water and therefore should not be installed in contact with soil.
Every wall needs a water-resistive barrier such as asphalt felt or housewrap. It’s also possible to use rigid foam as a barrier, as long as foam seams are sealed with a suitable tape or installed with Z-flashing. Regardless of your choice of barrier, all penetrations, including windows and doors, need to be flashed properly; these flashings need to be integrated with the barrier using adequate overlaps or durable tapes.
Exterior foam is a good option for walls and roofs, new or old
Adding exterior foam to walls works well for new construction. As long as you meet local wind and earthquake codes, it’s usually possible to build a foam-sheathed wall without structural oriented strand board (OSB) or plywood sheathing. Foam-sheathed walls are braced using one of four methods:
• Diagonal 1×4 let-in braces.
• Diagonal T-profile steel strapping, such as Simpson TWB.
• Inset shear panels.
• A few strategically placed pieces of OSB (they are usually installed at corners).
Of course, you should check with an engineer and your local building official before finalizing your wall-bracing plan.
Exterior foam sheathing is often installed on existing homes as an energy-saving retrofit when new roofing or siding is needed. You can install rigid foam on the inside of a wall as well, but adding exterior foam increases the R-value of a wall or roof without eating up interior living space.
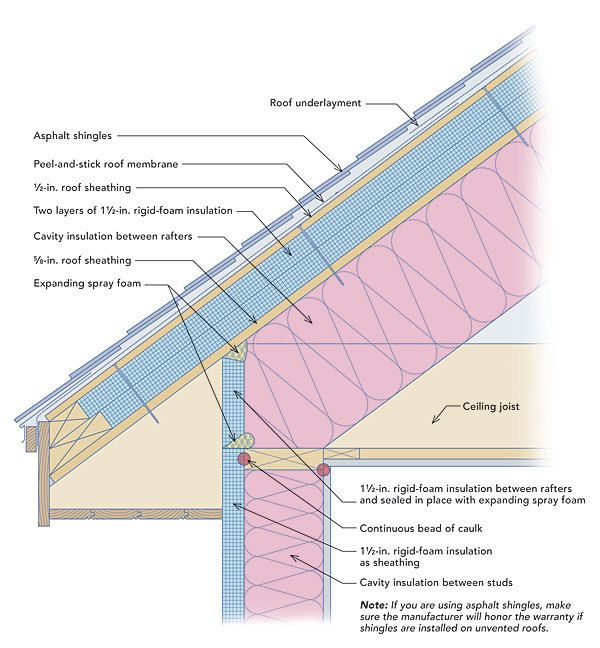
Installed on the roof, exterior foam makes the living space below more comfortable and reduces the likelihood of ice dams.
The illustration shows two layers of OSB or plywood roof sheathing: a lower layer conventionally nailed to the rafters and an upper layer installed as a nailing surface for the roofing material on top of the rigid foam. The type of fasteners used and the way they need to be spaced for the top layer of sheathing depend on the pitch of the roof and roof loads, particularly wind and snow loads. It’s fairly easy to find screws with a pullout-resistance rating exceeding 400 lb., even when they are secured just to plywood or OSB sheathing. The fastener rating increases if the screws are driven into the rafters. (Fastener sources include Wind-lock and FastenMaster, which manufactures HeadLok and OlyLog screws.)
Most foam-sheathed walls include a rain-screen gap between the foam and the siding. After the foam is tacked in place temporarily with a few nails, it is secured in place with vertical 1×3 or 1×4 strapping that is screwed through the foam to the underlying studs. Some siding types, including cedar shingles, may require a drainage mat, kerfed horizontal furring, or an OSB or plywood nailer over the foam.
Does exterior foam create a wrong-side vapor barrier?
Some builders worry that exterior foam sheathing is a “wrong-side vapor barrier” that can trap moisture in walls. In new construction without interior polyethylene vapor barriers, the worry is baseless. As long as the foam sheathing is thick enough, it will reduce the chance that moisture will accumulate in a wall. By warming the wall cavity, exterior foam eliminates cold surfaces where moisture can condense. Here are the minimum R-values for exterior foam for 2×6 walls:
• R-15 in climate zones 7 and 8
• R-11.25 in climate zone 6
• R-7.5 in climate zone 5
• R-3.75 in climate zone 4
When exterior rigid foam is used as an energy-saving detail in warmer climates, condensation is not a concern, so no minimum R-values apply.
Since exterior foam reduces a wall’s ability to dry to the exterior, foam-sheathed walls should be able to dry to the interior. That means that foam-sheathed walls should never include interior polyethylene or vinyl wallpaper. Painted drywall has a high enough permeance to allow any incidental moisture that enters a wall cavity in the winter to evaporate through the drywall during the summer.
If you are considering installing exterior foam on a house with interior 6-mil polyethylene, proceed with caution. If water ever enters a wall with foam sheathing and interior poly, the wall has a very limited ability to dry. This raises the stakes, and water-management details must be impeccable.
Increase insulation and prevent condensation
The benefits of adding a layer of rigid-foam insulation to the exterior of walls and roofs are twofold. First, the foam will increase thermal performance by adding R-value and minimizing thermal bridging. Second, the foam will keep the sheathing warm, so moisture passing through the wall or roof will find no cold surfaces for condensation to occur. For this reason, the roof does not need to be vented. That’s why exterior roof foam makes a lot of sense on difficult-to-vent hipped roofs or on roofs with multiple dormers.
RELATED STORIES
Fine Homebuilding Recommended Products
Fine Homebuilding receives a commission for items purchased through links on this site, including Amazon Associates and other affiliate advertising programs.
Disposable Suit
Staple Gun
Caulking Gun


View Comments
Where would I look to figure out my climate zone? Great article.
Here's one place:
https://www2.iccsafe.org/states/Phoenix2006/Phoenix_Energy/PDFs/Chapter%203_Climate%20Zones.pdf
Do shingles - especially black shingles - suffer heat damage without a ventilation channel immediately underneath the top layer of plywood?
the illustration says to check with your manufacturer in fine print on the bottom regarding your question and would seem to imply that "yes" they can
I’m such a hater, that the icc safe.org blocked me , ha!