How to Install Garden-Shed Windows and Doors - Fine Homebuilding FHB Logo Facebook LinkedIn Email Pinterest Twitter Instagram Plus Icon Close Icon Navigation Search Icon Arrow Down Icon Video Guide Icon Article Guide Icon Modal Close Icon Guide Search Icon Skip to content
Main Menu
Subscribe

In every issue you'll find...

  • Expert insights on techniques and principles
  • Unbiased tool reviews
  • Step-by-step details to master the job
  • Field-tested advice and know-how
Subscribe Now!
Subscribe
  • How-To
  • Design
  • Tools & Materials
  • Videos
  • Blogs
  • Forum
  • Magazine
  • Members
  • FHB House
  • Podcast
  • Join
  • Log In
Main Menu Subscribe
How-To

How to Install Garden-Shed Windows and Doors

Tack the windows in place with screws before you check for level and permanently fasten them

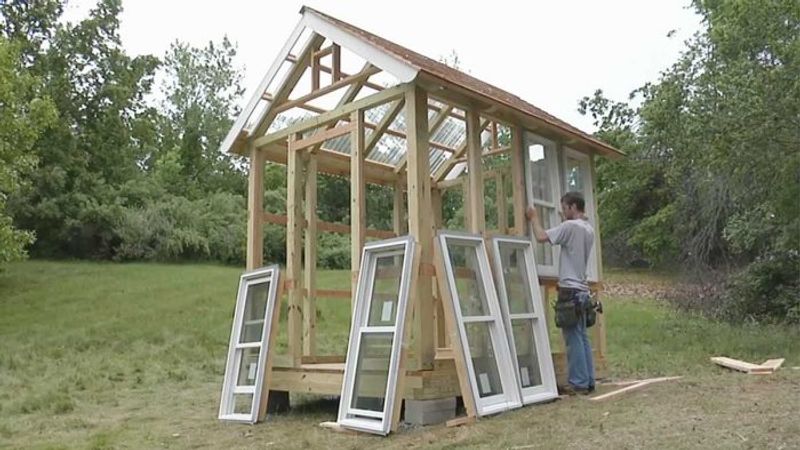
If you are building your own windows, you would have the luxury of sizing them to fit between the posts of your timber-frame shed. We got ours as a bargain-bin deal at our local lumber yard, so we need to do a little bit of shimming on either side of the opening, so we just ripped down some 2x4s. As the windows go in, you will need to run in and out of the shed to check reveals and alignment, so now is a good time to cut the girt and sill out of the doorway.

I’m not going to bother with flashing tape on the nail flanges. This shed isn’t living space, and it doesn’t have any weather barrier like felt paper of housewrap, so I’m simplifying our window installation. I’mjust going to tack each window in place with a couple of pan-head screws, then check it for level and plumb, and then finish fastening it.

Anytime you have a wall with several windows in it and you’re going to have trim in between them, you need to be sure you have nice, even spaces between the windows so you don’t have to do any tapered rip cuts to fit your trim in. Right now I’m just checking for plumb and tweaking the windows before I put in all of the screws. With all seven windows in place, it’s time to move on to the door.

We won’t be including a threshold on our door, partly because I’m not trying to seal the shed against drafts, and partly because not having a sill makes it easier to sweep out. But without a threshold, I do need to make sure the bottom of the jamb legs and the door slab are sealed. Then I just tip the door into place, hold it temporarily with some shims, and then go back outside and adjust the door so it projects ¾-in. from the frame, which will put it in the same plane as the board siding that will come later.

I use long screws to secure the jamb to the framing, then adjust the screws as necessary to get the jamb straight and plumb, and finally, insert shims to lock everything into its final position.

We have to put furring strips on the lower half of the building so that the thin siding and trim at the bottom of the shed will be in plane with the thicker board-and-batten above. The dividing line between these two types of siding will be a sill that runs around the whole shed.

I’m spacing the top of my furring strips down 2-1/8-in. from the top of the girt that runs around the entire building. That’s because I’m going to put a sill extension in that space. That extension is going to sit right on top of the furring strips.

Now I’m not going to slide my furring strips all the way to the corner of the building; I want to slide them in far enough that I still have room to fasten my corner boards but I also leave an edge exposed for nailing on my clapboards.

To ensure that the mitered corners of my sill extensions line up correctly, I use a short place-holder block to help align each of them to their mating pieces. Then I fasten it to the vertical furring strips below. Once the sill is fitted and fastened on both gables, fill in with a longer piece. After the pieces are all in place, I’m going to come back and put screws in each of the mitered corners.

Just like I furred out the lower portion of the frame for the clapboards, I need to fur out the upper trim boards to match the battens in the board-and-batten siding.

That does it for the furring; the next episode will cover trim and siding.

Sign up for eletters today and get the latest how-to from Fine Homebuilding, plus special offers.

Sign Up

Get home building tips, offers, and expert advice in your inbox

×
X
X

Videos in the Series

  • How to Build a Garden Shed: Introduction

    In this video series you’ll see the step-by-step process as we fabricate and assemble all the parts of this garden shed including the tips and techniques you’ll need to know to build one for yourself.

  • How to Build a Foundation and Frame a Floor for a Garden Shed

    Construct a sturdy platform for your outdoor storage space out of compacted gravel, concrete blocks, and pressure-treated 4x4s

  • How to Frame Garden-Shed Walls with Half-Lapped 4X4s

    For the walls of this shed I wanted to continue the same timberframe look without the complicated joinery. So, just like with the floor frame, I relied on half lap…

  • How to Frame a Garden-Shed Roof and Install Skip Sheathing for Cedar Shingles

    The half laps at the top of the roof rafters are basically the same as the half laps used for the floor and walls, but they are set on an…

  • How to Install Cedar-Shingle and Clear-Polycarbonate Roofing on a Shed

    Follow along with custom builder Justin Fink as he finishes each side of this simple shed roof with different materials.

  • How to Install Garden-Shed Windows and Doors

    Tack the windows in place with screws before you check for level and permanently fasten them

  • How to Install Corner Boards, Skirtboards, and Clapboards on a Garden Shed

    Add furring strips and assemble your cornerboards first to make this job go smoothly

  • How to Install Board-and-Batten Siding on a Garden Shed

    The boards and battens on the upper half of the shed are a combination of primed 1x10 and 1x4 trim boards. The first step is to install blocking in several…

New Feature

Fine Homebuilding Forums

Ask questions, offer advice, and share your work

About This Video Series

Backyard sheds are a popular do-it-yourself project.  They’re relatively quick to build and have a little taste of everything from framing to finish. Not surprisingly, there’s no shortage of information on the topic, and a lot of it is pretty predictable.  So, when our colleagues at Fine Gardening asked us to design a shed for them, we decided to build something a little different. This shed has no stud walls, no asphalt shingles, and not… More about this Video Series

View Comments

  1. Suburbanguy | May 10, 2019 03:45am | #1

    The shed is very lovely, but I'd make the suggestion that you rip a recessed groove, just inside of the edge of the underside of the sill to act as a drip edge. It will prevent potential rot and minimize discolouration from water running down the skirtboards. "In days past" when window sills were of wood, all good carpenters cut these grooves in the underside of the sill. The continuous sill around the perimeter of this shed is no different. Tom Silva, on This Old House, brought it to the viewer's attention during one episode.

Log in or create an account to post a comment.

Sign up Log in

Become a member and get full access to FineHomebuilding.com

Up Next

Featured Story

FHB Podcast 316: Pro Talk With Dennis Bessette

Podcast 316: PRO TALK With Dennis Bessette

In this Pro-Talk podcast, Patrick talks to Vermont cabinetmaker Dennis Bessette about his decades spent working in the trades.

Featured Video

Micro-Adjust Deck-Baluster Spacing for an Eye-Deceiving Layout

No math, no measuring—just a simple jig made from an elastic band is all you need to lay out a good-looking deck railing.

Related Stories

  • Fix a Timber Retaining Wall

  • Slinky Shade Screens

  • Alternative Patio Base

  • Podcast 201: Broken Bricks, Unloved Concrete, and Portable Tablesaws

Discussion Forum

Recent Posts and Replies

  • |
  • |
  • |
  • |
  • |
  • |
View More Create Post

Highlights

  • Fine Homebuilding All Access
  • Fine Homebuilding Podcast
  • Tool Tech

    Plus, get an extra 20% off with code GIFT20

  • "I have learned so much thanks to the searchable articles on the FHB website. I can confidently say that I expect to be a life-long subscriber." - M.K.

    Get home building tips, offers, and expert advice in your inbox

    Sign Up See all newsletters

Video

View All
  • Podcast 201: Broken Bricks, Unloved Concrete, and Portable Tablesaws

  • Podcast Episode 180: Rigid Foam Over Roofs, Warm-Climate Insulation Details, and Fuel-Efficient Work Trucks

  • How to Install a Vinyl Privacy Fence: Layout Post Holes

  • How to Install a Vinyl Privacy Fence: Dig and Prepare the Post Holes

View All

Outdoor Spaces

View All
  • Fix a Timber Retaining Wall

  • Slinky Shade Screens

  • Alternative Patio Base

  • Podcast 201: Broken Bricks, Unloved Concrete, and Portable Tablesaws

View All

BOOKS, DVDs, & MERCH

Shop the Store
  • 2020 Fine Homebuilding Archive

    Buy Now
  • Code Check Building 4th Edition

    Buy Now
  • Musings of an Energy Nerd

    Buy Now
  • Fine Homebuilding Magazine Slipcase

    Buy Now
  • Shop the Store

Fine Homebuilding Magazine

  • Issue 297 - February/March 2021

    • Foundations for Success
    • Staircase Renovation
    • Ditch the Hose
  • Issue 296 - Dec 2020/Jan 2021

    • Insulating Glass Keeps Getting Better
    • Simple Way to Make Old Walls Straight and Plumb
    • Making Sense of Minisplits
  • Issue 295 - Kitchens & Baths

    • Condo Kitchen Reimagined
    • Row-House Remodel
    • Rise of the IAQ Monitor
  • Issue 294 - Oct/Nov 2020

    • Schoolhouse Reimagined
    • Tool Test: Folding Sawhorses
    • A Better Way to Build Tall Walls
  • Issue 293 - Aug/Sept 2020

    • A Practical Guide to Fall Protection
    • Installing Frameless Cabinets
    • Make Any Tablesaw Safer

Fine Homebuilding

Follow

Newsletter

Get home building tips, offers, and expert advice in your inbox

Sign Up See all newsletters

Membership & Magazine

  • Online Archive
  • Start Free Trial
  • Magazine Subscription
  • Magazine Renewal
  • Gift a Subscription
  • Customer Support
  • Manage Preferences

Taunton Network

  • Green Building Advisor
  • Fine Woodworking
  • Fine Gardening
  • Threads
  • About
  • Contact
  • Advertise
  • Privacy Policy
  • Careers
  • Copyright
  • Terms of Use
  • Accessibility

© 2021 The Taunton Press, Inc. All rights reserved.

    Main Menu

  • How-To
  • Design
  • Tools & Materials
  • Video
  • Blogs
  • Forum
  • Reader Projects
  • Magazine
  • Members
  • FHB House
  • Podcasts

  • FHB Podcast
  • ProTalk
  • Account

  • Log In
  • Join

    Podcasts

  • FHB Podcast
  • ProTalk
  • Popular Topics

  • Kitchens
  • Business
  • Bedrooms
  • Roofs
  • Architecture and Design
  • Green Building
  • Decks
  • Framing
  • Safety
  • Remodeling
  • Bathrooms
  • Windows
  • Tilework
  • Ceilings
  • HVAC

    Magazine

  • Current Issue
  • Past Issues
  • Magazine Index
  • Subscribe
  • Online Archive
  • Author Guidelines

    All Access

  • Member Home
  • Start Free Trial
  • Gift Membership

    Shop the Store

  • Books
  • DVDs
  • Taunton Workshops

    More

  • FHB Ambassadors
  • Reader Projects
  • Podcast
  • Customer Support

    Account

  • Log In
  • Join

Newsletter

Get home building tips, offers, and expert advice in your inbox

Sign Up See all newsletters

Follow

Join All Access

Become a member and get instant access to thousands of videos, how-tos, tool reviews, and design features.

Start Your Free Trial

Subscribe

FHB Magazine

Start your subscription today and save up to 52%

Subscribe

We hope you’ve enjoyed your free articles. To keep reading, become a member today.

Get complete site access to expert advice, how-to videos, Code Check, and more, plus the print magazine.

Start your FREE trial

Already a member? Log in