How to Build a Foundation and Frame a Floor for a Garden Shed - Fine Homebuilding FHB Logo Facebook LinkedIn Email Pinterest Twitter Instagram Plus Icon Close Icon Navigation Search Icon Arrow Down Icon Video Guide Icon Article Guide Icon Modal Close Icon Guide Search Icon Skip to content
Main Menu
Subscribe

In every issue you'll find...

  • Expert insights on techniques and principles
  • Unbiased tool reviews
  • Step-by-step details to master the job
  • Field-tested advice and know-how
Subscribe Now!
Subscribe
  • How-To
  • Design
  • Tools & Materials
  • Videos
  • Blogs
  • Forum
  • Magazine
  • Members
  • FHB House
  • Podcast
  • Join
  • Log In
Main Menu Subscribe
How-To

How to Build a Foundation and Frame a Floor for a Garden Shed

Construct a sturdy platform for your outdoor storage space out of compacted gravel, concrete blocks, and pressure-treated 4x4s

Every spring, countless numbers of homeowners embark on the quintessential outdoor project—a shed to hold their lawn and garden tools, outdoor furniture, and toys. The first step is to choose a location for the shed. The next step is to get the function and style of your shed right. Then, with plans in hand, you can determine what type of foundation you need.

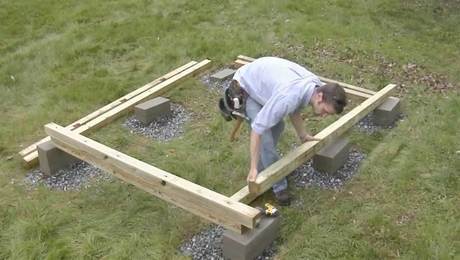
Sometimes you need to pour concrete piers for a shed, but often you can build a shed on precast piers or simple concrete blocks placed on compacted gravel, as you’ll see here. The trick is getting the blocks level, which you can do with a spirit-level clamped to a straight board that is long enough to span between the blocks.

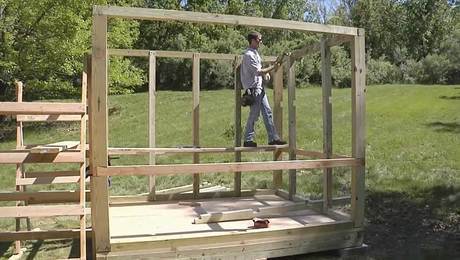
With a firm foundation in place, it’s time to frame the floor. Again, there are a number of methods, from common stick framing with pressure treated 2x6s, to the timber frame style floor shown here, which is build with pressure treated 4x4s.

You have options for the floor itself, too. Here, you’ll see how to use 2x material, which is sturdy enough to be the finished floor, without subflooring. Just make sure your floor frame is square before you nail down the flooring—it’ll make the rest of the project much smoother.


Video transcript: Here’s the location for our new shed. It’s relatively flat, cleared of growth, and ready for us to get started. For this shed foundation, I’m going to set concrete blocks atop pads of compacted gravel. I use a tamper to help pack the gravel into a uniform surface and to help prevent settling. I like building sheds atop concrete blocks because they’re inexpensive and easy to work with. If your site is hilly or requires stacking more than a few blocks to get the foundation level, you’ll need to either do some preliminary site work to level the area, or consider choosing poured concrete piers instead.

It’s a good idea to start with 4-in. blocks laid on the gravel pad, and then if you need to, use 2-in. blocks for a finer height adjustment. If you need to make adjustments finer than that, it’s best to either add or remove some gravel from the pad. At this point in the process, you’re just looking to get the blocks close to level, so use the highest corner as a benchmark, and then level the other corners with the help of a long board and a box-beam level. You can tweak them some more once the floor frame is in place. We’re looking really good here. It’s time to move on to the floor.

Let’s look at the shed’s floor frame, where you’re going to learn the technique. When you strip away the floorboards you’ll see that each side of the floor frame is made from a pair of pressure-treated 4x4s. The whole perimeter of the frame locks together at the corners, and the floor joists just drop into the notches. Joist hangers or other metal connectors aren’t necessary because these joists rest on top of the 4×4 below.

Let me show you how I lay these out and cut my notches. I’m going to cut six of these. After cutting to length, clamp together all of the pieces that need to be notched. Make sure that the ends are lined up flush on one end and trimmed to length on the other end. Next, I’ll need to mark out my notches and cut them, a process that involves a circular saw and a hammer. Our window rough openings are determined by this layout, so it’s crucial to get it aligned correctly. I set the saw blade to the required depth of cut, which is half the thickness of my 4x4s. Don’t assume the 4x4s are a standard 3-1/2″ square. If they’re wet, and they likely will be, they may be swollen. Adjust your halfway mark accordingly.

I make my first two passes with the blade just removing the marked line. I’m comfortable making this cut freehand, but a saw guide or straight piece of lumber can also be clamped to the stack to help keep you on the line.

The rest of the passes are just to kerf the lumber so it’s easier to remove, so these can be cut without a guide. Aim for no more than 1/4 in. between kerfs; otherwise it will be difficult to knock the kerfed lumber loose with the hammer.

Finish cleaning up the knocked-out kerfs with a router and straight bit. A pair of clamped guides keep the router from wandering into the shoulders of the notch.

Now that I’ve got my floor-framing pieces cut, I’m going to assemble the pairs, then lay them out on the blocks and fasten them together.

For assembling all of the half-laps throughout this project, I’m using structural screws, which are made by several companies. The beauty of these fasteners is that they’re very strong but zip right in without pilot holes. Next, I take diagonal measurements to check that the assembly is square. Ideally, the two measurements should be within 1/8 in. of each other. If not, persuade the frame a bit with a hammer and a block.

The floor of the shed is simply a combination of 2×6 and 2×10 framing lumber: durable and visually interesting. The boards are fastened to the underlying frame with epoxy-coated decking screws. Just like the 4×4 components, these floorboards are likely to be wet from the lumberyard and a bit swollen. I want to install them tight to each other so that when they dry out and shrink, I’m not left with excessive gaps. Although I’m using 10-footers to avoid waste, nominal lumber sometimes varies a bit in length from board to board. Flush up one end as you lay the boards, and if the opposite ends overhang the floor frame at all, trim them in place.

Sign up for eletters today and get the latest how-to from Fine Homebuilding, plus special offers.

Sign Up

Get home building tips, offers, and expert advice in your inbox

×
X
X

Videos in the Series

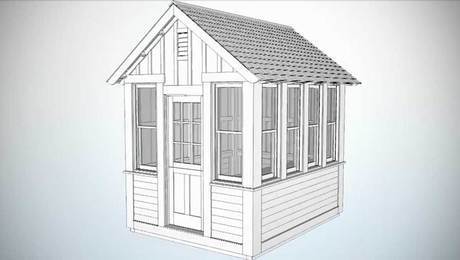
  • How to Build a Garden Shed: Introduction

    In this video series you’ll see the step-by-step process as we fabricate and assemble all the parts of this garden shed including the tips and techniques you’ll need to know to build one for yourself.

  • How to Build a Foundation and Frame a Floor for a Garden Shed

    Construct a sturdy platform for your outdoor storage space out of compacted gravel, concrete blocks, and pressure-treated 4x4s

  • How to Frame Garden-Shed Walls with Half-Lapped 4X4s

    For the walls of this shed I wanted to continue the same timberframe look without the complicated joinery. So, just like with the floor frame, I relied on half lap…

  • How to Frame a Garden-Shed Roof and Install Skip Sheathing for Cedar Shingles

    The half laps at the top of the roof rafters are basically the same as the half laps used for the floor and walls, but they are set on an…

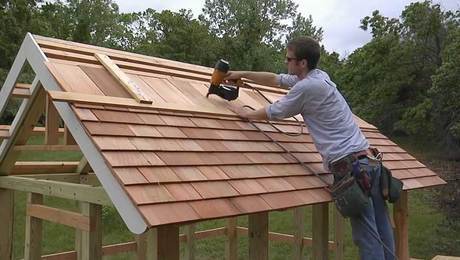
  • How to Install Cedar-Shingle and Clear-Polycarbonate Roofing on a Shed

    Follow along with custom builder Justin Fink as he finishes each side of this simple shed roof with different materials.

  • How to Install Garden-Shed Windows and Doors

    Tack the windows in place with screws before you check for level and permanently fasten them

  • How to Install Corner Boards, Skirtboards, and Clapboards on a Garden Shed

    Add furring strips and assemble your cornerboards first to make this job go smoothly

  • How to Install Board-and-Batten Siding on a Garden Shed

    The boards and battens on the upper half of the shed are a combination of primed 1x10 and 1x4 trim boards. The first step is to install blocking in several…

New Feature

Fine Homebuilding Forums

Ask questions, offer advice, and share your work

About This Video Series

Backyard sheds are a popular do-it-yourself project.  They’re relatively quick to build and have a little taste of everything from framing to finish. Not surprisingly, there’s no shortage of information on the topic, and a lot of it is pretty predictable.  So, when our colleagues at Fine Gardening asked us to design a shed for them, we decided to build something a little different. This shed has no stud walls, no asphalt shingles, and not… More about this Video Series

View Comments

  1. acarl0720 | Nov 13, 2018 02:22pm | #1

    It seems that you just set the floor frame on top of stacked blocks. Isn't this risky as far as keeping the shed in place? A good bump from the side could slide the entire shed off center and possibly off the blocks entirely.

  2. S_curvy | Apr 04, 2019 06:28pm | #2

    As comment #1 points out, lateral forces are a real concern, and here in California, tremors and high winds can knock the shed off the fndn and/or out of square. I would feel more comfortable putting 1/2” plywd down first, and then set the plank flooring.

Log in or create an account to post a comment.

Sign up Log in

Become a member and get full access to FineHomebuilding.com

Up Next

Featured Story

FHB Podcast 317

Podcast 317: Natural Air Changes, Flashing Windows in Brick Walls, and Cleaning Construction Messes

Rob, Kiley, and Patrick hear from listeners about going all-electric and air-sealing adventures before taking listener questions about natural air changes, flashing windows in brick openings, and how clean a job site should be.

Featured Video

Install Cable Rail Around Wood-Post Corners

How to Install Cable Rail Around Wood-Post Corners

Use these tips to keep cables tight and straight for a professional-looking deck-railing job.

Related Stories

  • Fix a Timber Retaining Wall

  • Slinky Shade Screens

  • Alternative Patio Base

  • Podcast 201: Broken Bricks, Unloved Concrete, and Portable Tablesaws

Discussion Forum

Recent Posts and Replies

  • |
  • |
  • |
  • |
  • |
  • |
View More Create Post

Highlights

  • Fine Homebuilding All Access
  • Fine Homebuilding Podcast
  • Tool Tech

    Plus, get an extra 20% off with code GIFT20

  • "I have learned so much thanks to the searchable articles on the FHB website. I can confidently say that I expect to be a life-long subscriber." - M.K.

    Get home building tips, offers, and expert advice in your inbox

    Sign Up See all newsletters

Video

View All
  • Podcast 201: Broken Bricks, Unloved Concrete, and Portable Tablesaws

  • Podcast Episode 180: Rigid Foam Over Roofs, Warm-Climate Insulation Details, and Fuel-Efficient Work Trucks

  • How to Install a Vinyl Privacy Fence: Layout Post Holes

  • How to Install a Vinyl Privacy Fence: Dig and Prepare the Post Holes

View All

Outdoor Spaces

View All
  • Fix a Timber Retaining Wall

  • Slinky Shade Screens

  • Alternative Patio Base

  • Podcast 201: Broken Bricks, Unloved Concrete, and Portable Tablesaws

View All

BOOKS, DVDs, & MERCH

Shop the Store
  • Fine Homebuilding Magazine Slipcase

    Buy Now
  • 2020 Fine Homebuilding Archive

    Buy Now
  • Musings of an Energy Nerd

    Buy Now
  • Code Check Building 4th Edition

    Buy Now
  • Shop the Store

Fine Homebuilding Magazine

  • Issue 297 - February/March 2021

    • Foundations for Success
    • Staircase Renovation
    • Ditch the Hose
  • Issue 296 - Dec 2020/Jan 2021

    • Insulating Glass Keeps Getting Better
    • Simple Way to Make Old Walls Straight and Plumb
    • Making Sense of Minisplits
  • Issue 295 - Kitchens & Baths

    • Condo Kitchen Reimagined
    • Row-House Remodel
    • Rise of the IAQ Monitor
  • Issue 294 - Oct/Nov 2020

    • Schoolhouse Reimagined
    • Tool Test: Folding Sawhorses
    • A Better Way to Build Tall Walls
  • Issue 293 - Aug/Sept 2020

    • A Practical Guide to Fall Protection
    • Installing Frameless Cabinets
    • Make Any Tablesaw Safer

Fine Homebuilding

Follow

Newsletter

Get home building tips, offers, and expert advice in your inbox

Sign Up See all newsletters

Membership & Magazine

  • Online Archive
  • Start Free Trial
  • Magazine Subscription
  • Magazine Renewal
  • Gift a Subscription
  • Customer Support
  • Manage Preferences

Taunton Network

  • Green Building Advisor
  • Fine Woodworking
  • Fine Gardening
  • Threads
  • About
  • Contact
  • Advertise
  • Privacy Policy
  • Careers
  • Copyright
  • Terms of Use
  • Accessibility

© 2021 The Taunton Press, Inc. All rights reserved.

    Main Menu

  • How-To
  • Design
  • Tools & Materials
  • Video
  • Blogs
  • Forum
  • Reader Projects
  • Magazine
  • Members
  • FHB House
  • Podcasts

  • FHB Podcast
  • ProTalk
  • Account

  • Log In
  • Join

    Podcasts

  • FHB Podcast
  • ProTalk
  • Popular Topics

  • Kitchens
  • Business
  • Bedrooms
  • Roofs
  • Architecture and Design
  • Green Building
  • Decks
  • Framing
  • Safety
  • Remodeling
  • Bathrooms
  • Windows
  • Tilework
  • Ceilings
  • HVAC

    Magazine

  • Current Issue
  • Past Issues
  • Magazine Index
  • Subscribe
  • Online Archive
  • Author Guidelines

    All Access

  • Member Home
  • Start Free Trial
  • Gift Membership

    Shop the Store

  • Books
  • DVDs
  • Taunton Workshops

    More

  • FHB Ambassadors
  • Reader Projects
  • Podcast
  • Customer Support

    Account

  • Log In
  • Join

Newsletter

Get home building tips, offers, and expert advice in your inbox

Sign Up See all newsletters

Follow

Join All Access

Become a member and get instant access to thousands of videos, how-tos, tool reviews, and design features.

Start Your Free Trial

Subscribe

FHB Magazine

Start your subscription today and save up to 52%

Subscribe

We hope you’ve enjoyed your free articles. To keep reading, become a member today.

Get complete site access to expert advice, how-to videos, Code Check, and more, plus the print magazine.

Start your FREE trial

Already a member? Log in