FHB Logo Facebook LinkedIn Email Pinterest Twitter Instagram Plus Icon Close Icon Navigation Search Icon Navigation Search Icon Arrow Down Icon Video Guide Icon Article Guide Icon Modal Close Icon Guide Search Icon Skip to content
Subscribe

In every issue you'll find...

  • Expert insights on techniques and principles
  • Unbiased tool reviews
  • Step-by-step details to master the job
  • Field-tested advice and know-how
Subscribe Now!
Subscribe
  • How-To
  • Design
  • Tools & Materials
  • Videos
  • Blogs
  • Forum
  • Magazine
  • Members
  • FHB House
  • Podcast
  • Join
  • Log In
Subscribe

Fine Homebuilding Project Guides

Siding & Exterior Trim

Guide Home
Chapter
  • Choosing Siding
  • Installing Siding
  • Choosing Exterior Trim
  • Installing Exterior Trim
  • Repairing Siding & Trim
How-To

How to Install Board-and-Batten Siding on a Garden Shed

First install the blocking, and then nail on the boards and battens.

The boards and battens on the upper half of the shed are a combination of primed 1×10 and 1×4 trim boards. The first step is to install blocking in several places so that I have solid nailing for the board-and-batten siding.

With the blocking in place, I tack the first board up, making sure to get it dead plumb. If it’s not perfect, I’ll end up fighting the layout all the way across the wall.

For the nailing pattern, I drive a nail in about one third of the width of the board from either edge. I use a ¾-in. spacer to establish the coursing on the boards as I nail them. Once all of the boards are up, I’ll install the battens which will cover and pin down the edges of the boards.

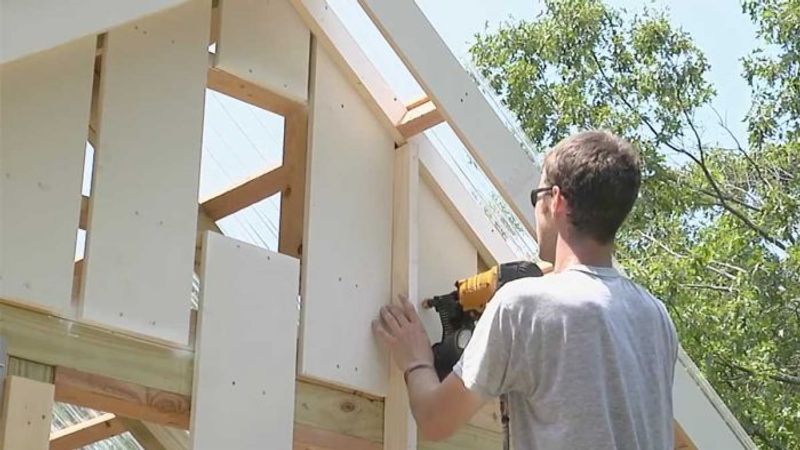
For the board-and-batten siding on the gable ends, I’m going to start in the center and work my way out. There will be a small vent above the door, and that is why we want to center the first board. A horizontal trim board that will span the tops of the doors and windows allows me to use short boards on the gable, which makes cutting and fitting them to the bottom of the roof much easier. The boards tuck up behind the fly-rafter assembly for a nice clean look. This detail also means that the angled cut at the top of the boards doesn’t have to be perfect.

With the boards in place, it’s time to move to the trim. First I’ll tackle the fascia boards that tuck up under the eaves. The easiest way to locate the notches for the rafters is to cut the fascia board a little long, tack it in place, and then use a speed square and a pencil to mark the cuts right off of the rafters. Once it’s marked, I’ll pull the board back down and cut it with a jigsaw.

For the other side of the shed, our windows get in the way of sliding a notched fascia board into place. So instead, I’ll build the fascia in two layers: I’ll use a piece of 5/4 trim between the rafter tails, and then I’ll run a thinner continuous piece underneath the rafters. When screwed together, the assembly has the appearance of a full-height fascia.

Next comes some preassembled corner boards, just like the ones in the previous video on installing the lower clapboards. After that comes the door and window casings, which I leave long, mark in place for final cut, and then install. Be sure to bevel the bottom edges of the window casings where they meet the sill. On the front of the building, the horizontal trim is done in pieces to make the heads of the door and window casings. On the back gable of the building, I’m going to use a continuous horizontal piece to cover the gap between the upper and lower boards.

With the trim in place, I just need to fill in with the pine battens. The job of the battens is to hide the expansion gaps between the boards while also preventing the boards from cupping. Nails should go through the middle of the battens and directly into the framing.

All that I have left is the vents—which install from the inside—and a few pieces of blocking. Earlier, we took the door off to prime it. Now I’ll rehang it and finish it up with a threshold.

The painters will come in next, and then we’ll do some landscaping and install some steps and this shed will be all done.

Sign up for eletters today and get the latest how-to from Fine Homebuilding, plus special offers.

Signing you up...

This site is protected by reCAPTCHA and the Google Privacy Policy and Terms of Service apply.
See all newsletters
See all newsletters

Videos in the Series

  • How to Build a Garden Shed: Introduction

    In this video series you’ll see the step-by-step process as we fabricate and assemble all the parts of this garden shed including the tips and techniques you’ll need to know to build one for yourself.

  • How to Build a Foundation and Frame a Floor for a Garden Shed

    Construct a sturdy platform for your outdoor storage space out of compacted gravel, concrete blocks, and pressure-treated 4x4s

  • How to Frame Garden-Shed Walls with Half-Lapped 4X4s

    For the walls of this shed I wanted to continue the same timberframe look without the complicated joinery. So, just like with the floor frame, I relied on half lap…

  • How to Frame a Garden-Shed Roof and Install Skip Sheathing for Cedar Shingles

    The half laps at the top of the roof rafters are basically the same as the half laps used for the floor and walls, but they are set on an…

  • How to Install Cedar-Shingle and Clear-Polycarbonate Roofing on a Shed

    Follow along with custom builder Justin Fink as he finishes each side of this simple shed roof with different materials.

  • How to Install Garden-Shed Windows and Doors

    Tack the windows in place with screws before you check for level and permanently fasten them

  • How to Install Corner Boards, Skirtboards, and Clapboards on a Garden Shed

    Add furring strips and assemble your cornerboards first to make this siding and trim job go smoothly.

  • How to Install Board-and-Batten Siding on a Garden Shed

    First install the blocking, and then nail on the boards and battens.

Previous: Better Board-and-Batten Siding Next: Tips for Staining and Installing Board-and-Batten Siding

Guide

Siding & Exterior Trim

Chapter

Installing Siding

View Comments

  1. User avater
    Wisjeepman | Nov 02, 2018 12:51pm | #1

    Looks very nice but I have a question on cedar siding. Why did you drive nails through the top of the underlying course when you installed. I was under the assumption that the cedar need to expand with the weather. Did I miss something?

Log in or create an account to post a comment.

Sign up Log in

Become a member and get full access to FineHomebuilding.com

Siding & Exterior Trim

Siding & Exterior Trim

Trusted, comprehensive guidance from the pros for choosing, installing, and repairing siding and exterior trim

View Project Guide

View All Project Guides »

Become a member and get unlimited site access, including the Siding & Exterior Trim Project Guide.

Start Free Trial

Choosing Siding
  • Materials
  • Design Options
Installing Siding
  • Siding Basics
  • Lap Siding
  • Shingle Siding
  • Board & Batten
  • Fiber Cement and Composite Siding
  • Vinyl Siding
  • Masonry Claddings
Choosing Exterior Trim
  • Trim Materials
  • Trim Design
Installing Exterior Trim
  • Trim Basics
  • Roof Eaves Trim
  • Corner Boards
  • Corbels & Brackets
  • Window & Door Trim
Repairing Siding & Trim
  • Trim Repairs
  • Siding Repairs

Fine Homebuilding

Follow

  • twitter
  • facebook
  • instagram
  • pinterest

Newsletter

Get home building tips, offers, and expert advice in your inbox

Signing you up...

This site is protected by reCAPTCHA and the Google Privacy Policy and Terms of Service apply.
See all newsletters
See all newsletters

Membership & Magazine

  • Online Archive
  • Start Free Trial
  • Magazine Subscription
  • Magazine Renewal
  • Gift a Subscription
  • Customer Support
  • Privacy Preferences

Taunton Network

  • Green Building Advisor
  • Fine Woodworking
  • Fine Gardening
  • Threads
  • About
  • Contact
  • Advertise
  • Careers
  • Copyright
  • Terms of Use
  • Site Map
  • Do not sell or share my information
  • Privacy Policy
  • Accessibility
  • California Privacy Rights

© 2023 The Taunton Press, Inc. All rights reserved.

X
X
This is a dialog window which overlays the main content of the page. The modal window is a 'site map' of the most critical areas of the site. Pressing the Escape (ESC) button will close the modal and bring you back to where you were on the page.

Main Menu

  • How-To
  • Design
  • Tools & Materials
  • Video
  • Blogs
  • Forum
  • Reader Projects
  • Magazine
  • Members
  • FHB House

Podcasts

  • FHB Podcast
  • ProTalk

Webinars

  • Upcoming and On-Demand

Account

  • Log In
  • Join

Podcasts

  • FHB Podcast
  • ProTalk

Webinars

  • Upcoming and On-Demand

Popular Topics

  • Kitchens
  • Business
  • Bedrooms
  • Roofs
  • Architecture and Design
  • Green Building
  • Decks
  • Framing
  • Safety
  • Remodeling
  • Bathrooms
  • Windows
  • Tilework
  • Ceilings
  • HVAC

Magazine

  • Current Issue
  • Past Issues
  • Magazine Index
  • Subscribe
  • Online Archive
  • Author Guidelines

All Access

  • Member Home
  • Start Free Trial
  • Gift Membership

Shop the Store

  • Books
  • DVDs
  • Taunton Workshops

More

  • FHB Ambassadors
  • Reader Projects
  • Podcast
  • Customer Support

Account

  • Log In
  • Join

Newsletter

Get home building tips, offers, and expert advice in your inbox

Signing you up...

This site is protected by reCAPTCHA and the Google Privacy Policy and Terms of Service apply.
See all newsletters
See all newsletters

Follow

  • twitter
  • facebook
  • instagram
  • pinterest

Join All Access

Become a member and get instant access to thousands of videos, how-tos, tool reviews, and design features.

Start Your Free Trial

Subscribe

FHB Magazine

Start your subscription today and save up to 70%

Subscribe

We hope you’ve enjoyed your free articles. To keep reading, become a member today.

Get complete site access to expert advice, how-to videos, Code Check, and more, plus the print magazine.

Start your FREE trial

Already a member? Log in