
Flashing Window and Door Bucks
Preflashing the window and door bucks allows us to completely install the exterior insulation and rain-screen furring.
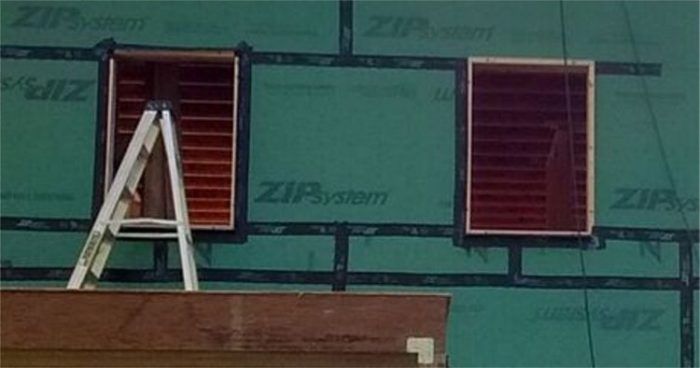
We’re installing 2×3 bucks around the rough openings to pad the windows and doors out to the plane of the rain-screen surface. Since the Huber Zip System wall sheathing is the primary water control layer, we have to flash around the bucks.  That way, in the event any water gets behind the siding and trim and makes its way to the Zip wall, the flashing will redirect the water over or around the windows and doors.
Bruce has been doing most of the flashing and has become proficient at it. He starts at the bottom with a piece of 6-in.-wide Zip System Tape. The 6-in. tape has a paper release sheet, making it easier to work with for this type of flashing than the 3-3/4-in. Zip Tape that doesn’t have a release sheet.
 First, Bruce cuts flashing tape pieces for the perimeter of the buck—each piece a couple inches longer than the side. Then he scores the release sheets of the bottom and side pieces down the center, being careful not to cut into the tape itself. A fresh utility-knife blade helps here. Then he removes one-half of the release sheet, folds it back on itself (face to face), and bonds the exposed adhesive to the wall.
After the wall side is stuck, he pulls off the remaining release sheet and folds the tape onto the edge of the buck and then onto the face. The 6-in. tape gives us 3 in. of coverage onto the Zip wall sheathing, 2-1/2 in. onto the edge of the buck, and 1/2 in. onto the face of the buck.
 We start installing the tape along the bottom of the buck. A little bit of the tape extends beyond the end of the buck corner. A relief cut is made, and the extra is folded onto the sides of the buck. Before moving on to the sides, we wrap the corners with 6-in. pieces of Zip Stretch Tape. The tape stretches in length and width, so it’s easy to form a continuous corner that flares out on the wall sheathing for a leakproof seal.
 After the sides are done, Bruce installs pieces of Stretch Tape to transition to the head of the buck.
 The head flashing is prepared a little differently than the bottom and side pieces. Instead of a single cut in the release paper, he makes two cuts. For a proper weather lap, the head flashing tape needs to fold on top of the window flange. Since the windows won’t be installed for a couple weeks, we need to leave release paper on the head flap portion of the flashing tape. So Bruce makes two straight cuts in the paper and removes the middle section. He backfolds the tape face-to-face and bonds the exposed adhesive to the buck. Then he removes the wall-portion release paper and bonds the tape to the wall. The remaining paper stays on the tape and will be removed after the window is fastened.
By flashing the window buck at this point with the Zip System Tapes, we can install the Roxul insulation and furring strips all the way around the bucks. Had we not preflashed the bucks, we would have to leave the insulation several inches back from the buck perimeter in order to apply the tape when the windows arrive.


View Comments
Why not just use the stretch tape rather than having three layers of tape in each corner? Cost?
Yes - cost. Stretch is about $2/ft vs. straight 6 in. tape that's about 50 cents/ft. Plus Stretch tape is actually hard to work with on straight 90 degree inside corners like on a buck to wall connection. The Zip tapes are pretty thin so the 3 layer build-up at corners is negligible.
I can understand how the extra $12-13 a window over a project with a lot of windows can add up, but I'm not sure I follow on the difficulty in the corners? Don't you mean outside corners and aren't you using it solely for the purpose of sealing the corner? Also in practice because you still bought the stretch tape, I think you're really only saving a few dollars a window. I went through this exercise with our window replacement project.
We've been replacing some windows in our house and using Zip stretch tape. If you score the release paper as described but also score where the 90 degree is, it makes corners much easier (Inside corner in my case).
I also don't see the three layers as a thickness problem but as an intrusion problem. Shouldn't we be minimizing intrusion points? In this case you have two rather than one. I know it's a lot of sealed/bonded tape for water to work through but just doesn't seem like what I would expect you all to be using in practice.
Response to AmherstWoodArtisan:
The cost of the Stretch tape is the main issue for me. Using it for the window and door heads on all units would have totaled over $400. A drop in the overall cost of the house but on the other hand that's the cost of one window. I'm always looking for ways to save a little here and a little there - in the end the savings add up.
I'm not worried at all about the extra tape joints. Each one has a mechanical overlap. Plus, the biggest potential leak area isn't in the flashing tape joints between the corner pieces / side piece / head piece, it is the reliance on the adhesive bond between the Zip wall sheathing and the tape itself. Without a mechanical overlap we have to make certain that we use a J roller to press the tape tight to the sheathing.