FHB Logo Facebook LinkedIn Email Pinterest Twitter Instagram Tiktok YouTube Plus Icon Close Icon Navigation Search Icon Navigation Search Icon Arrow Down Icon Video Guide Icon Article Guide Icon Modal Close Icon Guide Search Icon Skip to content
Subscribe
Log In
  • How-To
  • Design
  • Tools & Materials
  • Videos
  • Blogs
  • Forum
  • Magazine
  • Members
  • FHB House
  • Podcast
Log In
How-To

Simple Way to Make Old Walls Straight and Plumb

Use this fast, foolproof method to deal with problematic framing or depth differences when remodeling.

By Tyler Grace Issue 296 - Dec 2020/Jan 2021
Simple depth gauge. Drive a screw into the framing adjacent to the door, setting it 1⁄2 in. deeper than the outside face of the jamb to account for the drywall that will later be installed.

Synopsis: Remodeler Tyler Grace’s method for getting walls plumb and flat involves using a drywall screw as a depth gauge for the placement of new studs. The process is useful when remodeling lath and plaster walls and accounting for the difference in the depth of the drywall, but works just as well on any wall or ceiling that needs flattening.


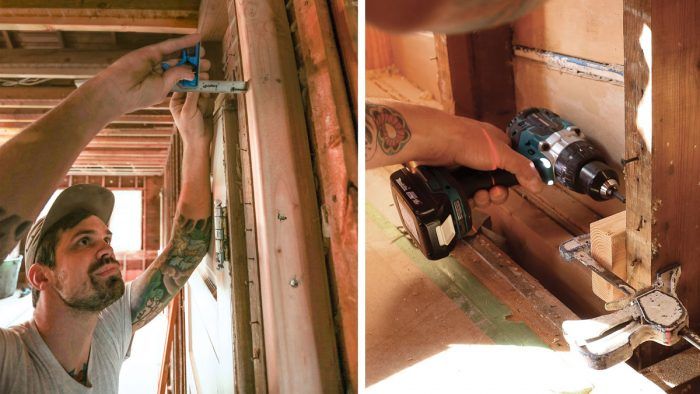
Most of the remodels my company does are in older homes with lath and plaster as the finished wall surface. Many times the scope of work is extensive, and requires us to gut those walls to add utilities or insulation, or simply to start fresh. Often the existing door and window jambs are being left in place, so we have to account for the difference in depth between the old 3⁄4-in.- to 1-in.-thick plaster being removed and the new 1⁄2-in. drywall that will be replacing it. Since this means padding out the framing a bit, we take that opportunity to also correct any inconsistencies in the old framing.

Our method of establishing plumb and flat relies on drywall screws as depth gauges, which we like because they’re easy to fine-tune with the guidance of a laser plumb line. Although it would take longer, you could do this work using a long level in place of the laser.

Of course, this method can be useful for flattening walls and ceilings in any house, regardless of whether the interior was plaster—but in my experience, if a home is old enough to have lath and plaster walls, it is typically old enough to have settled, bowed, and moved. Taking into consideration the fact that we have to pad the wall out to make up for the difference between lath and plaster and drywall, I prefer to kill two birds with one stone by sistering new studs to the existing wall studs and ensuring everything is flat.

The jambs set the depth

Make a mark. Place the open end of a tape-wrapped bit holder against a piece of scrapwood, hold a felt-tipped marker against it, and gently pull the trigger. As the bit holder spins, the marker creates a bold reference line. (The line’s location on the holder doesn’t matter.)Make a mark. Place the open end of a tape-wrapped bit holder against a piece of scrapwood, hold a felt-tipped marker against it, and gently pull the trigger. As the bit holder spins, the marker creates a bold reference line. (The line’s location on the holder doesn’t matter.)

Orient the laser. With the bit back in the holder, position the drill as if you were driving the screw while a helper sets up a plumb laser line at the other end of the wall. Adjust the laser line until it aligns with the mark.Orient the laser. With the bit back in the holder, position the drill as if you were driving the screw while a helper sets up a plumb laser line at the other end of the wall. Adjust the laser line until it aligns with the mark.


Sink additional screws. Without moving the laser, drive another screw near both the top and bottom of that same stud, stopping when the mark on the bit holder aligns with the laser.Sink additional screws. Without moving the laser, drive another screw near both the top and bottom of that same stud, stopping when the mark on the bit holder aligns with
the laser.

Blocks lock it in. After repeating the process on the other end of the wall, set blocks alongside the studs at each screw position. Set the face of the blocks in plane with the screwheads, and use a clamp to ensure they don’t drift off the mark while being fastened.Blocks lock it in. After repeating the process on the other end of the wall, set blocks alongside the studs at each screw position. Set the face of the blocks in plane with the screwheads, and use a clamp to ensure they don’t drift off the mark while being fastened.

Stretch strings. Next, set up a pair of taut stringlines—one between the two upper blocks, and another between the two lower blocks—to guide the placement of the new studs.

Stretch strings. Next, set up a pair of taut stringlines—one between the two upper blocks, and another between the two lower blocks—to guide the placement of the new studs.

Add new studs. Working as a pair, hold a new stud along each existing stud, adjusting its position at the top and bottom until each end is a whisker shy of the stringline before tacking each end in place with a framing nail.Add new studs. Working as a pair, hold a new stud along each existing stud, adjusting its position at the top and bottom until each end is a whisker shy of the stringline before tacking each end in place with a framing nail.

Check your work. With all the new studs tacked in place, hold a long level across the wall and check for gaps, adjusting as needed. Then remove the blocks, replace them with studs, and completely fasten each new stud in place.Check your work. With all the new studs tacked in place, hold a long level across the wall and check for gaps, adjusting as needed. Then remove the blocks, replace them with studs, and completely fasten each new stud in place.

Fine Homebuilding ambassador Tyler Grace is a remodeler in Medford, N.J. Photos by Justin Fink.

Old Walls Furred FlatThis article originally appeared in Fine Homebuilding #296 titled Old Walls Furred Flat.

To read the entire article, please click the View PDF button below.

Sign up for eletters today and get the latest how-to from Fine Homebuilding, plus special offers.

Signing you up...

This site is protected by reCAPTCHA and the Google Privacy Policy and Terms of Service apply.
See all newsletters
See all newsletters
×

Get home building tips, offers, and expert advice in your inbox

Signing you up...

This site is protected by reCAPTCHA and the Google Privacy Policy and Terms of Service apply.
See all newsletters
See all newsletters
View PDF

New Feature

Fine Homebuilding Forums

Ask questions, offer advice, and share your work

Log in or create an account to post a comment.

Sign up Log in

Become a member and get full access to FineHomebuilding.com

Up Next

Video Shorts

Featured Story

Dust-Collecting Sliding Miter Saw

The Makita LS1219L makes precise repetitive cuts and can handle wide and heavy timbers.

Featured Video

A Modern California Home Wrapped in Rockwool Insulation for Energy Efficiency and Fire Resistance

The designer and builder of the 2018 Fine Homebuilding House detail why they chose mineral-wool batts and high-density boards for all of their insulation needs.

Related Stories

  • Stop Dropping Screws
  • Breeze Blocks Are Back
  • Details for Integrating an Addition
  • Weatherized Wall Framing

Discussion Forum

Recent Posts and Replies

  • |
  • |
  • |
  • |
  • |
  • |
View More Create Post

Highlights

Fine Homebuilding All Access
Fine Homebuilding Podcast
Tool Tech
Plus, get an extra 20% off with code GIFT20

"I have learned so much thanks to the searchable articles on the FHB website. I can confidently say that I expect to be a life-long subscriber." - M.K.

Get home building tips, offers, and expert advice in your inbox

Signing you up...

This site is protected by reCAPTCHA and the Google Privacy Policy and Terms of Service apply.
See all newsletters
See all newsletters

Video

View All Videos
  • Don't Wait to Get These Tools
  • How to Enlarge a Hole With a Hole Saw
  • 10 Great Gift Ideas for People Who Love Tools
  • Replace the Cord on a Power Tool
View All

Drills and Drivers

View All Drills and Drivers Articles
  • Handy Bit Storage
  • Custom-Made Tool for Inserts
  • Chuck-Key Holder
  • Accurate Holes in Masonry
View All Drills and Drivers Articles

BOOKS, DVDs, & MERCH

Shop the Store
  • Pretty Good House
    Buy Now
  • Code Check Complete 3rd Edition
    Buy Now
  • 2024 Tool Guide
    Buy Now
  • 2023 Fine Homebuilding Archive
    Buy Now
  • Shop the Store

Fine Homebuilding Magazine

  • Issue 320 - Dec 2023/Jan 2024
    • How to Reuse Salvaged Wood
    • Chainsaw Retrofit and Energy Performance
    • Maximize HVAC Efficiency
  • Issue 319 - November 2023
    • Nearly Net-Zero ADU
    • An Easy Approach to Coffered Ceilings
    • Understanding Types of Roof Vents
  • Issue 318 - October 2023
    • Make Mudsills Square and Level
    • Turn Up the Heat With Induction Cooktops
    • The Fine Homebuilding Interview: Lloyd Alter
  • Issue 317 - Aug/Sept 2023
    • Finishing Drywall With Seamless Results
    • A Flat Roof in a Cold Climate
    • Compact Cordless Shop Vacs
  • Issue 316 - July 2023
    • Timber-Framed Solar Canopies
    • Build a Transom Above a Stock Door
    • Understanding Toilet Design and Efficiency

Fine Homebuilding

Follow

  • YouTube
  • instagram
  • facebook
  • pinterest
  • Tiktok
  • twitter

Newsletter

Get home building tips, offers, and expert advice in your inbox

Signing you up...

This site is protected by reCAPTCHA and the Google Privacy Policy and Terms of Service apply.
See all newsletters
See all newsletters

Membership & Magazine

  • Online Archive
  • Start Free Trial
  • Magazine Subscription
  • Magazine Renewal
  • Gift a Subscription
  • Customer Support
  • Privacy Preferences

Taunton Network

  • Green Building Advisor
  • Fine Woodworking
  • Fine Gardening
  • Threads
  • About
  • Contact
  • Advertise
  • Careers
  • Copyright
  • Terms of Use
  • Site Map
  • Do not sell or share my information
  • Privacy Policy
  • Accessibility
  • California Privacy Rights

© 2023 The Taunton Press, Inc. All rights reserved.

X
X
This is a dialog window which overlays the main content of the page. The modal window is a 'site map' of the most critical areas of the site. Pressing the Escape (ESC) button will close the modal and bring you back to where you were on the page.

Main Menu

  • How-To
  • Design
  • Tools & Materials
  • Video
  • Blogs
  • Forum
  • Project Guides
  • Reader Projects
  • Magazine
  • Members
  • FHB House

Podcasts

  • FHB Podcast
  • ProTalk

Webinars

  • Upcoming and On-Demand

Podcasts

  • FHB Podcast
  • ProTalk

Webinars

  • Upcoming and On-Demand

Popular Topics

  • Kitchens
  • Business
  • Bedrooms
  • Roofs
  • Architecture and Design
  • Green Building
  • Decks
  • Framing
  • Safety
  • Remodeling
  • Bathrooms
  • Windows
  • Tilework
  • Ceilings
  • HVAC

Magazine

  • Current Issue
  • Past Issues
  • Magazine Index
  • Subscribe
  • Online Archive
  • Author Guidelines

All Access

  • Member Home
  • Start Free Trial
  • Gift Membership

Shop the Store

  • Books
  • DVDs
  • Taunton Workshops

More

  • FHB Ambassadors
  • Reader Projects
  • Podcast
  • FHB House
  • Customer Support

Account

  • Log In
  • Join

Newsletter

Get home building tips, offers, and expert advice in your inbox

Signing you up...

This site is protected by reCAPTCHA and the Google Privacy Policy and Terms of Service apply.
See all newsletters
See all newsletters

Follow

  • YouTube
  • instagram
  • facebook
  • pinterest
  • Tiktok
  • twitter

Join All Access

Become a member and get instant access to thousands of videos, how-tos, tool reviews, and design features.

Start Your Free Trial

Subscribe

FHB Magazine

Start your subscription today and save up to set_percent%

Subscribe

We hope you’ve enjoyed your free articles. To keep reading, become a member today.

Get complete site access to expert advice, how-to videos, Code Check, and more, plus the print magazine.

Start your FREE trial

Already a member? Log in