FHB Logo Facebook LinkedIn Email Pinterest Twitter Instagram Plus Icon Close Icon Navigation Search Icon Navigation Search Icon Arrow Down Icon Video Guide Icon Article Guide Icon Modal Close Icon Guide Search Icon Skip to content
Subscribe

In every issue you'll find...

  • Expert insights on techniques and principles
  • Unbiased tool reviews
  • Step-by-step details to master the job
  • Field-tested advice and know-how
Subscribe Now!
Subscribe
  • How-To
  • Design
  • Tools & Materials
  • Videos
  • Blogs
  • Forum
  • Magazine
  • Members
  • FHB House
  • Podcast
  • Join
  • Log In
Subscribe
How-To

Easy Router Jig for Perfect Hinge Mortises

Get an accurate, consistent depth that perfectly fits the hinge leaves with this shopmade three-sided template.

By Stefan Straka Issue 304 - Dec 2021/Jan 2022

Traditional butt hinges are hard to beat. Aside from their clean, beautiful look, they can deliver a lifetime of smooth, accurate action on the heaviest, most heavily used doors. For passage doors, cabinetry, and furniture, they have no match. With no built-in adjustment, however, butt hinges can a be a challenge to install.

Inset doors with butt hinges require precise fitting

Using butt hinges with inset doors, as I did recently on a run of kitchen cabinets, adds another level of difficulty to butt-hinge installation. The main challenge with inset doors is the way they are boxed in on all sides, allowing your eye to pick up the slightest differences in the reveals. Using butt hinges requires that you trim and mount your door perfectly the first time.

One of the keys to success is choosing high-quality butt hinges with accurate milling and little to no slop in the barrel. I get mine from Horton Brasses. Whitechapel and Brusso are other great brands, which I use for both cabinetry and stand-alone furniture.

With hinges in hand, the next critical step is mortising them to a very accurate, consistent depth. You can chop and pare these shallow mortises by hand with chisels, but I find it to be much faster and easier with a shopmade router jig. The router ensures that the mortise depths are accurate and uniform, and the template ensures that the hinge leaves fit perfectly (after a minute of chisel work to square the corners).

A template that’s easy to make with common tools

I make hinge-mortising jigs a variety of ways, including using my CNC router, but here’s a very simple design that’s easy to build with common tools, and works for doors and hinges of all sizes. It is basically a three-sided template that guides a straight, top-bearing bit in your router. The template is made on the tablesaw from an 8-in.-wide strip of 3/4-in. MDF. Start with a strip roughly twice as long as you need, to allow room for mistakes.

The fence is made from any other straight, flat material, roughly 3/4 in. thick.

The template has an open side, which means you don’t need a plunge router but can simple start the bit at full depth with any type of router.

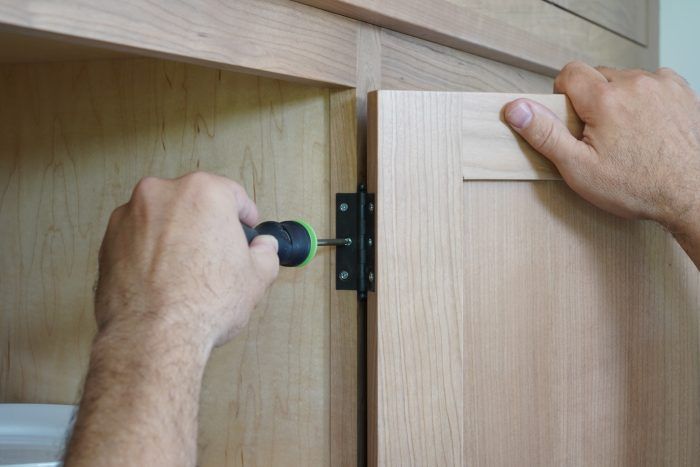
In the photos below, the hinges were set in from the back side of the doors and face frames roughly 1/8 in. but you can design your jig for any hinge size or setback.

The first step is cutting an accurate opening in the template, to fit a hinge leaf exactly. My approach is outlined in the photos.

The next step is attaching the fence parallel with the opening in the template, at a precise distance from it, so you get the desired hinge setback. To lock the two parts parallel to each other, I run a dado on the back side of the template, and rabbet a hardwood fence to fit it. If you don’t have a dado set, you can cut the dado and rabbet in a series of passes with a standard blade.

Make a couple of test cuts to verify that the mortises fit the hinges and the setback is right, and then glue the hardwood fence into the dado. From there all you have to dial in is the bit depth on more test material, and then you can set any number of hinges with total confidence.

Making the hinge-mortising jig

The key steps are cutting an accurate opening in the template and then attaching the fence parallel to it, with the desired setback.

Ends of notch are cut
Cut the ends of the notch. Support the workpiece with your miter gauge to cut one end of the opening on the tablesaw. Then use one of your hinges to mark the other end. Sneak up on the fit until the the outside edges of the two kerfs line up exactly with the ends of a hinge leaf.
Cutting back edge
Cut the back edge. There are a number of ways to do this, but I do it in one step on the tablesaw. Retract the blade fully and then move the fence and workpiece to line up the blade with the cuts you made earlier. Clamp a block at the back to keep the workpiece stable, and hold it down with one hand also. Then turn on the saw and raise the blade until it just frees the waste block. Turn off the saw and wait until the blade stops spinning to move the workpiece.


A dado and rabbet align the fence
Use a dado and rabbet to align the fence. Do some measuring to figure out the hinge setback in the door and locate the fence properly. Then run a dado in the bottom of the template and rabbet the fence to fit it before attaching the two with glue.


Using the jig

This template works with a standard top-bearing bit to rout accurate mortises for traditional butt hinges in frames and doors of all sizes.

dialing in the jig
Dial in the jig. Mortise two test pieces—equal in size to the stiles you will be using—and install the hinges with a single screw in each one, and check the gap. If necessary, adjust the routing depth and do another test-fitting.


Mortising face frame
Mortise frames first if possible. The jig is easiest to use on loose frame parts, but it also works on door frames and face frames that are already built and installed.


A dado and rabbet to align the fence.
Transfer the mortise locations. For this project, I was building inset cabinet doors to fit the openings, trimming them top and bottom for even reveals but leaving a bit of extra width for one last trim cut on the strike side. I then transfer the frame mortises to the hinge side of the door,using a marking knife, extending the marks with a small square.
Routing door mortises
Rout the door mortises. To help you locate the router jig accurately on the knife lines, darken them with a sharp pencil. Make sure you haven’t changed your router’s depth setting since the test-fitting stage. Then locate the jig carefully and rout with confidence. Square the corners with a sharp chisel, and you’re ready to install your hinges. A self-centering (Vix-style) drill bit will align pilot holes perfectly so the screws don’t pull your hinges out of position.

—Stefan Straka builds cabinetry and furniture in Bellingham, Wash. Photos by Asa Christiana.


RELATED LINKS

  • What’s the Difference: Degree of Opening
  • Foolproof Inset Cabinet Doors
  • Hinge Adjustment for a Door’s Final Fit
  • Routing Hinge Mortises

Sign up for eletters today and get the latest how-to from Fine Homebuilding, plus special offers.

Signing you up...

This site is protected by reCAPTCHA and the Google Privacy Policy and Terms of Service apply.
See all newsletters
See all newsletters
×

Get home building tips, offers, and expert advice in your inbox

Signing you up...

This site is protected by reCAPTCHA and the Google Privacy Policy and Terms of Service apply.
See all newsletters
See all newsletters

New Feature

Fine Homebuilding Forums

Ask questions, offer advice, and share your work

Log in or create an account to post a comment.

Sign up Log in

Become a member and get full access to FineHomebuilding.com

Up Next

Video Shorts

Featured Story

High-Performance Windows for Timeless Design

Jake Bruton highlights how the Andersen® 400 Series windows were selected to complement and achieve the goals of the wall assembly in this high-performance home.

Featured Video

Builder’s Advocate: An Interview With Viewrail

Learn more about affordable, modern floating stairs, from design to manufacturing to installation.

Related Stories

  • Templating Techniques for Countertops and Floating Shelves
  • Quicker Coped Moldings
  • Highlight Cutlines
  • Dowels for Painting and Stacking

Discussion Forum

Recent Posts and Replies

  • |
  • |
  • |
  • |
  • |
  • |
View More Create Post

Highlights

Fine Homebuilding All Access
Fine Homebuilding Podcast
Tool Tech
Plus, get an extra 20% off with code GIFT20

"I have learned so much thanks to the searchable articles on the FHB website. I can confidently say that I expect to be a life-long subscriber." - M.K.

Get home building tips, offers, and expert advice in your inbox

Signing you up...

This site is protected by reCAPTCHA and the Google Privacy Policy and Terms of Service apply.
See all newsletters
See all newsletters

Video

View All
  • Building Custom Kitchen Cabinets
  • Podcast 331: PRO TALK With Cabinetmaker Ben Scott
  • How to Use a Pocket-Hole Jig
  • Podcast 128: Worst. Photo. Shoot. Ever.
View All

Jigs and Fixtures

View All Jigs and Fixtures Articles
  • Face-frame clamp
    Face-Frame Clamp for Cabinets
  • making stepped corbels
    How to Make Stepped Corbels with a Router Jig
  • Butt hinge
    Easy Router Jig for Perfect Hinge Mortises
  • Straight-Hole Jig
    Straight-Hole Jig
View All Jigs and Fixtures Articles

BOOKS, DVDs, & MERCH

Shop the Store
  • 2022 Fine Homebuilding Archive
    Buy Now
  • Code Check Building 4th Edition
    Buy Now
  • Pretty Good House
    Buy Now
  • 2023 Tool Guide
    Buy Now
  • Shop the Store

Fine Homebuilding Magazine

  • Issue 313 - Feb/March 2023
    • Practical System for a Seismic Retrofit
    • Fine Homebuilding Issue #313 Online Highlights
    • Practical System for a Seismic Retrofit
  • Issue 312 - Dec 2022/Jan 2023
    • Tool Test: Cordless Tablesaws
    • Gray-Water System for a Sustainable Home
    • Insulate a Cape Roof to Avoid Ice Dams
  • Issue 311 - November 2022
    • 7 Steps to a Perfect Exterior Paint Job
    • Options for Smarter Home-Energy Tracking
    • The Fine Homebuilding Interview: James Metoyer
  • Issue 310 - October 2022
    • Choosing a Tile-Leveling System
    • Choosing Between HRVs and ERVs
    • Custom Built-in Cabinets Made Easy
  • Issue 309 - Aug/Sept 2022
    • 10 Steps to Install Crown Molding on Cabinets
    • How to Get Sturdy Walls Without OSB
    • Choosing the Right Construction Tape for the Job

Fine Homebuilding

Follow

  • twitter
  • facebook
  • instagram
  • pinterest

Newsletter

Get home building tips, offers, and expert advice in your inbox

Signing you up...

This site is protected by reCAPTCHA and the Google Privacy Policy and Terms of Service apply.
See all newsletters
See all newsletters

Membership & Magazine

  • Online Archive
  • Start Free Trial
  • Magazine Subscription
  • Magazine Renewal
  • Gift a Subscription
  • Customer Support
  • Privacy Preferences

Taunton Network

  • Green Building Advisor
  • Fine Woodworking
  • Fine Gardening
  • Threads
  • About
  • Contact
  • Advertise
  • Careers
  • Copyright
  • Terms of Use
  • Site Map
  • Do not sell or share my information
  • Privacy Policy
  • Accessibility
  • California Privacy Rights

© 2023 The Taunton Press, Inc. All rights reserved.

X
X
This is a dialog window which overlays the main content of the page. The modal window is a 'site map' of the most critical areas of the site. Pressing the Escape (ESC) button will close the modal and bring you back to where you were on the page.

Main Menu

  • How-To
  • Design
  • Tools & Materials
  • Video
  • Blogs
  • Forum
  • Reader Projects
  • Magazine
  • Members
  • FHB House

Podcasts

  • FHB Podcast
  • ProTalk

Webinars

  • Upcoming and On-Demand

Account

  • Log In
  • Join

Podcasts

  • FHB Podcast
  • ProTalk

Webinars

  • Upcoming and On-Demand

Popular Topics

  • Kitchens
  • Business
  • Bedrooms
  • Roofs
  • Architecture and Design
  • Green Building
  • Decks
  • Framing
  • Safety
  • Remodeling
  • Bathrooms
  • Windows
  • Tilework
  • Ceilings
  • HVAC

Magazine

  • Current Issue
  • Past Issues
  • Magazine Index
  • Subscribe
  • Online Archive
  • Author Guidelines

All Access

  • Member Home
  • Start Free Trial
  • Gift Membership

Shop the Store

  • Books
  • DVDs
  • Taunton Workshops

More

  • FHB Ambassadors
  • Reader Projects
  • Podcast
  • Customer Support

Account

  • Log In
  • Join

Newsletter

Get home building tips, offers, and expert advice in your inbox

Signing you up...

This site is protected by reCAPTCHA and the Google Privacy Policy and Terms of Service apply.
See all newsletters
See all newsletters

Follow

  • twitter
  • facebook
  • instagram
  • pinterest

Join All Access

Become a member and get instant access to thousands of videos, how-tos, tool reviews, and design features.

Start Your Free Trial

Subscribe

FHB Magazine

Start your subscription today and save up to 70%

Subscribe

We hope you’ve enjoyed your free articles. To keep reading, become a member today.

Get complete site access to expert advice, how-to videos, Code Check, and more, plus the print magazine.

Start your FREE trial

Already a member? Log in