FHB Logo Facebook LinkedIn Email Pinterest Twitter X Instagram Tiktok YouTube Plus Icon Close Icon Navigation Search Icon Navigation Search Icon Arrow Down Icon Video Guide Icon Article Guide Icon Modal Close Icon Guide Search Icon Skip to content
Subscribe
Log In
  • How-To
  • Design
  • Tools & Materials
  • Restoration
  • Videos
  • Blogs
  • Forum
  • Magazine
  • Members
  • FHB House
  • Podcast
Log In

Fine Homebuilding Project Guides

Finish & Trim Carpentry

Guide Home
  • Trim Design
  • Tools and Materials
  • Interior Trim Basics
  • Window and Door Casings
  • Baseboard and Crown Molding
  • Wainscot and Paneling
  • Mantels and Fireplace Surrounds
  • Coffered Ceilings
How-To

Inside Crown Corners

Coping crown molding is more than blindly following tradition. Understand the benefits and learn how to cope joints the right way.

By Tucker Windover Issue 209
  • X
  • facebook
  • linkedin
  • pinterest
  • email
  • add to favorites Log in or Sign up to save your favorite articles

Synopsis: On Tucker Windover’s first day on a finish-carpentry crew, he decided to buck tradition and miter some inside crown molding corners instead of coping them. He quickly learned that some traditions are worth keeping, and in this article he describes the advantages coped corners have over mitered ones: They remain tight even as the wood expands and contracts, they fit well in rooms with minor imperfections, they are more adjustable, and they are more forgiving. He also provides step-by-step instructions for the entire process: mitering the stock, coping the cut, testing the fit, and installing the crown. In a sidebar, finish carpenter Chris Whalen, who has been installing mitered crown for 20 years, provides a contrary view.


I can still remember my first day on a finish-carpentry crew. I spent most of my time keeping one eye on the lead carpenter, trying to pick up as many new tricks as I could. I watched him cope and fit a couple of pieces of crown molding. His movements were fluid. His process looked easy. But I didn’t quite understand why we had to complicate a joint that could be made with two simple miters. I asked if it would be OK to miter the corners instead of coping them, and the lead said, “Go for it—if you can make it look right and convince me that it will stay that way.” So I attempted to do it the easy way, or what I thought would be the easy way. In truth, I didn’t make it through a single room before turning to a coping saw.

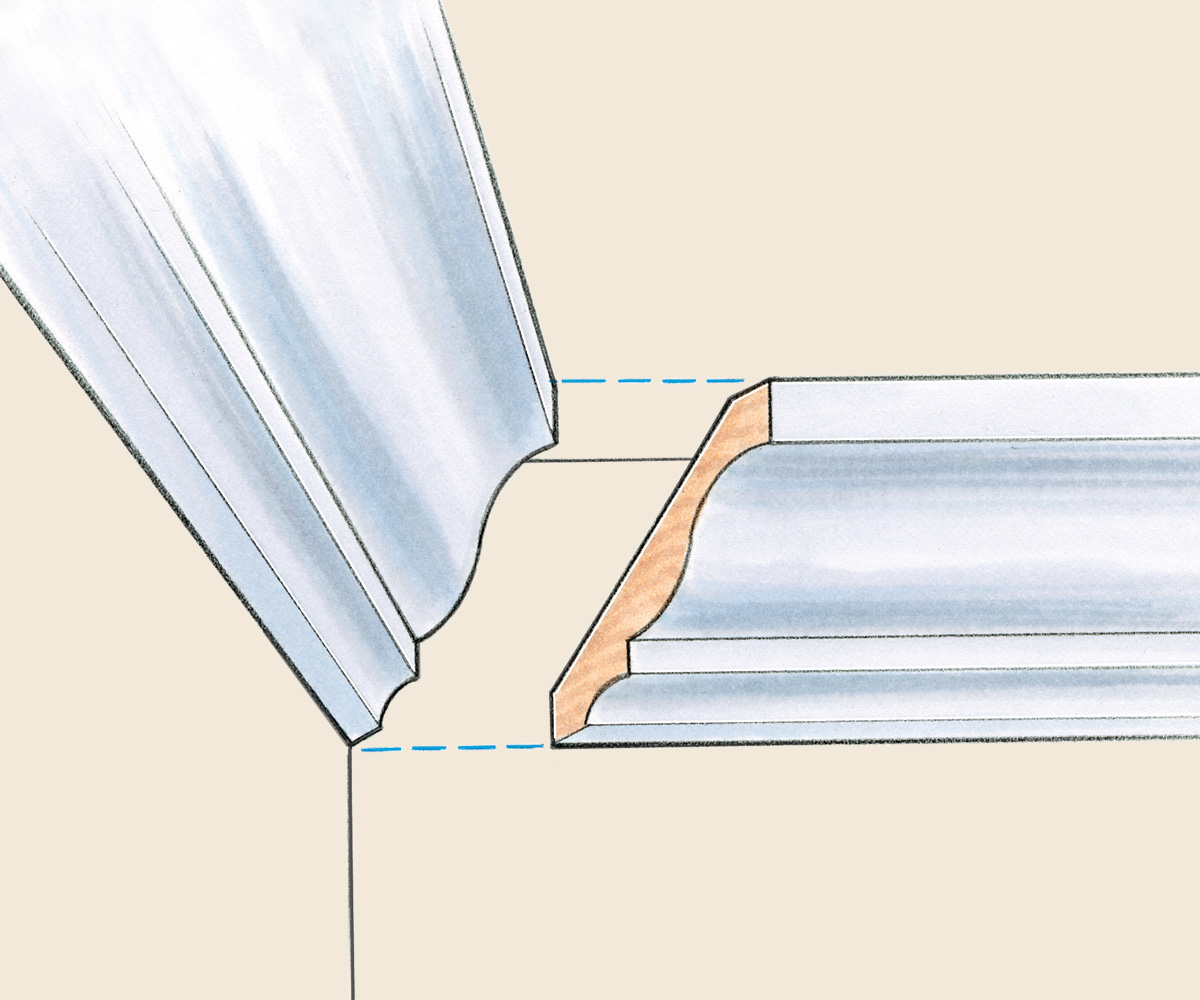
I’ve learned a lot since then, and in my opinion, a coped joint is preferable to a miter in several ways. Due to wood movement, miters tend to open at the short point or the long point. A coped corner stays tight as each piece of trim expands and contracts in sync. A coped joint also fits well when installed in a room with minor imperfections, such as one with corners that are out of square or ceilings and walls that are less than straight, level, and plumb. The smallest bump of joint compound can throw a mitered corner out of proper alignment.

A coped joint is also more adjustable. If there is a gap in the joint, you often need only to pry the other end of the trim to squeeze the joint tight. Finally, the coped joint is much more forgiving. This makes it a faster joint to make because there is less fussing over the fit. If a piece of trim is cut slightly short, say by 1/8 in., the gap is covered by the subsequent piece of coped trim. When you’re mitering a corner, any error in length will be revealed.

Still, the coped joint has limitations. Certain crown profiles can’t be coped. In these instances, I create a hybrid joint by coping what’s copable and mitering what’s not. When working with medium-density-fiberboard (MDF) trim, I miter the inside corners instead of coping them. MDF trim is more stable than wood, but when coped, its edges become too fragile. I miter crown when installing it on kitchen cabinets that I know to be straight, level, and square. Also, I find that when preassembling crown for a column or a fireplace mantel, mitering works best.

Some people believe that coping is difficult or time-consuming. I can assure you that with a little practice, coping becomes as easy and as fast as tying your shoes.

Miter the stock

using a miter marking jig

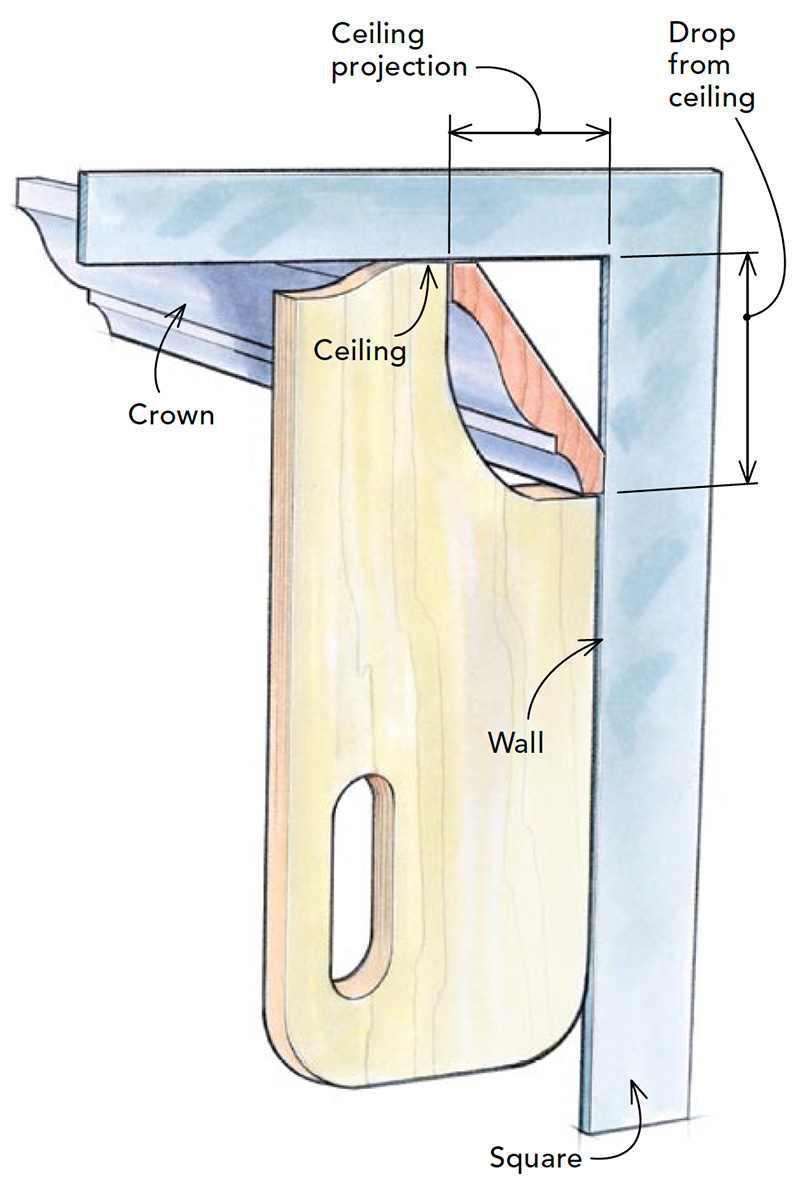
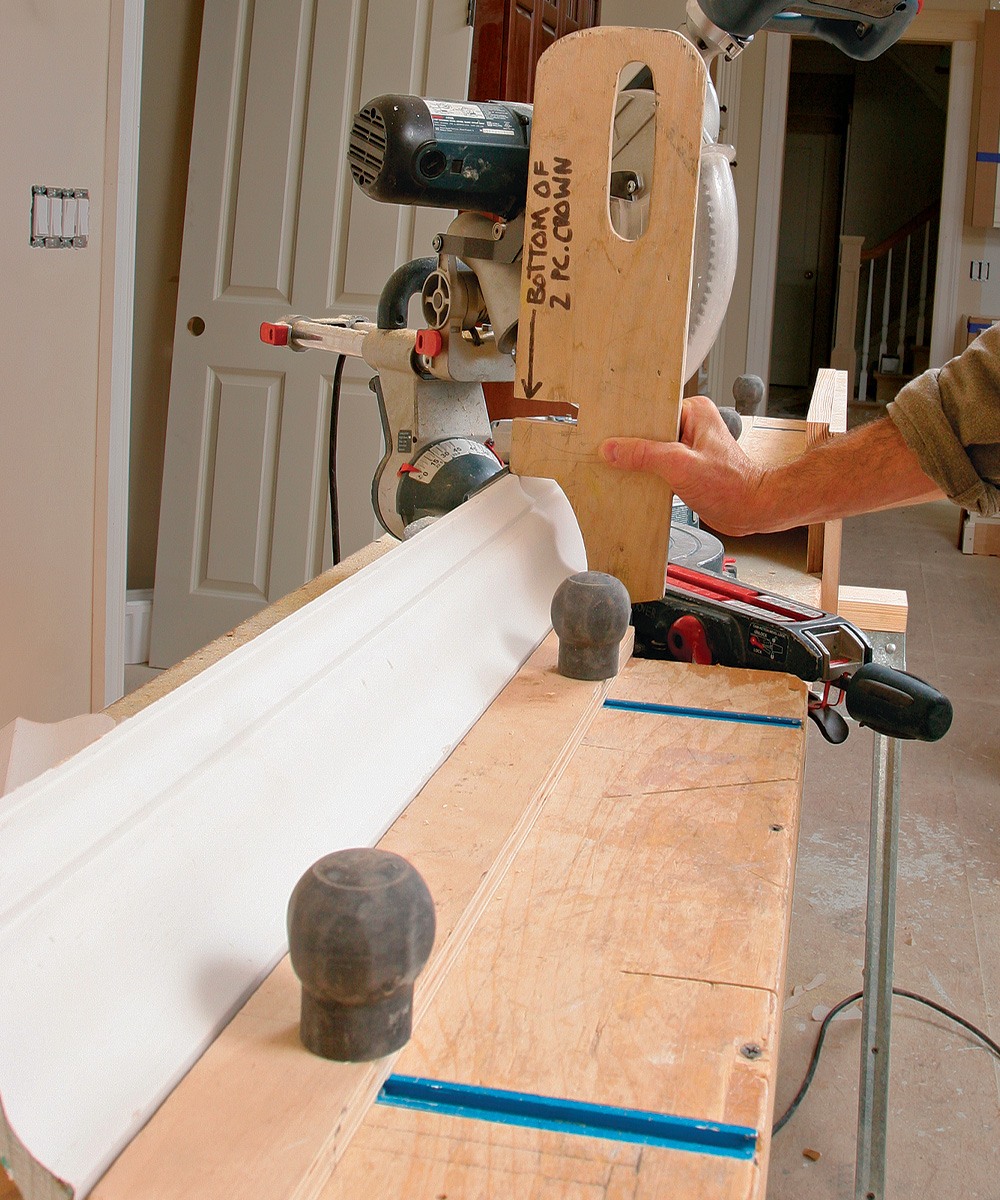
Step 1: To start, make a marking jig. Label the top of a rectangular scrap of 1/2-in. plywood as ceiling and its right side as wall. Measure the molding’s ceiling projection and its drop down the wall by nesting it in a framing square. Transfer these measurements to the piece of plywood, and cut between the points, removing the jig’s corner. This jig will be used to ensure proper crown positioning throughout the cope and the installation.

illustration of marking jig

Step 2: Create a stop that replicates the ceiling position. The distance between the stop and the miter saw’s fence should match the ceiling projection. Check the stop location with the marking jig. This setup guarantees that the molding is cut in the same position as it will be installed.

Create a stop that replicates the ceiling position

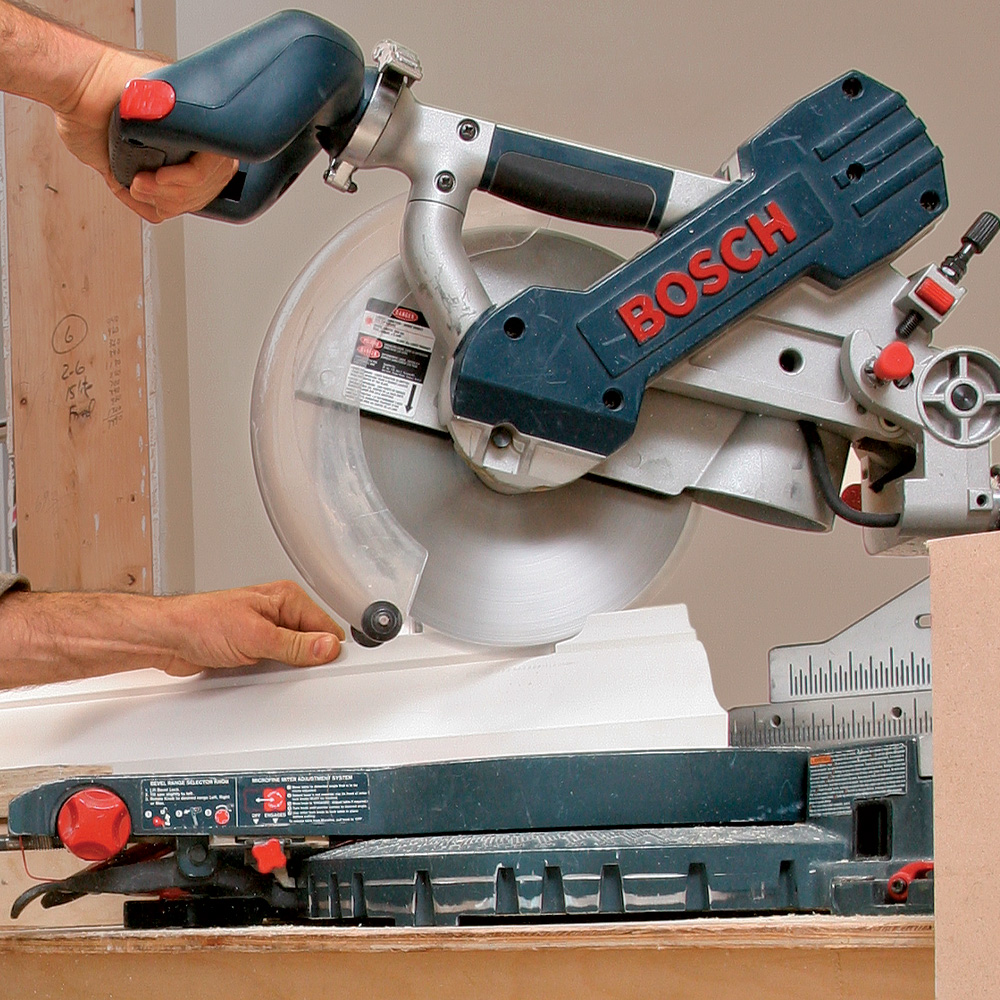
Step 3: Cut a 45° miter, and measure for length. Place the top edge of the molding down against the stop, and the bottom edge of the crown against the saw’s fence. If coping to the left, the long point of the miter will be at the bottom edge of the crown. Make the miter. Then, using a measurement taken between the corners of the wall, measure from the long point of the miter to mark the trim’s length.
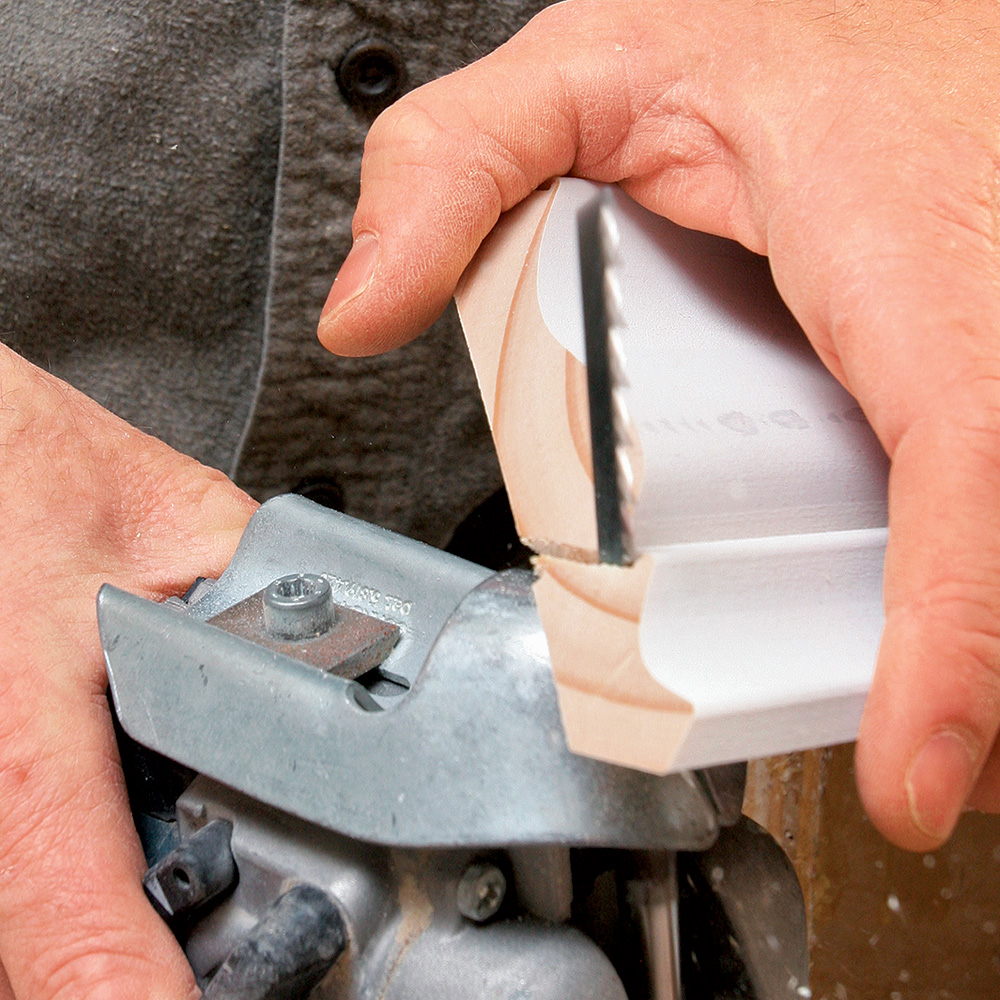
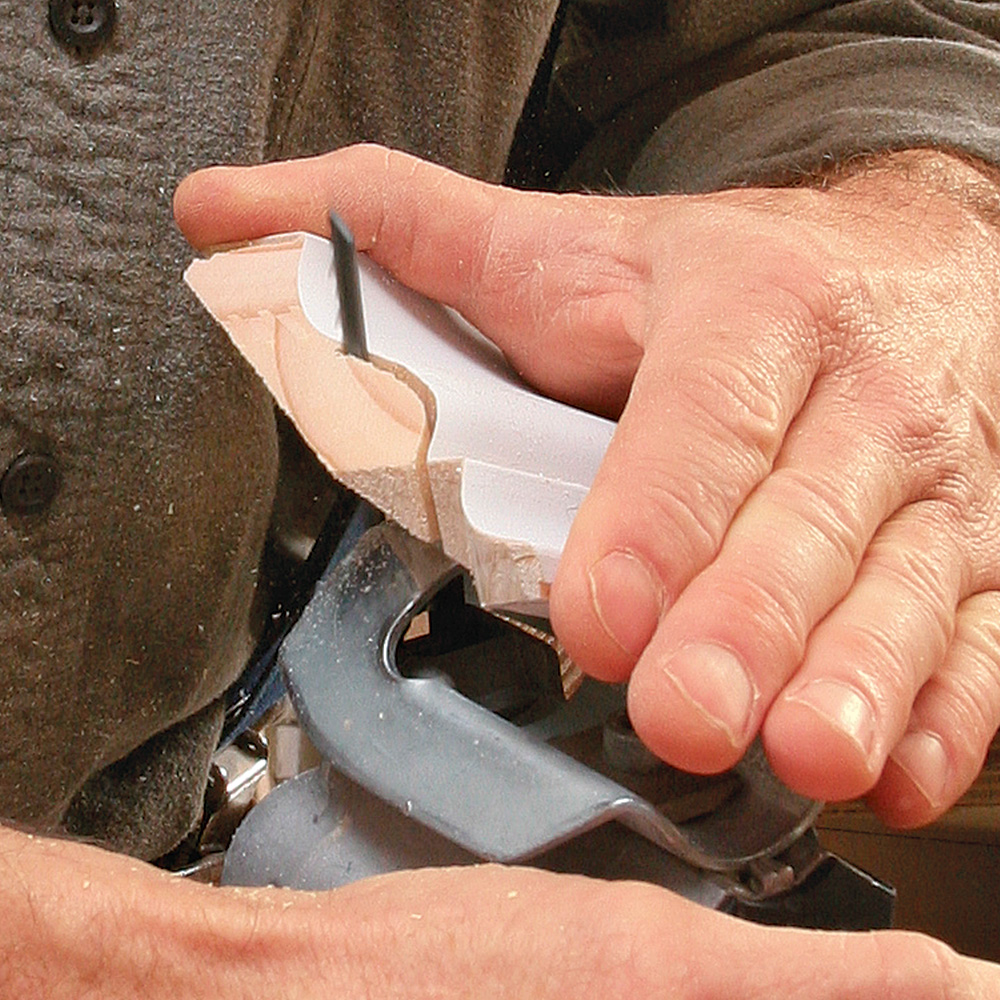
Cut a 45° miter

Cope the cut

Step 4: An auxiliary fence helps to secure the trim for the cope. With the ceiling-side edge of the trim flat against the fence and the wall-side edge flat against the stand, snug up a stop to keep it in position. Use the marking jig to be sure that the trim is seated correctly.

Use the marking jig to be sure that the trim is seated correctly

coping saw

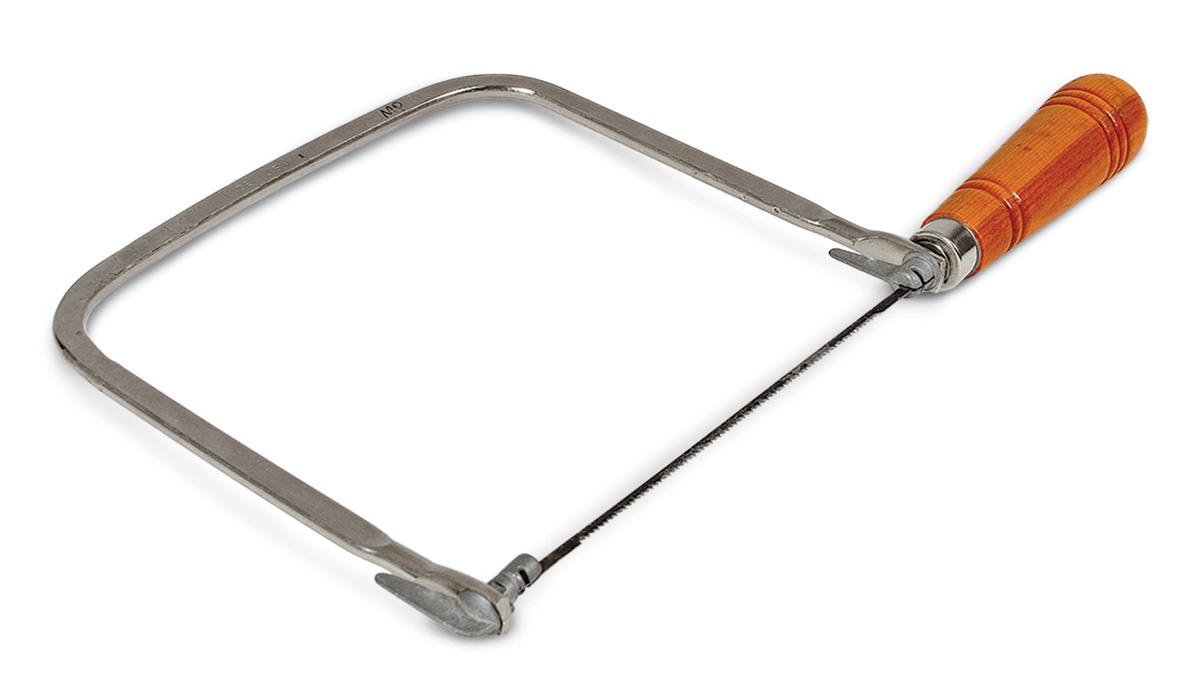
Step 5: A jigsaw fitted with a coping foot (collinstool.com) and a Bosch T244D blade increases the speed of the cut. When used correctly, this setup provides a very precise, controlled cope. If the jigsaw doesn’t suit you, there is nothing wrong with using a traditional coping saw. With either tool, make several relief cuts before following the profile of the molding. Hold the saw somewhat less than vertical to give the cope a slight back cut.

jigsaw fitted with a coping foot
coping the cut
coping the cut

Test the fit

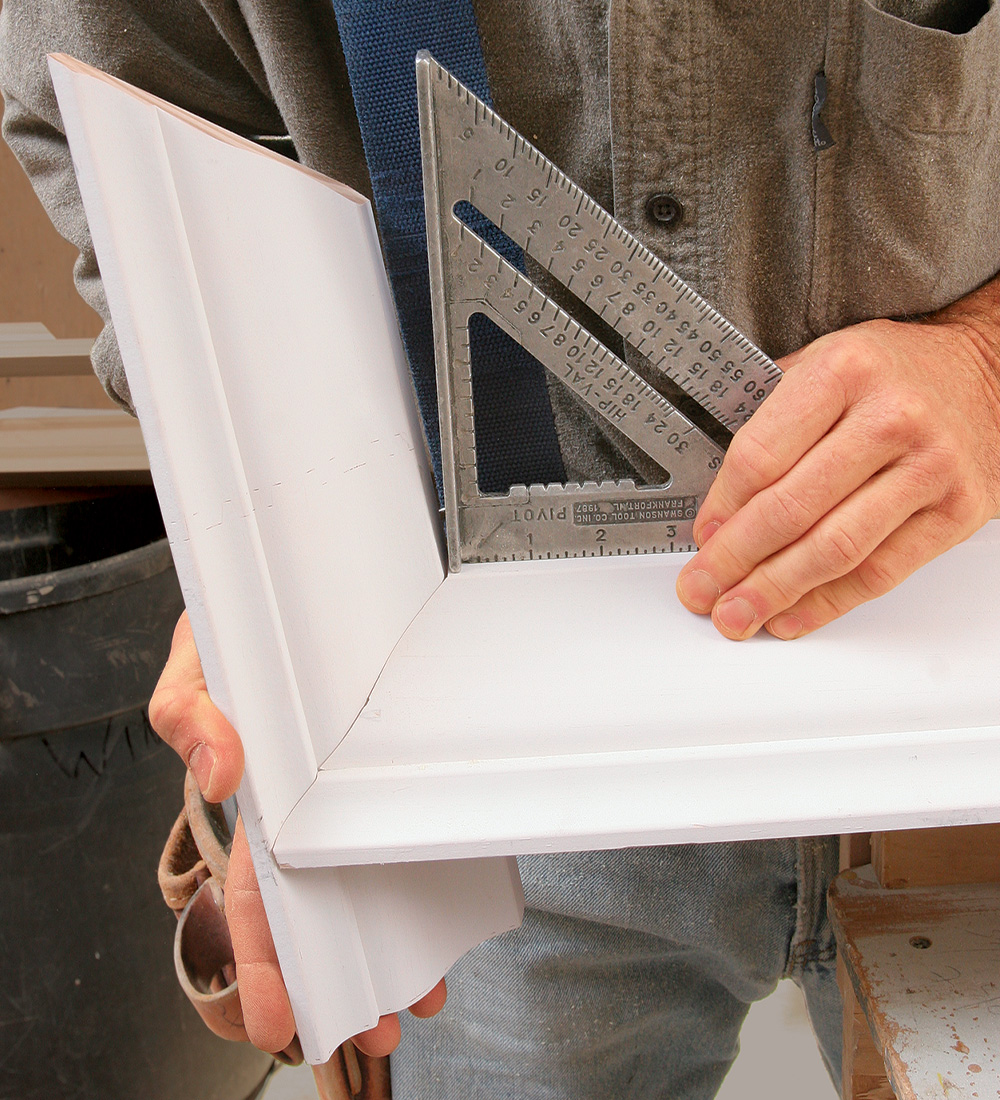
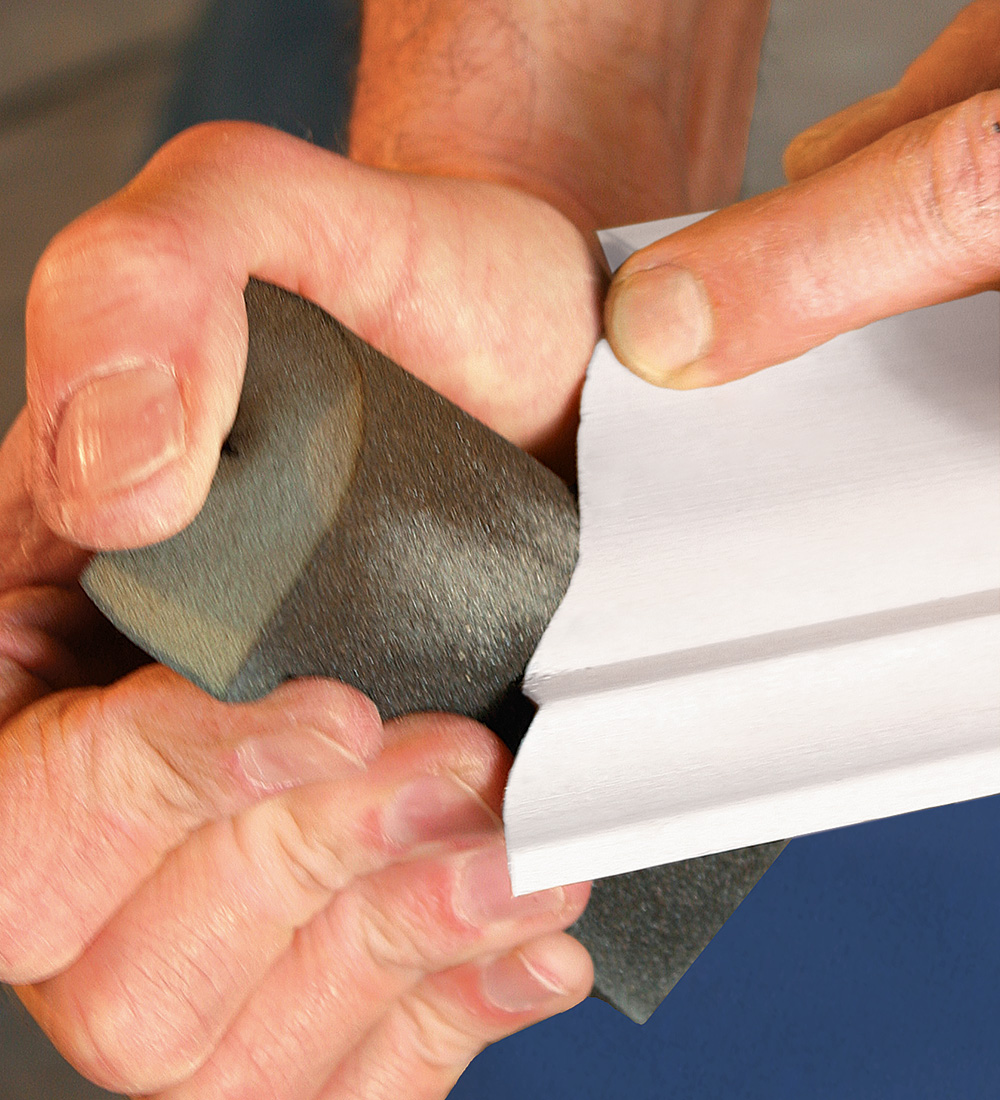
Step 6: Use a scrap of the molding to test the accuracy of the cope. Whether the corner is less than or greater than 90°, the coped joint stays tight. If the joint isn’t as tight as you’d like, fine-tune the cope with a rasp or a sanding sponge.

Use a scrap of the molding to test the accuracy of the cope
fine-tune the cope with a sanding sponge

Install the Crown

Step 7: Cut the trim to length with a 90° cut. This butt end is covered by the adjacent coped piece of trim. Cut pieces of trim more than 8 ft. 1/8 in. long. The compression helps to keep the corners tight over time. When installing the trim, don’t nail within 2 ft. of each end until the joint fits the way you want it.

installing the crown molding

Going against the grain: I miter

mitered crown molding

As a student of two old-school carpenters, I was taught to cope the inside corners of crown molding. I installed my crown that way for 15 years because it was the only way the old guys would allow it to be done. However, 20 years ago, fellow finish carpenter Craig Lawrence suggested to me that it was a lot easier and faster to miter inside corners. I was skeptical, but tried the approach and found that he was correct. Since then, I have mitered all my crown-molding corners with nary a complaint.

With the miter approach, you simply set up some stops, pull the trigger, and slice through the stock for a perfect cut every time. I even back-cut each piece a degree or so to accommodate out-of-square corners. If this is not done, the joint will open in front. I leave the ends of the first piece of crown loose until I have the second one up and in position. This allows the corner to be tweaked until it fits. I then glue the pieces together, which I have found helps to form a tight-fitting joint. Finally, I wipe the joint with caulk to blend the pieces together, using colored caulks for stained wood.

My advice? Develop a system that works for you, but give miters a try.

—Chris Whalen is a finish carpenter in Missoula, Mont.


From Fine Homebuilding #209

To see this article as a PDF, click the View PDF button below:

View PDF
Previous: The Secret to Coping Crown Molding Next: Coping Crown Molding on Inside Corners

Guide

Finish & Trim Carpentry

Chapter

Baseboard and Crown Molding

Sign up for eletters today and get the latest how-to from Fine Homebuilding, plus special offers.

Signing you up...

This site is protected by reCAPTCHA and the Google Privacy Policy and Terms of Service apply.
See all newsletters
See all newsletters

Log in or create an account to post a comment.

Sign up Log in

Become a member and get full access to FineHomebuilding.com

Finish & Trim Carpentry

Finish & Trim Carpentry

Trusted, comprehensive guidance from the pros for creating perfect trim details in any room of the house

View Project Guide

View All Project Guides »

Become a member and get unlimited site access, including the Finish & Trim Carpentry Project Guide.

Start Free Trial

Trim Design
  • Trim Style and Design
Tools and Materials
  • Tools
  • Materials
Interior Trim Basics
  • Tips and Tricks
  • Techniques
  • Using Jigs
Window and Door Casings
  • Windows
  • Doors
Baseboard and Crown Molding
  • Baseboard
  • Crown Molding
  • Specialty Crown Situations
Wainscot and Paneling
  • Beadboard Wainscot
  • Paneled Wainscot
  • Chair Rails
  • Wall Treatments
Mantels and Fireplace Surrounds
  • Design
  • Installing Mantels and Surrounds
Coffered Ceilings

Fine Home Building

Newsletter Sign-up

  • Fine Homebuilding

    Home building tips, offers, and expert advice in your inbox.

  • Green Building Advisor

    Building science and energy efficiency advice, plus special offers, in your inbox.

  • Old House Journal

    Repair, renovation, and restoration tips, plus special offers, in your inbox.

Signing you up...

This site is protected by reCAPTCHA and the Google Privacy Policy and Terms of Service apply.
See all newsletters

Follow

  • Fine Homebuilding

    Dig into cutting-edge approaches and decades of proven solutions with total access to our experts and tradespeople.

    Start Free Trial Now
    • Facebook
    • Instagram
    • X
    • LinkedIn
  • GBA Prime

    Get instant access to the latest developments in green building, research, and reports from the field.

    Start Free Trial Now
    • Facebook
    • YouTube
  • Old House Journal

    Learn how to restore, repair, update, and decorate your home.

    Subscribe Now
    • Facebook
    • Instagram
    • X

Membership & Magazine

  • Online Archive
  • Start Free Trial
  • Magazine Subscription
  • Magazine Renewal
  • Gift a Subscription
  • Customer Support
  • Privacy Preferences
  • About
  • Contact
  • Advertise
  • Careers
  • Terms of Use
  • Site Map
  • Do not sell or share my information
  • Privacy Policy
  • Accessibility
  • California Privacy Rights

© 2025 Active Interest Media. All rights reserved.

Fine Homebuilding receives a commission for items purchased through links on this site, including Amazon Associates and other affiliate advertising programs.

  • Home Group
  • Antique Trader
  • Arts & Crafts Homes
  • Bank Note Reporter
  • Cabin Life
  • Cuisine at Home
  • Fine Gardening
  • Fine Woodworking
  • Green Building Advisor
  • Garden Gate
  • Horticulture
  • Keep Craft Alive
  • Log Home Living
  • Military Trader/Vehicles
  • Numismatic News
  • Numismaster
  • Old Cars Weekly
  • Old House Journal
  • Period Homes
  • Popular Woodworking
  • Script
  • ShopNotes
  • Sports Collectors Digest
  • Threads
  • Timber Home Living
  • Traditional Building
  • Woodsmith
  • World Coin News
  • Writer's Digest
Active Interest Media logo
X
X
This is a dialog window which overlays the main content of the page. The modal window is a 'site map' of the most critical areas of the site. Pressing the Escape (ESC) button will close the modal and bring you back to where you were on the page.

Main Menu

  • How-To
  • Design
  • Tools & Materials
  • Video
  • Blogs
  • Forum
  • Project Guides
  • Reader Projects
  • Magazine
  • Members
  • FHB House

Podcasts

  • FHB Podcast
  • ProTalk

Webinars

  • Upcoming and On-Demand

Podcasts

  • FHB Podcast
  • ProTalk

Webinars

  • Upcoming and On-Demand

Popular Topics

  • Kitchens
  • Business
  • Bedrooms
  • Roofs
  • Architecture and Design
  • Green Building
  • Decks
  • Framing
  • Safety
  • Remodeling
  • Bathrooms
  • Windows
  • Tilework
  • Ceilings
  • HVAC

Magazine

  • Current Issue
  • Past Issues
  • Magazine Index
  • Subscribe
  • Online Archive
  • Author Guidelines

All Access

  • Member Home
  • Start Free Trial
  • Gift Membership

Online Learning

  • Courses
  • Project Guides
  • Reader Projects
  • Podcast

More

  • FHB Ambassadors
  • FHB House
  • Customer Support

Account

  • Log In
  • Join

Newsletter

Get home building tips, offers, and expert advice in your inbox

Signing you up...

This site is protected by reCAPTCHA and the Google Privacy Policy and Terms of Service apply.
See all newsletters
See all newsletters

Follow

  • X
  • YouTube
  • instagram
  • facebook
  • pinterest
  • Tiktok

Join All Access

Become a member and get instant access to thousands of videos, how-tos, tool reviews, and design features.

Start Your Free Trial

Subscribe

FHB Magazine

Start your subscription today and save up to 70%

Subscribe

This is your last free article.

Don't miss another expert tip or technique from building pros. Start your free trial today.

Start your FREE trial

Already a member? Log in

We hope you’ve enjoyed your free articles. To keep reading, become a member today.

Get complete site access to expert advice, how-to videos, Code Check, and more, plus the print magazine.

Start your FREE trial

Already a member? Log in

Privacy Policy Update

We use cookies, pixels, script and other tracking technologies to analyze and improve our service, to improve and personalize content, and for advertising to you. We also share information about your use of our site with third-party social media, advertising and analytics partners. You can view our Privacy Policy here and our Terms of Use here.

Cookies

Analytics

These cookies help us track site metrics to improve our sites and provide a better user experience.

Advertising/Social Media

These cookies are used to serve advertisements aligned with your interests.

Essential

These cookies are required to provide basic functions like page navigation and access to secure areas of the website.

Delete My Data

Delete all cookies and associated data