FHB Logo Facebook LinkedIn Email Pinterest Twitter Instagram Plus Icon Close Icon Navigation Search Icon Navigation Search Icon Arrow Down Icon Video Guide Icon Article Guide Icon Modal Close Icon Guide Search Icon Skip to content
Subscribe
Log In
  • How-To
  • Design
  • Tools & Materials
  • Videos
  • Blogs
  • Forum
  • Magazine
  • Members
  • FHB House
  • Podcast
Log In

Fine Homebuilding Project Guides

Finish & Trim Carpentry

Guide Home
Chapter
  • Trim Design
  • Tools and Materials
  • Interior Trim Basics
  • Window and Door Casings
  • Baseboard and Crown Molding
  • Wainscot and Paneling
  • Mantels and Fireplace Surrounds
  • Coffered Ceilings
Building Skills

How To Use a Japanese-Style Pull Saw

Pull saws aren't everyday tools, but they can come in handy on occasion for cutting trim in place and for cutting small moldings.

By Will Beemer Issue 224

You probably won’t need a pull saw every day, but it’s a great tool to have when the need arises. Unlike Western-style saws, which cut on the push stroke, Japanese-style saws cut on the pull. Pulling on the blade takes advantage of steel’s higher tensile strength compared to its compressive strength. As a result, the extra thin blade on a Japanese saw cuts straighter and with greater accuracy than the blade on a Western saw.

You’ll find pull saws useful for cutting casing and base trim in place and for cutting small moldings. In short, they are great tools for using any time you need to make a precise, easily guided cut.

Japanese saws are available in a number of different styles. Perhaps the most useful for carpenters is the Ryoba. This type of saw has two sets of teeth: one set for crosscuts and one for rips. You can tell the difference between the two sets by looking at how light reflects along the teeth. If the light reflects the same on every tooth, it’s a rip blade. The teeth are usually bigger, too, but not always. If you see a bright reflection on every other tooth, it’s a crosscut blade. It used to be that Japanese-style saws were rare (and expensive), but now you can find them in just about every hardware store and home center.

Step by Step

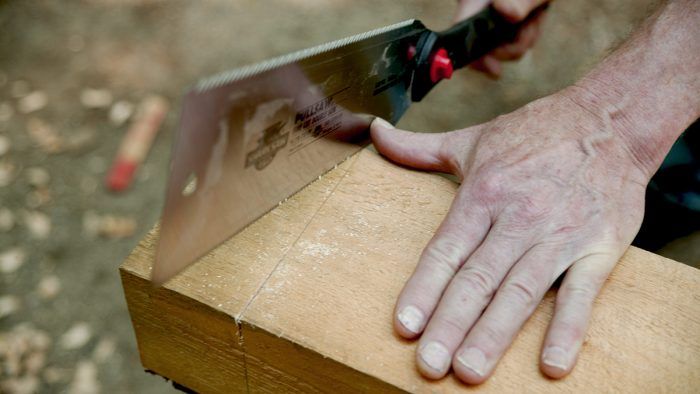
Start the cut. Once you’ve marked the top and sides of the stock, gently push the saw against your thumb as you pull back on the handle. Your thumb should guide the blade so that the teeth are in the center of the line. Keep your thumb above the teeth to prevent getting cut.

Move your thumb away. Once the kerf is established, you can move both hands to the handle. Both thumbs should be lined up on top of the handle.

cutting into stock

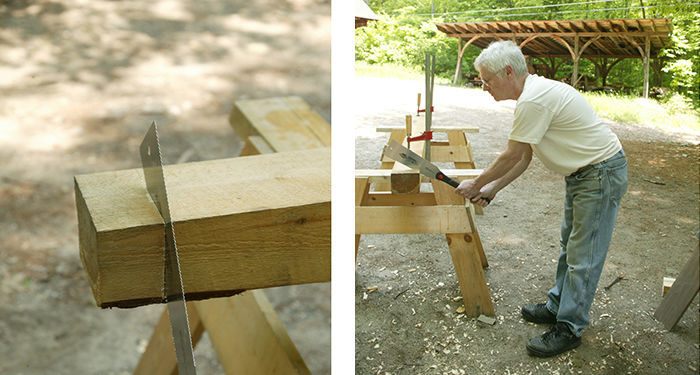
Take a stance. Position your body so that your dominant hand is directly behind the cutline and your feet are spread shoulder width apart. Hold the blade at a 45° angle, and cut with a steady, even rhythm.

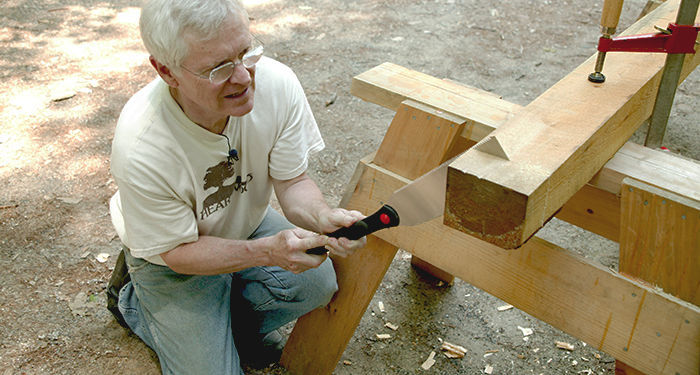
Don’t cut a line you can’t see. Position your body so that you can see the cut progressing. You may need to crouch down to keep the blade from blocking your line of sight.

crouching down to cut into stock

Change sides. Once you’ve cut through the first side, move your body to the other side of the stock. Use the existing kerf to line up the blade. Once again, cut with the blade at a 45° angle.

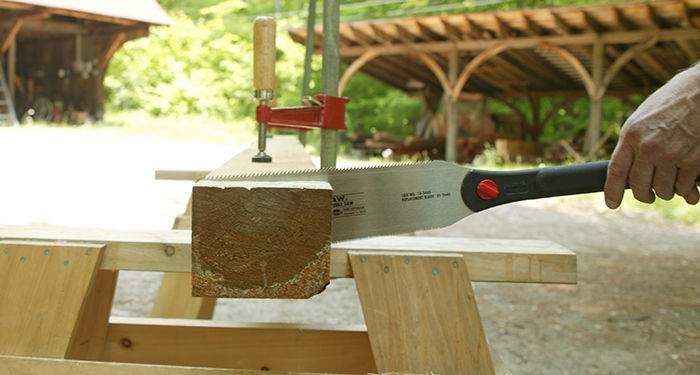
Level off the blade. To finish the center of the cut, let the weight of the saw do all the work. As you near the end of the cut, grab the offcut to prevent splitting along the grain.

leveling off blade

Video: How to Use a Japanese-Style Pull Saw

A good all-around pull saw

Shark 10-2440 Fine Cut Saw

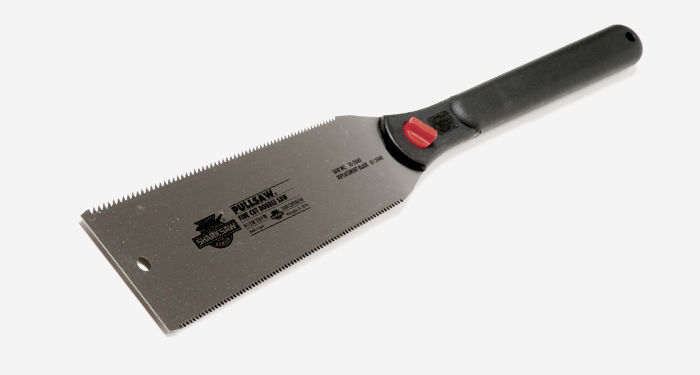
Top-quality Japanese-style pull saws for woodworking can cost hundreds of dollars, but a more-than-adequate saw for doing trimwork and other carpentry projects can be had for about $32.

Shark 10-2440 Fine Cut Saw 9-1⁄2-in. blade with 9-point (rip) and 17-point (crosscut) diamondshaped teeth and ABS handle

Photos: Charles Bickford and Dan Thorton

From Fine Homebuilding #224

Sign up for eletters today and get the latest how-to from Fine Homebuilding, plus special offers.

Signing you up...

This site is protected by reCAPTCHA and the Google Privacy Policy and Terms of Service apply.
See all newsletters
See all newsletters
Previous: How to Scribe Trim to Fit Against a Wall Next: Scribing Made Simple

Guide

Finish & Trim Carpentry

Chapter

Interior Trim Basics

Log in or create an account to post a comment.

Sign up Log in

Become a member and get full access to FineHomebuilding.com

Finish & Trim Carpentry

Finish & Trim Carpentry

Trusted, comprehensive guidance from the pros for creating perfect trim details in any room of the house

View Project Guide

View All Project Guides »

Become a member and get unlimited site access, including the Finish & Trim Carpentry Project Guide.

Start Free Trial

Trim Design
  • Trim Style and Design
Tools and Materials
  • Tools
  • Materials
Interior Trim Basics
  • Tips and Tricks
  • Techniques
  • Using Jigs
Window and Door Casings
  • Windows
  • Doors
Baseboard and Crown Molding
  • Baseboard
  • Crown Molding
  • Specialty Crown Situations
Wainscot and Paneling
  • Beadboard Wainscot
  • Paneled Wainscot
  • Chair Rails
  • Wall Treatments
Mantels and Fireplace Surrounds
  • Design
  • Installing Mantels and Surrounds
Coffered Ceilings

Fine Homebuilding

Follow

  • twitter
  • facebook
  • instagram
  • pinterest

Newsletter

Get home building tips, offers, and expert advice in your inbox

Signing you up...

This site is protected by reCAPTCHA and the Google Privacy Policy and Terms of Service apply.
See all newsletters
See all newsletters

Membership & Magazine

  • Online Archive
  • Start Free Trial
  • Magazine Subscription
  • Magazine Renewal
  • Gift a Subscription
  • Customer Support
  • Privacy Preferences

Taunton Network

  • Green Building Advisor
  • Fine Woodworking
  • Fine Gardening
  • Threads
  • About
  • Contact
  • Advertise
  • Careers
  • Copyright
  • Terms of Use
  • Site Map
  • Do not sell or share my information
  • Privacy Policy
  • Accessibility
  • California Privacy Rights

© 2023 The Taunton Press, Inc. All rights reserved.

X
X
This is a dialog window which overlays the main content of the page. The modal window is a 'site map' of the most critical areas of the site. Pressing the Escape (ESC) button will close the modal and bring you back to where you were on the page.

Main Menu

  • How-To
  • Design
  • Tools & Materials
  • Video
  • Blogs
  • Forum
  • Reader Projects
  • Magazine
  • Members
  • FHB House

Podcasts

  • FHB Podcast
  • ProTalk

Webinars

  • Upcoming and On-Demand

Podcasts

  • FHB Podcast
  • ProTalk

Webinars

  • Upcoming and On-Demand

Popular Topics

  • Kitchens
  • Business
  • Bedrooms
  • Roofs
  • Architecture and Design
  • Green Building
  • Decks
  • Framing
  • Safety
  • Remodeling
  • Bathrooms
  • Windows
  • Tilework
  • Ceilings
  • HVAC

Magazine

  • Current Issue
  • Past Issues
  • Magazine Index
  • Subscribe
  • Online Archive
  • Author Guidelines

All Access

  • Member Home
  • Start Free Trial
  • Gift Membership

Shop the Store

  • Books
  • DVDs
  • Taunton Workshops

More

  • FHB Ambassadors
  • Reader Projects
  • Podcast
  • FHB House
  • Customer Support

Account

  • Log In
  • Join

Newsletter

Get home building tips, offers, and expert advice in your inbox

Signing you up...

This site is protected by reCAPTCHA and the Google Privacy Policy and Terms of Service apply.
See all newsletters
See all newsletters

Follow

  • twitter
  • facebook
  • instagram
  • pinterest

Join All Access

Become a member and get instant access to thousands of videos, how-tos, tool reviews, and design features.

Start Your Free Trial

Subscribe

FHB Magazine

Start your subscription today and save up to 70%

Subscribe

We hope you’ve enjoyed your free articles. To keep reading, become a member today.

Get complete site access to expert advice, how-to videos, Code Check, and more, plus the print magazine.

Start your FREE trial

Already a member? Log in