FHB Logo Facebook LinkedIn Email Pinterest Twitter X Instagram Tiktok YouTube Plus Icon Close Icon Navigation Search Icon Navigation Search Icon Arrow Down Icon Video Guide Icon Article Guide Icon Modal Close Icon Guide Search Icon Skip to content
Subscribe
Log In
  • How-To
  • Design
  • Tools & Materials
  • Restoration
  • Videos
  • Blogs
  • Forum
  • Magazine
  • Members
  • FHB House
  • Podcast
Log In

Fine Homebuilding Project Guides

Insulation

Guide Home
  • Energy Efficiency
  • Air-Sealing
  • Choosing Insulation
  • Installing Insulation
  • Water Management
How-To

Insulating Scissors Trusses

These roof trusses can be tricky to insulate because blown-in insulation might slump or slide.

By Martin Holladay
  • X
  • facebook
  • linkedin
  • pinterest
  • email
  • add to favorites Log in or Sign up to save your favorite articles

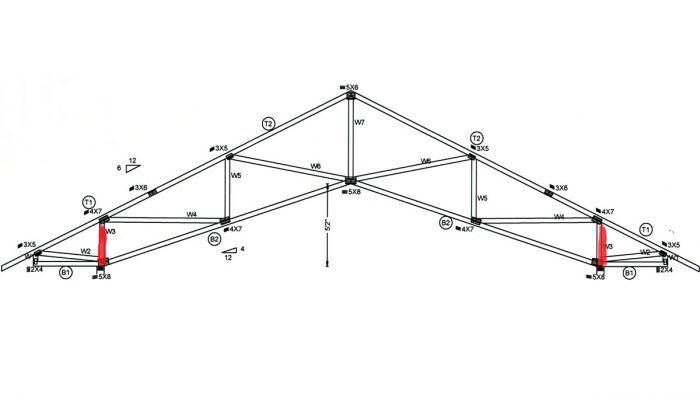
A scissors truss is a roof truss that creates a sloped ceiling instead of a horizontal ceiling. Unlike parallel-chord trusses — a type of truss that creates a sloped ceiling that is just as steep as the roof — a scissors truss creates a ceiling that has a gentler slope than the roof slope. You end up with a steep roof and a not-so-steep ceiling — in other words, a ceiling that is almost a cathedral ceiling but not quite.

A scissors truss creates a cramped attic that is very tight at the eaves and somewhat more generous in height near the ridge. It’s not the type of attic that you want to spend much time in, since it is far too cramped to negotiate easily.

Builders sometimes specify scissors trusses in hopes that the trusses will create a cathedral-like effect with less hassle than rafters or parallel-chord trusses, which can be tough to insulate well.

Surprisingly, some builders install scissors trusses before they have finalized their insulation plan. Then they post a question on the GBA site: “How do I insulate my scissors trusses?”

Scissors trusses can be tricky to insulate, because loose insulation doesn’t generally like to be installed on a slope unless it is fully encapsulated by rigid materials (due to the risk that the insulation will slide downhill). Whatever insulation plan you come up with, talk to your insulation contractor before you order your trusses, because there is no use in specifying an insulation method that your local contractor won’t agree to.

A variety of insulation materials can be used to insulate scissors truss roofs, as long as:

  • The venting details (if required) are well executed;
  • Attention has been paid to airtightness;
  • The R-value of the insulation meets or exceeds minimum code requirements;
  • The insulation is installed in a way that prevents the insulation from sliding or slumping; and
  • The insulation is meticulously installed, so that there are no voids.

Make sure that you order raised-heel trusses

Like ordinary roof trusses, scissors trusses come with or without a raised heel (sometimes called an energy heel). If you ended up with scissors trusses without raised heels, you’ve got a major problem on your hands. This type of truss doesn’t have enough room at the eaves to accommodate the required insulation depth.

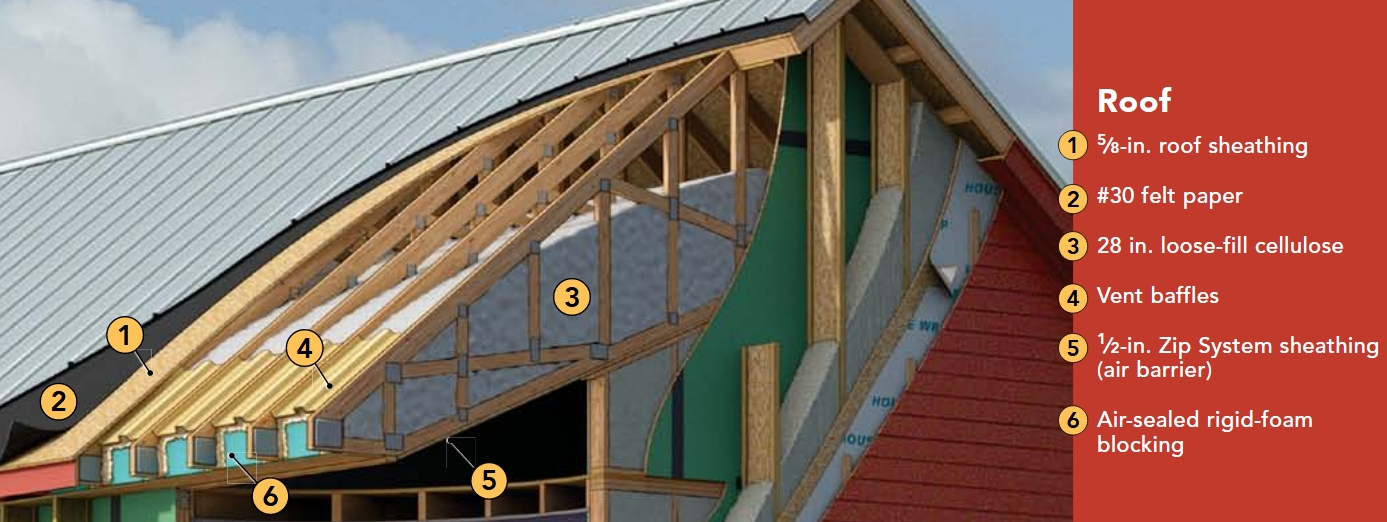
Even if you order raised-heel trusses, it’s best to tell your truss manufacturer exactly how much room you need at the eaves. If you plan to install 24 inches of cellulose, and you’ll have a 1/2-inch-thick ventilation baffle and a 2-inch ventilation channel, you’ll need 26 1/2 inches of vertical height at the heel. Unless you provide that information to the truss manufacturer, you may end up with trusses with heels that aren’t high enough.

Disadvantages of scissors trusses

Scissors trusses are harder to insulate than typical roof trusses used to create a horizontal ceiling, for the following reasons:

  • If the scissors truss has a steep ceiling, blown-in insulation materials like cellulose or blown-in fiberglass may slide downhill or slump.
  • Compared to ordinary roof trusses, scissors trusses provide very tight access at the eaves, so construction workers are usually reluctant to crawl to the edge of the attic to perform work. For example, if a designer has located recessed can lights near the eaves — always a mistake — it may be impossible to get a worker to crawl into the tight attic to install an airtight cap above the recessed can. It’s also hard to air-seal the wind-washing dams that are needed near the eaves. (For more on wind-washing dams, see “Site-Built Ventilation Baffles for Roofs.”)
  • Access is also limited for whoever needs to blow the insulation. Before you finalize your plans, you’ll need to answer these questions: How will I get the hose up there? Where will the installer stand when he or she is holding the hose?
  • As with many truss types, it’s hard to insulate scissors trusses with the flash-and-batt method, because it’s hard to figure out how to keep the fiberglass batts in physical contact with the cured spray foam. Moreover, all of the truss braces make it difficult to install InsulWeb or a similar membrane, so it’s hard to use the flash-and-fill approach.

Where do you blow the insulation from?

Stephen Sheehy, a GBA reader who authored a blog series called “Pretty Good, Not So Big Maine House,” shared his “difficult access” story in a GBA comment.

Sheehy wrote, “We just did this in my house. We put insulation baffles on the underside of the roof sheathing running well past where the top of the two feet of insulation would be. Installed air barrier membrane on underside of lower truss chord, then strapped it and drywalled. Then blew two feet of cellulose into space, accessing from an outside access port cut into the top of one gable, just under the peak.”

How steep is too steep?

Everyone agrees that if a ceiling is too steep, blown-in cellulose will just slide downhill rather than staying put where it is blown. The question is, how steep is too steep?

The consensus among builders who have expressed an opinion on this question is that the ceiling slope can be as steep as 4-in-12, but no steeper.

In a YouTube video posted by Hammer and Hand, the construction company that built the Pumpkin Ridge Passive House, carpenter Val Darrah explains, “We’re looking at a 6/12 upper pitch and a 4/12 vaulted ceiling. … We decided that we didn’t want to go with a vaulted ceiling any higher [that is, steeper] than a 4/12 for fear of settling cellulose.”

According to Malcolm Taylor, a designer and builder from British Columbia, “Loose fill cellulose won’t stay put on a 6/12 pitch.”

Some builders who try to install cellulose over a steep ceiling just mound up the insulation higher than usual, especially near the ridge, in hopes that the extra insulation will make up for any slumping.

In a GBA post, a reader named Jeff Newman writes that, in his opinion, it’s possible to insulate a sloped ceiling as steep as 6-in-12 — steeper than recommended by Malcolm Taylor or Val Darrah. Newman wrote, “You will definitely need a vertical stop at the bottom (basically a continuation of the exterior wall sheathing) leaving room for ventilation below the roof sheathing. My opinion would be that if the ceiling slope is 6/12 or less cellulose or rock wool should not slide down. Batt insulation of any kind is a bad idea unless you can be guaranteed of near perfect installation.”

A house with insulated scissors trusses

When Matthew O’Malia, an architect specializing in high-performance buildings, designed a Passive House for clients in Michigan, he specified cellulose-insulated scissors trusses. Most of the ceiling area was covered with 28 inches of cellulose, although the insulation was somewhat thinner near the eaves.

cellulose-insulated scissors trusses

O’Malia’s details were illustrated in a Green Building Advisor article titled “Cold-Climate Collaboration.” (The article originally appeared in Fine Homebuilding magazine.)

Commenting on the illustration, Charlie Sullivan, a professor of engineering at Dartmouth College, noted, “The picture … looks a little iffy to me. The first 2 feet of cellulose near the eaves is held back from the roof, allowing ventilation space, but the next 2 feet looks like it would be hard to install with the close clearance shown and nothing holding it back. I’d think that vent baffles going up further would be a good idea.”

Of course, it’s possible that O’Malia’s Passive House had longer baffles than the ones shown in the illustration. The moral of the story: When in doubt, extend those baffles a little higher than you think you need to.

What about spray foam?

If you’re a builder who specified scissors trusses before finalizing your insulation plan, you may be unable to use blown-in insulation, especially if your ceiling is steep. In that case, it’s always possible to create an unvented roof assembly with a combination of closed-cell spray foam against the roof sheathing — thick enough to keep the interior surface of the cured spray foam above the dew point — followed by open-cell spray foam to bring the insulation layer up to your R-value target.

This approach is similar to the flash-and-batt approach, except that open-cell spray foam — a type of insulation that stays put after it is installed — is used instead of fiberglass batts.


Originally published on GBA.com.

Fine Homebuilding Recommended Products

Fine Homebuilding receives a commission for items purchased through links on this site, including Amazon Associates and other affiliate advertising programs.

Respirator Mask

A full-face respirator prevents fog up and is more comfortable than constantly replacing particle makes that get fouled or sweaty and is ideal for the pro installer.
Buy at Amazon

Utility Knife

This utility knife is well-made and comes in handy when cutting rigid foam insulation. You can extend the snap blade to cut through a 2-inch foam board.
Buy at Amazon

Great Stuff Foam Cleaner

It’s important to clean and maintain a professional foam-dispensing gun, and this product fits the bill. It has a spray applicator for general cleaning, plus it screws onto the dispensing gun so you can clean the inside.
Buy at Amazon
Previous: Sliding Insulation between Rafters from Above Next: Better Vented-Roof Baffles

Guide

Insulation

Chapter

Installing Insulation

Sign up for eletters today and get the latest how-to from Fine Homebuilding, plus special offers.

Signing you up...

This site is protected by reCAPTCHA and the Google Privacy Policy and Terms of Service apply.
See all newsletters
See all newsletters

Log in or create an account to post a comment.

Sign up Log in

Become a member and get full access to FineHomebuilding.com

Insulation

Insulation

Trusted, comprehensive guidance from the pros for a home that is healthy, comfortable, and energy efficient

View Project Guide

View All Project Guides »

Become a member and get unlimited site access, including the Insulation Project Guide.

Start Free Trial

Energy Efficiency
  • Understanding Energy and Houses
  • Building Energy-Efficient Homes
Air-Sealing
  • Air-Sealing Basics
  • Air-Sealing Tools and Materials
  • Foundations and Floors
  • Walls, Windows, and Doors
  • Attics and Roofs
Choosing Insulation
  • Insulation Basics
  • Material Choices
Installing Insulation
  • Insulating Attics and Roofs
  • Insulating Walls
  • Insulating Floors, Footings, and Slabs
  • Insulating Foundation Walls
Water Management
  • Water-Management Principles
  • Materials
  • Installation Methods

Fine Home Building

Newsletter Sign-up

  • Fine Homebuilding

    Home building tips, offers, and expert advice in your inbox.

  • Green Building Advisor

    Building science and energy efficiency advice, plus special offers, in your inbox.

  • Old House Journal

    Repair, renovation, and restoration tips, plus special offers, in your inbox.

Signing you up...

This site is protected by reCAPTCHA and the Google Privacy Policy and Terms of Service apply.
See all newsletters

Follow

  • Fine Homebuilding

    Dig into cutting-edge approaches and decades of proven solutions with total access to our experts and tradespeople.

    Start Free Trial Now
    • Facebook
    • Instagram
    • X
    • LinkedIn
  • GBA Prime

    Get instant access to the latest developments in green building, research, and reports from the field.

    Start Free Trial Now
    • Facebook
    • YouTube
  • Old House Journal

    Learn how to restore, repair, update, and decorate your home.

    Subscribe Now
    • Facebook
    • Instagram
    • X

Membership & Magazine

  • Online Archive
  • Start Free Trial
  • Magazine Subscription
  • Magazine Renewal
  • Gift a Subscription
  • Customer Support
  • Privacy Preferences
  • About
  • Contact
  • Advertise
  • Careers
  • Terms of Use
  • Site Map
  • Do not sell or share my information
  • Privacy Policy
  • Accessibility
  • California Privacy Rights

© 2025 Active Interest Media. All rights reserved.

Fine Homebuilding receives a commission for items purchased through links on this site, including Amazon Associates and other affiliate advertising programs.

  • Home Group
  • Antique Trader
  • Arts & Crafts Homes
  • Bank Note Reporter
  • Cabin Life
  • Cuisine at Home
  • Fine Gardening
  • Fine Woodworking
  • Green Building Advisor
  • Garden Gate
  • Horticulture
  • Keep Craft Alive
  • Log Home Living
  • Military Trader/Vehicles
  • Numismatic News
  • Numismaster
  • Old Cars Weekly
  • Old House Journal
  • Period Homes
  • Popular Woodworking
  • Script
  • ShopNotes
  • Sports Collectors Digest
  • Threads
  • Timber Home Living
  • Traditional Building
  • Woodsmith
  • World Coin News
  • Writer's Digest
Active Interest Media logo
X
X
This is a dialog window which overlays the main content of the page. The modal window is a 'site map' of the most critical areas of the site. Pressing the Escape (ESC) button will close the modal and bring you back to where you were on the page.

Main Menu

  • How-To
  • Design
  • Tools & Materials
  • Video
  • Blogs
  • Forum
  • Project Guides
  • Reader Projects
  • Magazine
  • Members
  • FHB House

Podcasts

  • FHB Podcast
  • ProTalk

Webinars

  • Upcoming and On-Demand

Podcasts

  • FHB Podcast
  • ProTalk

Webinars

  • Upcoming and On-Demand

Popular Topics

  • Kitchens
  • Business
  • Bedrooms
  • Roofs
  • Architecture and Design
  • Green Building
  • Decks
  • Framing
  • Safety
  • Remodeling
  • Bathrooms
  • Windows
  • Tilework
  • Ceilings
  • HVAC

Magazine

  • Current Issue
  • Past Issues
  • Magazine Index
  • Subscribe
  • Online Archive
  • Author Guidelines

All Access

  • Member Home
  • Start Free Trial
  • Gift Membership

Online Learning

  • Courses
  • Project Guides
  • Reader Projects
  • Podcast

More

  • FHB Ambassadors
  • FHB House
  • Customer Support

Account

  • Log In
  • Join

Newsletter

Get home building tips, offers, and expert advice in your inbox

Signing you up...

This site is protected by reCAPTCHA and the Google Privacy Policy and Terms of Service apply.
See all newsletters
See all newsletters

Follow

  • X
  • YouTube
  • instagram
  • facebook
  • pinterest
  • Tiktok

Join All Access

Become a member and get instant access to thousands of videos, how-tos, tool reviews, and design features.

Start Your Free Trial

Subscribe

FHB Magazine

Start your subscription today and save up to 70%

Subscribe

You have 1 free article remaining.

Get complete site access, including thousands of videos, how-to tips, tool reviews, and design features.

Start your FREE trial

Already a member? Log in

We hope you’ve enjoyed your free articles. To keep reading, become a member today.

Get complete site access to expert advice, how-to videos, Code Check, and more, plus the print magazine.

Start your FREE trial

Already a member? Log in

Privacy Policy Update

We use cookies, pixels, script and other tracking technologies to analyze and improve our service, to improve and personalize content, and for advertising to you. We also share information about your use of our site with third-party social media, advertising and analytics partners. You can view our Privacy Policy here and our Terms of Use here.

Cookies

Analytics

These cookies help us track site metrics to improve our sites and provide a better user experience.

Advertising/Social Media

These cookies are used to serve advertisements aligned with your interests.

Essential

These cookies are required to provide basic functions like page navigation and access to secure areas of the website.

Delete My Data

Delete all cookies and associated data