
Better Vented-Roof Baffles
Reduce the amount of moisture that gets into insulation baffles by installing a variable-permeance membrane.
I am getting ready to insulate the cathedral ceiling of my new sunroom here in New England. I have researched airflow baffles that need to be installed between the roof deck and the fiberglass insulation for proper roof venting. I have decided on a product made of PVC. PVC will not allow moisture to escape into the baffle airflow space when—not if—it gets into the fiberglass insulation space. Some manufacturers’ instructions call for a 2-in. space between the butt ends of each baffle so some insulation is exposed to the airflow, but not enough to clog the airway. Is this enough space to guarantee that no moisture will be trapped in the insulation and void the R-value of the product?
—Brad via email
Michael Maines, a designer and builder in Palermo, Maine, replies: While the most popular insulation baffles, made from expanded polystyrene, allow vapor to pass through, you are correct that PVC will block moisture. In cold climates, including zones 5 to 7 in New England, vapor drive is almost always from interior to exterior; some moisture will find its way to the insulation baffle, so it’s good to consider what happens when it does.
Fortunately, in most cases the small amount of moisture that makes its way to the baffle can be safely absorbed by the rafter and harmlessly released when the roof heats up in the summer. As long as the rate of wetting is lower than the rate of drying, there should be no problems. But there are a few things to consider.
Air leaks carry (and deposit) a lot more water vapor than the amount that moves through solid materials via diffusion, so it’s important to have at least one continuous air-control layer in your assembly. It can be drywall, but any penetrations such as ceiling lights need to be carefully detailed. The ridge area of cathedral ceilings is especially vulnerable to air leaks and resulting condensation and rot, so take extra care in that location.
Although drywall with latex paint qualifies as the Class III vapor retarder required by building codes in most of New England, you can further reduce the amount of moisture moving via diffusion by installing a variable-permeance membrane at the interior, sometimes called a smart membrane or smart vapor retarder. This membrane can double as an air-control layer, though some brands make it easier than others. The advantage of variable-permeance membranes compared to static membranes like polyethylene sheeting is that in situations where vapor drive is reversed (generally, air-conditioning season), the variable- permeance membrane will allow drying to the interior. You are asking about a sunroom roof—if it’s the kind of sunroom that might have a lot of plants or something else that raises the indoor relative humidity beyond normal levels, I would definitely include a variable-permeance vapor retarder.
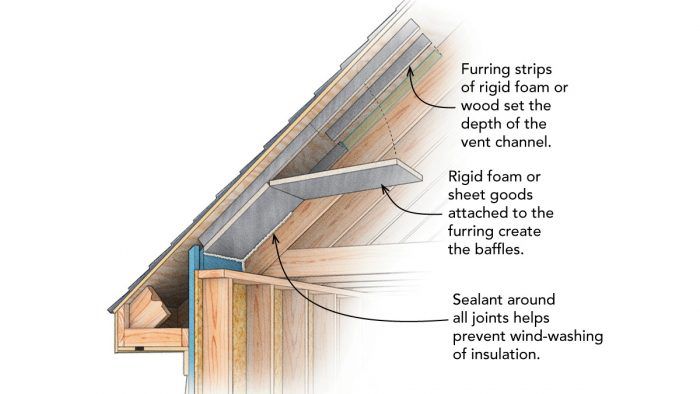
Building scientists often recommend making the vent baffles airtight to fight wind-washing—the tendency of moving air to rob R-value from the insulation. The more porous the insulation, the more notable the effect. Dense-pack cellulose and mineral-wool batts are denser and somewhat less prone to wind-washing than are fiberglass batts. Martin Holladay, in his 2015 Green Building Advisor article, “Site- Built Ventilation Baffles for Roofs,” recommends following the Energy Star Homes approach, which calls for air-permeable insulation to be sealed on all six sides. He suggests using tape, sealant, or spray foam to seal the perimeter of each baffle. That’s the opposite of leaving a 2-in. gap between baffles. (Are you sure that’s in the instructions? I’m only familiar with two brands of PVC baffles, AccuVent and SmartBaffle, and neither recommends a gap.)
Although Energy Star says that air-permeable insulation needs to be sealed on all six sides, that is never done in open attics with loose-blown or batt insulation, and it may not be necessary in rafter bays either. But if you don’t air-seal the vent chutes, assume that at least 1 in. to 2 in. of insulation won’t be providing the full R-value. I still would not intentionally leave gaps between baffles; in some conditions the air in the vent space will be carrying a lot of moisture, and you don’t want it deposited on cooler insulation. If you’re in a high-wind zone, in fact, I recommend overlapping the vent chutes shingle-style to drain wind-blown water back to the exterior.
If you’re still not convinced that you won’t have moisture problems, you could follow the advice Holladay provides in his article—make your own baffles of vapor-permeable materials such as thin EPS or fiberboard installed in an “airtight manner,” which he notes is especially important for cathedral ceilings.
Drawing: John Hartman
From Fine Homebuilding #296
Fine Homebuilding Recommended Products
Fine Homebuilding receives a commission for items purchased through links on this site, including Amazon Associates and other affiliate advertising programs.
Short Blade Chisel
Leather Tool Rig
Portable Wall Jack

