FHB Logo Facebook LinkedIn Email Pinterest Twitter Instagram Plus Icon Close Icon Navigation Search Icon Navigation Search Icon Arrow Down Icon Video Guide Icon Article Guide Icon Modal Close Icon Guide Search Icon Skip to content
Subscribe

In every issue you'll find...

  • Expert insights on techniques and principles
  • Unbiased tool reviews
  • Step-by-step details to master the job
  • Field-tested advice and know-how
Subscribe Now!
Subscribe
  • How-To
  • Design
  • Tools & Materials
  • Videos
  • Blogs
  • Forum
  • Magazine
  • Members
  • FHB House
  • Podcast
  • Join
  • Log In
Subscribe
How-To

Jacking up a garage

By George Nash Issue 85

Q:

I have a separate garage, which is 34 ft. long by 32 ft. wide, with 2×6 walls. Part of its stepped concrete-block foundation was built on filled land. The east wall has settled more than 4 in. in the past six years. I wouldn’t be surprised if it settled more during the next six years.

F. B. Plasman, East Lansing, MI

A:

George Nash, author of Renovating Old Houses, replies: Because the web of framing, siding and sheathing distributes loads so efficiently, you’ll be amazed by how little force and bracing it takes to lift a stick-framed structure. Most of the lifting that will correct your sagging east wall will be from the eastern corners of the north and south walls.

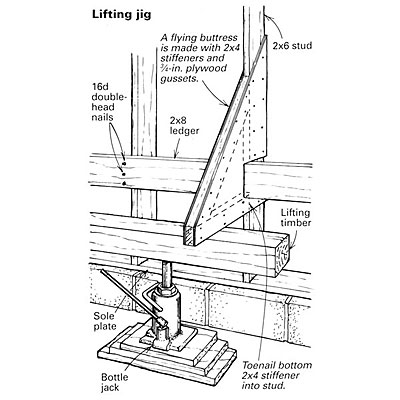
Inside the garage, tack two 12-ft. long 2×8 ledgers to the northeast and southeast walls, about 2 ft. from the garage floor. Once the ledgers are up, drive three double-headed 16d form nails through the ledgers into each stud. Then nail a triangular 3/4-in. plywood gusset to both sides of studs that occur at every 4 ft. along the ledgers, notching the gussets 3-1/2 in. from the bottom to fit around the ledger. Nail flatwise 2×4 stiffeners between the gussets. The top edge of the bottom stiffener should bear against the underside of the ledger. And toenail the bottom 2×4 stiffeners to the studs.

You could try jacking under each of these builtup gussets, called flying buttresses, but you can balance the lift better by setting a long 4×6 (on edge) or a 6×6 timber under these flying buttresses and jacking from under the timbers.

With the same timber and buttress arrangement on the northeast and southeast walls, alternate the jacking so that the building rises more or less evenly. Set a few 4×4 braces diagonally against the outside of the wall to keep it from kicking back as it’s lifted.

Remove the nuts from foundation anchor bolts or saw through any metal anchors. If the sole plate of the wall is nailed into a mudsill, pull all the nails. You may need to pry the plate off the foundation when you start jacking. If lifting the ends of the two long walls doesn’t take the whole east wall up with it, try levering up the east Remove the nuts from foundation anchor bolts or saw through any metal anchors. If the sole plate of the wall is nailed into a mudsill, pull all the nails. You may need to pry the plate off the foundation when you start jacking. If lifting the ends of the two long walls doesn’t take the whole east wall up with it, try levering up the east

Drive stakes into the garage floor (or tack them to the foundation wall) at the inside corners of the east wall and stretch a leveling string between them so that you’ll know how high to lift.

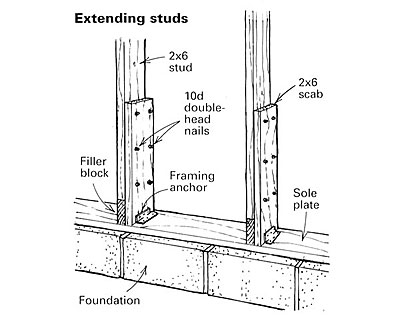
As far as filling in the space, cutting tapered 4x6s seems like a lot of trouble, especially if you have to shim them up again in the future. Instead, while the building’s off the foundation, use a sledgehammer to detach the sole plate from the studs. You may have to remove some siding and saw through some sheathing and nails first to free the sole plate. Then nail it to the sill or reattach it to the anchor bolts. Using double-headed nails, scab a 2-ft. long 2×6 to the side of each stud and tie the scabbed 2x6s to the plate with metal framing anchors. Cut pieces of blocking to fill in the gaps between the bottoms of the studs and the plates. If the wall continues to settle, all you have to do is pull the nails out of the scabs and replace the blocks with taller ones.

When you release the pressure on the jacks and remove the ledger and buttresses, the wall should settle, and any gap should disappear. If a gap doesn’t close up, try laying a plank across the roof and pound on it with a sledgehammer.

Finally, fill in the outside of the wall with tapered pieces of sheathing and siding. Before applying the finish siding, install metal flashing over the sheathing and let the flashing run 3 in. or 4 in. below the top of the foundation wall; if you need to lift the walls again, the gap will stay covered.


Lifting jig

Extending studs

Sign up for eletters today and get the latest how-to from Fine Homebuilding, plus special offers.

Signing you up...

This site is protected by reCAPTCHA and the Google Privacy Policy and Terms of Service apply.
See all newsletters
See all newsletters
×

Get home building tips, offers, and expert advice in your inbox

Signing you up...

This site is protected by reCAPTCHA and the Google Privacy Policy and Terms of Service apply.
See all newsletters
See all newsletters

New Feature

Fine Homebuilding Forums

Ask questions, offer advice, and share your work

View Comments

  1. user-7038851 | Aug 22, 2019 06:34am | #1

    a word of caution: i tried this method. Unfortunately, the studs were not firmly attached to the outside sheathing, and my bracing to keep the wall from kicking out did nothing to help the bottoms of the 2x4's from kicking INTO the inside. If you look at the gussets, it is obvious in hindsight that there would be a torquing force to peel the bottom of the studs off of the wall. I had to quickly run some threaded rods thru the wall and make the wall sandwich tight to continue the lift

Log in or create an account to post a comment.

Sign up Log in

Become a member and get full access to FineHomebuilding.com

Up Next

Video Shorts

Featured Story

Introduction to the Sustainable Home Building Accelerator

Watch this video to learn about the goals of the Sustainable Building Course based on the Pretty Good House.

Featured Video

A Modern California Home Wrapped in Rockwool Insulation for Energy Efficiency and Fire Resistance

The designer and builder of the 2018 Fine Homebuilding House detail why they chose mineral-wool batts and high-density boards for all of their insulation needs.

Related Stories

  • Tips for Choosing and Installing a Woodstove
  • Garage Separation for a High-Performance Build
  • Adding Garage Outlets
  • Maintaining Traditional Character on a Narrow Lot

Discussion Forum

Recent Posts and Replies

  • |
  • |
  • |
  • |
  • |
  • |
View More Create Post

Highlights

Fine Homebuilding All Access
Fine Homebuilding Podcast
Tool Tech
Plus, get an extra 20% off with code GIFT20

"I have learned so much thanks to the searchable articles on the FHB website. I can confidently say that I expect to be a life-long subscriber." - M.K.

Get home building tips, offers, and expert advice in your inbox

Signing you up...

This site is protected by reCAPTCHA and the Google Privacy Policy and Terms of Service apply.
See all newsletters
See all newsletters

Video

View All
  • Garage Separation for a High-Performance Build
  • Podcast Episode 140: Getting the Details Right When Re-Siding
  • Podcast Episode 87 — A Whole-House Remodel
  • Podcast Episode 57 — Remodeling a Snowy Mountain Home
View All

Maintenance and Repair

View All Maintenance and Repair Articles
  • Repairing Water Damage
  • Expert Session: Making Sense of Deck Stains and Finishes
  • Renewing a Deck
  • Building for Floods
View All Maintenance and Repair Articles

BOOKS, DVDs, & MERCH

Shop the Store
  • 2023 Tool Guide
    Buy Now
  • 2022 Fine Homebuilding Archive
    Buy Now
  • Pretty Good House
    Buy Now
  • Code Check Building 4th Edition
    Buy Now
  • Shop the Store

Fine Homebuilding Magazine

  • Issue 313 - Feb/March 2023
    • Practical System for a Seismic Retrofit
    • Fine Homebuilding Issue #313 Online Highlights
    • Practical System for a Seismic Retrofit
  • Issue 312 - Dec 2022/Jan 2023
    • Tool Test: Cordless Tablesaws
    • Gray-Water System for a Sustainable Home
    • Insulate a Cape Roof to Avoid Ice Dams
  • Issue 311 - November 2022
    • 7 Steps to a Perfect Exterior Paint Job
    • Options for Smarter Home-Energy Tracking
    • The Fine Homebuilding Interview: James Metoyer
  • Issue 310 - October 2022
    • Choosing a Tile-Leveling System
    • Choosing Between HRVs and ERVs
    • Custom Built-in Cabinets Made Easy
  • Issue 309 - Aug/Sept 2022
    • 10 Steps to Install Crown Molding on Cabinets
    • How to Get Sturdy Walls Without OSB
    • Choosing the Right Construction Tape for the Job

Fine Homebuilding

Follow

  • twitter
  • facebook
  • instagram
  • pinterest

Newsletter

Get home building tips, offers, and expert advice in your inbox

Signing you up...

This site is protected by reCAPTCHA and the Google Privacy Policy and Terms of Service apply.
See all newsletters
See all newsletters

Membership & Magazine

  • Online Archive
  • Start Free Trial
  • Magazine Subscription
  • Magazine Renewal
  • Gift a Subscription
  • Customer Support
  • Privacy Preferences

Taunton Network

  • Green Building Advisor
  • Fine Woodworking
  • Fine Gardening
  • Threads
  • About
  • Contact
  • Advertise
  • Careers
  • Copyright
  • Terms of Use
  • Site Map
  • Do not sell or share my information
  • Privacy Policy
  • Accessibility
  • California Privacy Rights

© 2023 The Taunton Press, Inc. All rights reserved.

X
X
This is a dialog window which overlays the main content of the page. The modal window is a 'site map' of the most critical areas of the site. Pressing the Escape (ESC) button will close the modal and bring you back to where you were on the page.

Main Menu

  • How-To
  • Design
  • Tools & Materials
  • Video
  • Blogs
  • Forum
  • Reader Projects
  • Magazine
  • Members
  • FHB House

Podcasts

  • FHB Podcast
  • ProTalk

Webinars

  • Upcoming and On-Demand

Account

  • Log In
  • Join

Podcasts

  • FHB Podcast
  • ProTalk

Webinars

  • Upcoming and On-Demand

Popular Topics

  • Kitchens
  • Business
  • Bedrooms
  • Roofs
  • Architecture and Design
  • Green Building
  • Decks
  • Framing
  • Safety
  • Remodeling
  • Bathrooms
  • Windows
  • Tilework
  • Ceilings
  • HVAC

Magazine

  • Current Issue
  • Past Issues
  • Magazine Index
  • Subscribe
  • Online Archive
  • Author Guidelines

All Access

  • Member Home
  • Start Free Trial
  • Gift Membership

Shop the Store

  • Books
  • DVDs
  • Taunton Workshops

More

  • FHB Ambassadors
  • Reader Projects
  • Podcast
  • Customer Support

Account

  • Log In
  • Join

Newsletter

Get home building tips, offers, and expert advice in your inbox

Signing you up...

This site is protected by reCAPTCHA and the Google Privacy Policy and Terms of Service apply.
See all newsletters
See all newsletters

Follow

  • twitter
  • facebook
  • instagram
  • pinterest

Join All Access

Become a member and get instant access to thousands of videos, how-tos, tool reviews, and design features.

Start Your Free Trial

Subscribe

FHB Magazine

Start your subscription today and save up to 70%

Subscribe

We hope you’ve enjoyed your free articles. To keep reading, become a member today.

Get complete site access to expert advice, how-to videos, Code Check, and more, plus the print magazine.

Start your FREE trial

Already a member? Log in