How to Insulate Cold Floors
For better energy performance, homes built on piers, rooms above garages, and cantilevered bays need properly air-sealed and insulated floors.
There are good reasons why we put more of our air-sealing and insulating time and money into attics and walls than we do floors. Dollar for dollar, upgrading your attic insulation is one of the best energy investments you can make. When we choose to insulate a roof assembly, it’s even more important that we get the details right.
For our walls, we have numerous insulation materials and methods to choose from. There’s fiberglass, which insulates just fine, but is tricky to install well. Cellulose can be damp sprayed or dense packed. Mineral wool is popular again. And there are open-cell and closed-cell spray foam, which are often misunderstood in properties and performance.
The truth is that our floors often don’t need to be insulated because they are inside the building envelope. Floors that are exposed on the underside to outdoor temperatures do need insulation however, and unfortunately, the job is often done poorly. Such floors can be found in homes with post foundations, in rooms over garages, and in cantilevered bays.
In many cases, these floors are casually insulated with fiberglass batts and covered with OSB or plywood. If the batts aren’t thick enough to fill the joist bays, they may fall away from the subfloor and rest on the OSB below. At that point, the floor assembly has an R-value of 0.
This type of floor usually leaks a lot of air, and the floor feels cold all winter long. If the floor includes plumbing, frozen pipes are a distinct possibility.
Bonus-room floors
There are two important reasons to do a careful job of air-sealing the floor of a bonus room over a garage: to improve the home’s energy performance and to prevent carbon monoxide from entering the room. Even after air-sealing, it’s essential that you install a CO detector.
When insulating a bonus-room floor, you’ll usually be working from below. If the area of the heated bonus room above the garage is smaller than the area of the garage ceiling, you’ll need to install blocking between the joists to provide an air barrier where the floor insulation stops. Locate the blocking under the kneewalls.
Blocking can be made from 2x lumber or rigid foam. If it is being installed between I-joists or floor trusses, rigid foam will be easier to cut into odd shapes than lumber. Whether you use 2x or rigid foam, it’s important to seal the perimeter of each piece of blocking with caulk or canned spray foam.
If the floor is the same size as the garage, it’s essential to air-seal the rim-joist area carefully. If ceiling joists extend from the house into the garage, you need to install blocking between the joists to maintain the home’s air barrier. Once the blocking has been installed, seal air leaks at the blocking and the rim-joist area on all four sides of the garage.
Air-seal, and hold insulation tight to subfloors The first step in energy-smart floor assemblies is air-sealing, which is particularly important in garages, where carbon monoxide and other toxic chemicals can leak into the living space above. Another significant detail is to make sure the insulation is held tight to the bottom of the subfloor; gaps negate the R-value of the insulation.
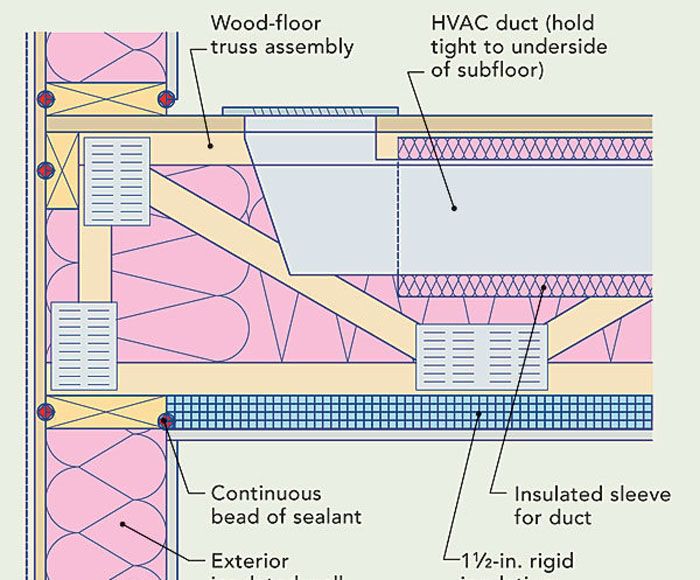
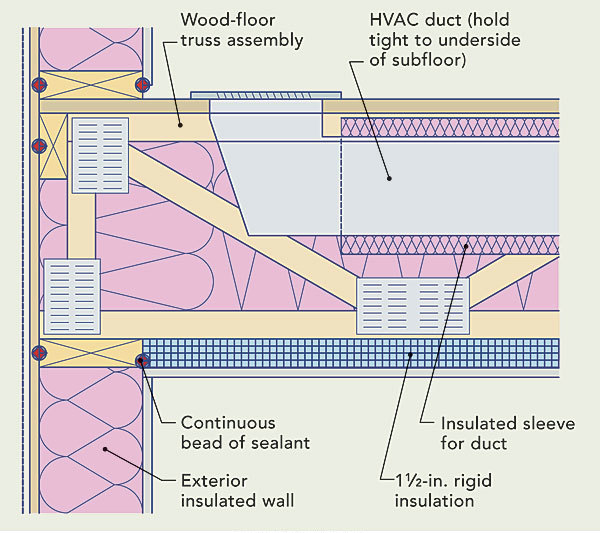
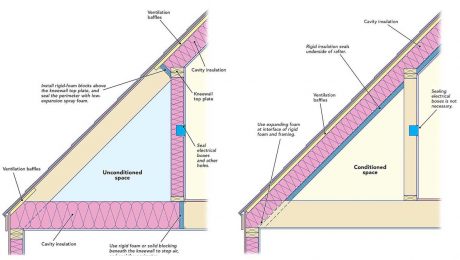
Floor above a garage This detail shows a garage bonus-room floor framed with open-web floor trusses. To prevent air leaks, it’s important to install caulk at all of the indicated locations. Ideally, the floor assembly won’t include any ducts. If there’s no way to avoid installing ductwork in the floor, specify deep floor joists, such as trusses, that provide plenty of room under the ducts for insulation, and be sure to include a continuous layer of rigid foam under the joists.
Smaller room over a large garage It is important to maintain a continuous thermal boundary between conditioned and unconditioned spaces. The weak link in this situation is the kneewalls. Install blocking (either wood or rigid foam) under the kneewalls, and insulate the walls, floor, and ceiling as shown.
 Floor above a garage
 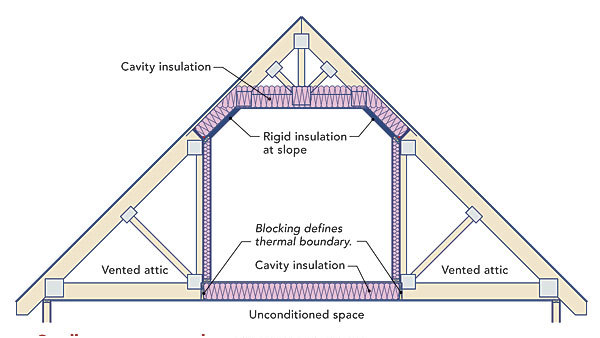 Smaller room over a large garage
Insulate ducts and plumbing, and put them close to the floor
If HVAC ducts are routed through the floor assembly, the floor joists must be deep enough to install several inches of insulation under the ducts. A floor with ducts also should be insulated with a continuous layer of thick rigid foam under the floor joists. To keep plumbing pipes from freezing, install them as close to the subfloor as possible, without insulation between the pipes and the subfloor. It’s also a good idea to install a layer of sealed rigid foam directly under the pipe. The rigid foam should extend the full width of the joist bay.
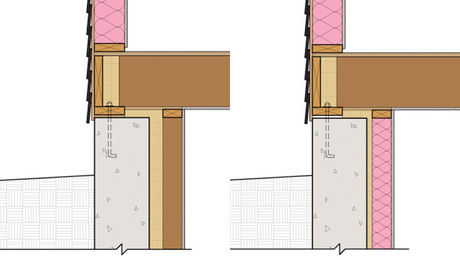
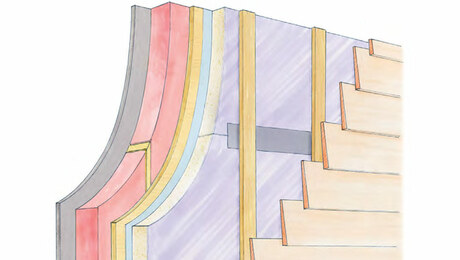
Cantilevered floors
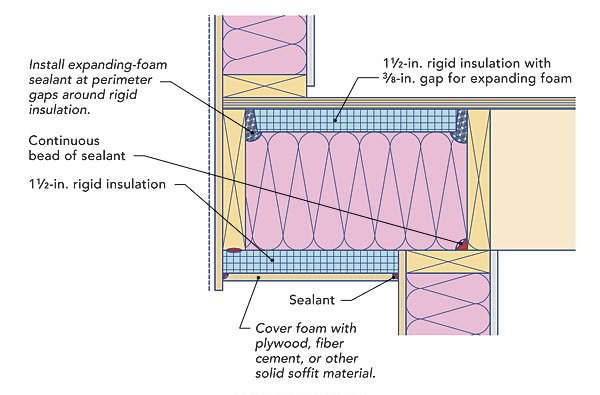
If you’re about to insulate a cantilevered floor, the first step is to install blocking between the joists. The blocking should be located above the bearing wall below. It’s better for the blocking to be on the interior side of the bearing wall rather than the exterior side. Seal each piece of blocking at the perimeter to prevent air leaks.
You can insulate cantilevered floors many ways; the illustration shows rigid foam at the top and bottom of the joist bays. At the top of the joist bays, insert narrow rectangles of rigid foam between each joist, and secure that foam to the subfloor with a compatible adhesive. Seal the perimeter of each piece of foam with caulk or canned foam.
Once the upper layer of foam is installed, the joist bays can be insulated with either fiberglass batts or with dense-packed cellulose insulation. Under the floor assembly, install a continuous piece of rigid foam mechanically fastened to the joists and in an airtight manner. Protect the foam with plywood or solid soffit material.
Cantilevered floor The blocking above the bearing wall helps to define the home’s air barrier, so each piece of blocking needs to be sealed at the perimeter with caulk or canned spray foam. As long as both layers of rigid foam are installed with attention to airtightness, this type of cantilevered floor performs well.
5 Tips for a Thermally Efficient Floor
1. Air-sealing is just as important as insulating; it’s especially crucial to seal the rim-joist area.
2. Fiberglass batts are the worst type of insulation for this application. Spray foam performs well because it adheres to the subfloor and stops air leaks.
3. If you’re insulating with fiberglass or cellulose, the insulation must completely fill the joist bays, and the top of the insulation should be in full contact with the subfloor above. If you’re building an Energy Star house, these principles are mandatory elements of the Thermal Bypass Checklist.
4. It’s always a good idea to install a continuous layer of rigid foam on the underside of the floor joists, especially if the joist bays are insulated with fiberglass batts or cellulose. Rigid foam stops thermal bridging through the floor joists and helps with air-sealing, especially if the perimeter of each piece of foam is sealed with caulk or high-quality tape. One of the best tapes for sealing the seams of rigid foam is 3M All Weather Flashing Tape 8067. The rigid foam should be protected by a layer of plywood, OSB, or drywall (for a garage ceiling).
5. Whatever type of insulation you install, the total R-value of the floor assembly must be no less than minimum code requirements. The 2009 International Residential Code calls for a minimum of R-13 floor insulation in climate zones 1-2, R-19 in zones 3-4 (except marine 4), and R-30 in marine 4 and zones 5-8.
RELATED LINKS


View Comments
I have a dirt crawl space, would it be a good idea to fasten rigid foam insulation panels to the underside of the floor joists? Or would that trap moisture and potentially create a mold problem between the joist bays? I live in climate zone 5.
Thanks