FHB Logo Facebook LinkedIn Email Pinterest Twitter Instagram Plus Icon Close Icon Navigation Search Icon Arrow Down Icon Video Guide Icon Article Guide Icon Modal Close Icon Guide Search Icon Skip to content
Main Menu
Subscribe

In every issue you'll find...

  • Expert insights on techniques and principles
  • Unbiased tool reviews
  • Step-by-step details to master the job
  • Field-tested advice and know-how
Subscribe Now!
Subscribe
  • How-To
  • Design
  • Tools & Materials
  • Videos
  • Blogs
  • Forum
  • Magazine
  • Members
  • FHB House
  • Podcast
  • Join
  • Log In
Main Menu Subscribe
Mastered in a Minute

How to Make a Zero-Clearance Miter Saw Fence

Quickly make a subfence out of scrapwood and Super Glue for precision cutting of trim and cabinet parts.

By Matthew Millham

Making small, accurate cuts on a miter saw is safer when using a zero-clearance fence. Here’s how to make one:

Cut two pieces of stock about the same length as the base—or even longer if you want additional support for long pieces of molding. The vertical piece should be taller than the material you want to cut, and the base should be at least the depth of the table—the key is to make it deep enough that the saw won’t cut all the way across it. Ideally you want at least a few inches of meat left in the front of the base after kerfing it for the 90° cut, because this is all that’s going to hold the zero-clearance fence together.

To assemble, start by placing the base piece tight against the fence, then position the vertical piece, and draw a line where the two pieces intersect. Remove the vertical and apply a bead of CA glue, also known as Super Glue, along the back of the base, staying between the line and the back of the piece.

To speed up the curing of the glue, spray the vertical’s bottom edge with curing activator. Then place the vertical tight against the fence, activator down, as you slide it down into the bead of glue. Hold the vertical firmly against the base for about 10 seconds, or until the glue grabs hold.

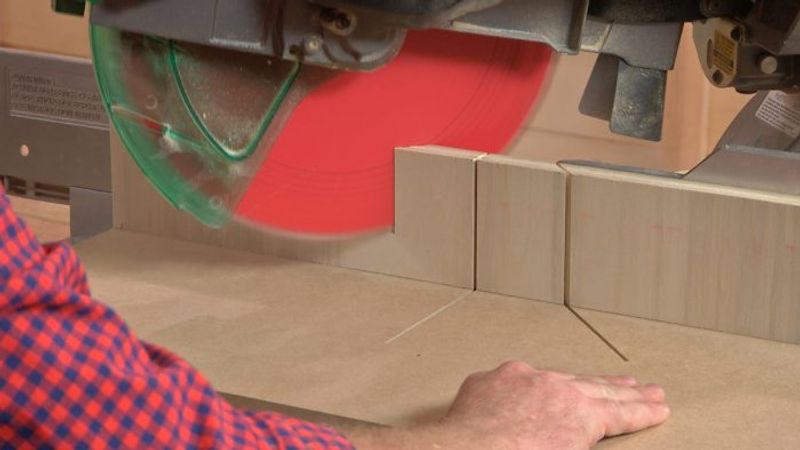
To finish the fence, push the saw’s slide carriage (if it has one) all the way back and lock it there, then make the three primary cuts at 90° and 45° in both directions, and the zero-clearance fence is ready for use.

Sign up for eletters today and get the latest how-to from Fine Homebuilding, plus special offers.

Sign Up

Get home building tips, offers, and expert advice in your inbox

×
X
X

New Feature

Fine Homebuilding Forums

Ask questions, offer advice, and share your work

View Comments

  1. User avater
    ArmandLewis | Oct 04, 2019 05:20am | #1

    It's amazing!

Log in or create an account to post a comment.

Sign up Log in

Become a member and get full access to FineHomebuilding.com

More Mastered in a Minute

View All
  • Stair Cable Rails

    How to Install Cable Rail on Stairs

  • How to Use Spring Miter Clamps

  • How to Use a Pocket-Hole Jig

  • How to Cut Extreme Angles on Your Miter Saw

View All

Up Next

Featured Story

FHB Podcast 346: Music Studios, Reducing Building Costs, and Indoor-Air Purifiers

Podcast 346: Music Studios, Reducing Building Costs, and Indoor-Air Purifiers

Matt, Kiley, and Patrick hear from listeners about energy-integration experts and ICC lawsuits before taking questions on converting a hog barn into a music studio, reducing costs in a new build, and the effectiveness of indoor-air purifiers.

Featured Video

How to Install Exterior Window Trim

In this episode of Shop Class, learn how to measure, cut, and build window casing made of cellular PVC, solid wood, poly-ash boards, or any common molding material. Plus, get tips for a clean and solid installation.

Related Stories

  • Built-ins for Odd Spaces

  • Scribing Made Simple

  • Exterior PVC Trim: Windows and Doors

  • Exterior PVC Trim: Wire and Pipe Penetrations

Discussion Forum

Recent Posts and Replies

  • |
  • |
  • |
  • |
  • |
  • |
View More Create Post

Highlights

  • Fine Homebuilding All Access
  • Fine Homebuilding Podcast
  • Tool Tech

    Plus, get an extra 20% off with code GIFT20

  • "I have learned so much thanks to the searchable articles on the FHB website. I can confidently say that I expect to be a life-long subscriber." - M.K.

    Get home building tips, offers, and expert advice in your inbox

    Sign Up See all newsletters

Video

View All
  • How to Make a Zero-Clearance Miter Saw Fence

  • Coping Crown Molding on Inside Corners

  • A Versatile Miter Saw Station Video

    Build a Built-in Mudroom Series: A Versatile Miter Saw Station

  • Tool Review: Milwaukee's New 12-in. Miter Saw

View All

Compound Miter Saws

View All
  • Supercapacity Sliding Miter Saw

    Supercapacity Sliding Miter Saw

  • Superportable Sliding Miter Saw

  • Floating shelves have a modern, seamless look. This article explains how to create floating shelves from 3/4-in. rift-sawn white-oak plywood, from cutting the mitered corners, to glue up, to installation. The author puts extra emphasis on the finishing touches—wire brushing, light sanding, and touch-ups.

    Floating Shelves Made Strong and Simple

  • The Britches Method: A Simple Template for Outside Skirt Returns

View All

BOOKS, DVDs, & MERCH

Shop the Store
  • Code Check Building 4th Edition

    Buy Now
  • Fine Homebuilding Magazine Slipcase

    Buy Now
  • Musings of an Energy Nerd

    Buy Now
  • 2020 Fine Homebuilding Archive

    Buy Now
  • Shop the Store

Fine Homebuilding Magazine

  • Issue 298 - April/May 2021

    • Butt Boards for Smooth Ceilings
    • Help Installing Gutters
    • Safety Bucket
  • Issue 297 - Feb/Mar 2021

    • Foundations for Success
    • Staircase Renovation
    • Ditch the Hose
  • Issue 296 - Dec 2020/Jan 2021

    • Insulating Glass Keeps Getting Better
    • Simple Way to Make Old Walls Straight and Plumb
    • Making Sense of Minisplits
  • Issue 295 - Kitchens & Baths

    • Condo Kitchen Reimagined
    • Row-House Remodel
    • Rise of the IAQ Monitor
  • Issue 294 - Oct/Nov 2020

    • Schoolhouse Reimagined
    • Tool Test: Folding Sawhorses
    • A Better Way to Build Tall Walls

Fine Homebuilding

Follow

Newsletter

Get home building tips, offers, and expert advice in your inbox

Sign Up See all newsletters

Membership & Magazine

  • Online Archive
  • Start Free Trial
  • Magazine Subscription
  • Magazine Renewal
  • Gift a Subscription
  • Customer Support
  • Manage Preferences

Taunton Network

  • Green Building Advisor
  • Fine Woodworking
  • Fine Gardening
  • Threads
  • About
  • Contact
  • Advertise
  • Privacy Policy
  • Careers
  • Copyright
  • Terms of Use
  • Accessibility
  • California Privacy Rights

© 2021 The Taunton Press, Inc. All rights reserved.

    Main Menu

  • How-To
  • Design
  • Tools & Materials
  • Video
  • Blogs
  • Forum
  • Reader Projects
  • Magazine
  • Members
  • FHB House
  • Podcasts

  • FHB Podcast
  • ProTalk
  • Account

  • Log In
  • Join

    Podcasts

  • FHB Podcast
  • ProTalk
  • Popular Topics

  • Kitchens
  • Business
  • Bedrooms
  • Roofs
  • Architecture and Design
  • Green Building
  • Decks
  • Framing
  • Safety
  • Remodeling
  • Bathrooms
  • Windows
  • Tilework
  • Ceilings
  • HVAC

    Magazine

  • Current Issue
  • Past Issues
  • Magazine Index
  • Subscribe
  • Online Archive
  • Author Guidelines

    All Access

  • Member Home
  • Start Free Trial
  • Gift Membership

    Shop the Store

  • Books
  • DVDs
  • Taunton Workshops

    More

  • FHB Ambassadors
  • Reader Projects
  • Podcast
  • Customer Support

    Account

  • Log In
  • Join

Newsletter

Get home building tips, offers, and expert advice in your inbox

Sign Up See all newsletters

Follow

Join All Access

Become a member and get instant access to thousands of videos, how-tos, tool reviews, and design features.

Start Your Free Trial

Subscribe

FHB Magazine

Start your subscription today and save up to 52%

Subscribe

We hope you’ve enjoyed your free articles. To keep reading, become a member today.

Get complete site access to expert advice, how-to videos, Code Check, and more, plus the print magazine.

Start your FREE trial

Already a member? Log in