FHB Logo Facebook LinkedIn Email Pinterest Twitter Instagram Plus Icon Close Icon Navigation Search Icon Navigation Search Icon Arrow Down Icon Video Guide Icon Article Guide Icon Modal Close Icon Guide Search Icon Skip to content
Subscribe
SUBSCRIBE TODAY

Save up to

70% off

the cover price

In-depth articles, up-close photography, and detailed illustrations in every issue.

Subscribe Now!
Subscribe
  • How-To
  • Design
  • Tools & Materials
  • Videos
  • Blogs
  • Forum
  • Magazine
  • Members
  • FHB House
  • Podcast
  • Join
  • Log In
Subscribe

Fine Homebuilding Project Guides

Finish & Trim Carpentry

Guide Home
Chapter
  • Trim Design
  • Tools and Materials
  • Interior Trim Basics
  • Window and Door Casings
  • Baseboard and Crown Molding
  • Wainscot and Paneling
  • Mantels and Fireplace Surrounds
  • Coffered Ceilings
Building Skills

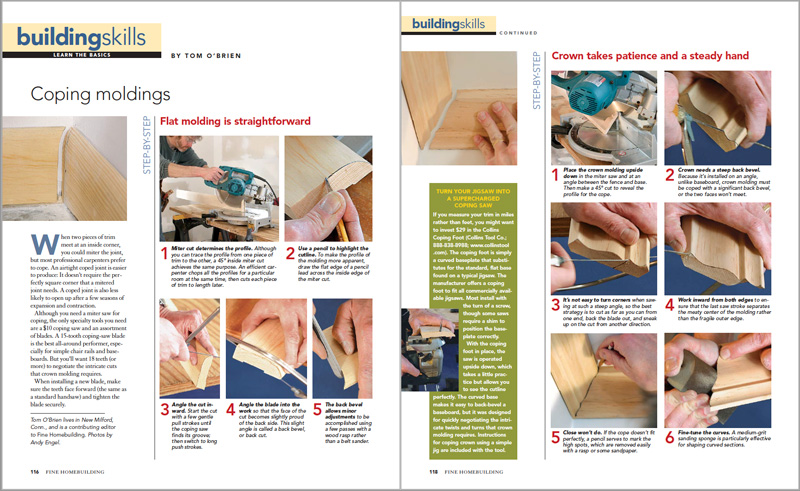
Coping Moldings

With a few common carpentry tools, making an airtight coped joint is easier than you might think–and more durable too.
By Tom O'Brien Issue 164
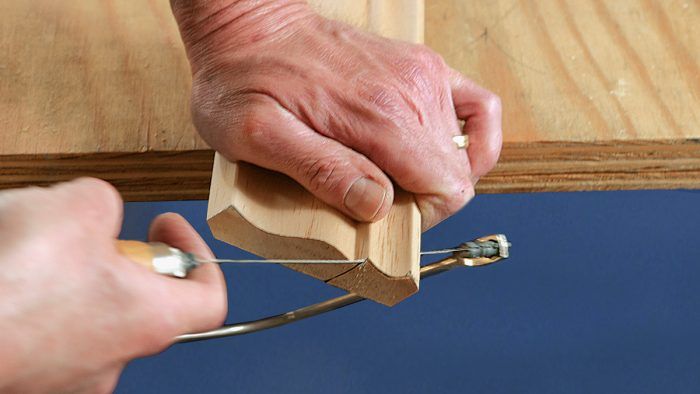
It’s not easy to turn corners when sawing at such a steep angle, so the best strategy is to cut as far as you can from one end, back the blade out, and sneak up on the cut from another direction.

Synopsis: Mitering trim joints works, but its not the method most pros prefer. Making an airtight coped joint is easier than you might think — and more durable too. Coped joints do not require perfectly square corners as miter joints do, and coped joints are also less likely to open up after a few seasons of expansion and contraction. As the author explains, all you’ll need to start coping is a $12 coping saw with a few blades to go along with your miter saw, or, if you plan on doing a great deal of coping, follow the authors instructions to turn your jigsaw into a supercharged coping saw. The article includes step-by-step instructions for producing perfect coped joints in both flat molding and crown molding, complete with detailed pictures to guide you through each step.


When two pieces of trim meet at an inside corner, you could miter the joint, but most professional carpenters prefer to cope. An airtight coped joint is easier to produce: It doesn’t require the perfectly square corner that a mitered joint needs. A coped joint is also less likely to open up after a few seasons of expansion and contraction.
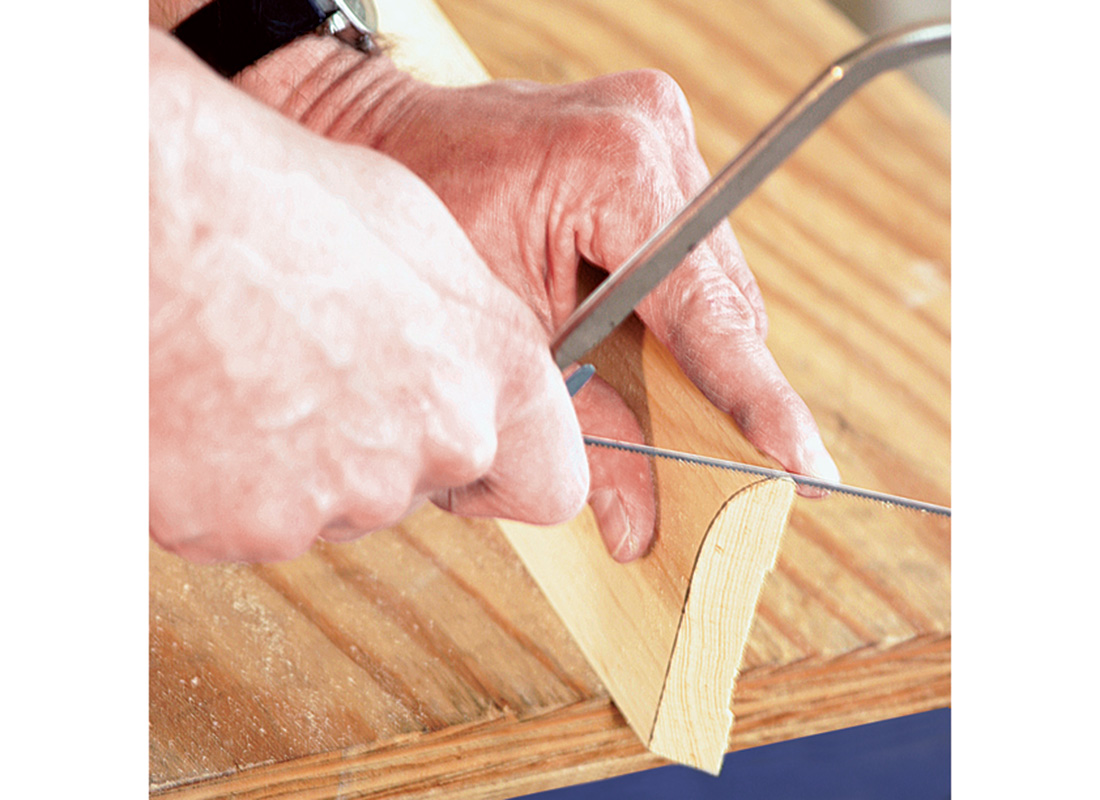
cutting into wood with coping saw
Angle the cut inward. Start the cut with a few gentle pull strokes until the coping saw finds its groove; then switch to long push strokes.

Although you need a miter saw for coping, the only specialty tools you need are a $12 coping saw and an assortment of blades. A 15-tooth coping-saw blade is the best all-around performer, especially for simple chair rails and baseboards. But you’ll want 18 teeth (or more) to negotiate the intricate cuts that crown molding requires.

When installing a new blade, make sure the teeth face forward (the same as a standard handsaw) and tighten the blade securely.

Turn your jigsaw into a supercharged coping saw

If you measure your trim in miles rather than feet, you might want to invest $35 in the Collins Coping Foot. The coping foot is simply a curved baseplate that substitutes for the standard, flat base found on a typical jigsaw. The manufacturer offers a coping foot to fit all commercially available jigsaws. Most install with the turn of a screw, though some saws require a shim to position the baseplate correctly. With the coping foot in place, the saw is operated upside down, which takes a little practice but allows you to see the cutline perfectly. The curved base makes it easy to back-bevel a baseboard, but it was designed for quickly negotiating the intricate twists and turns that crown molding requires. Instructions for coping crown using a simple jig are included with the tool…
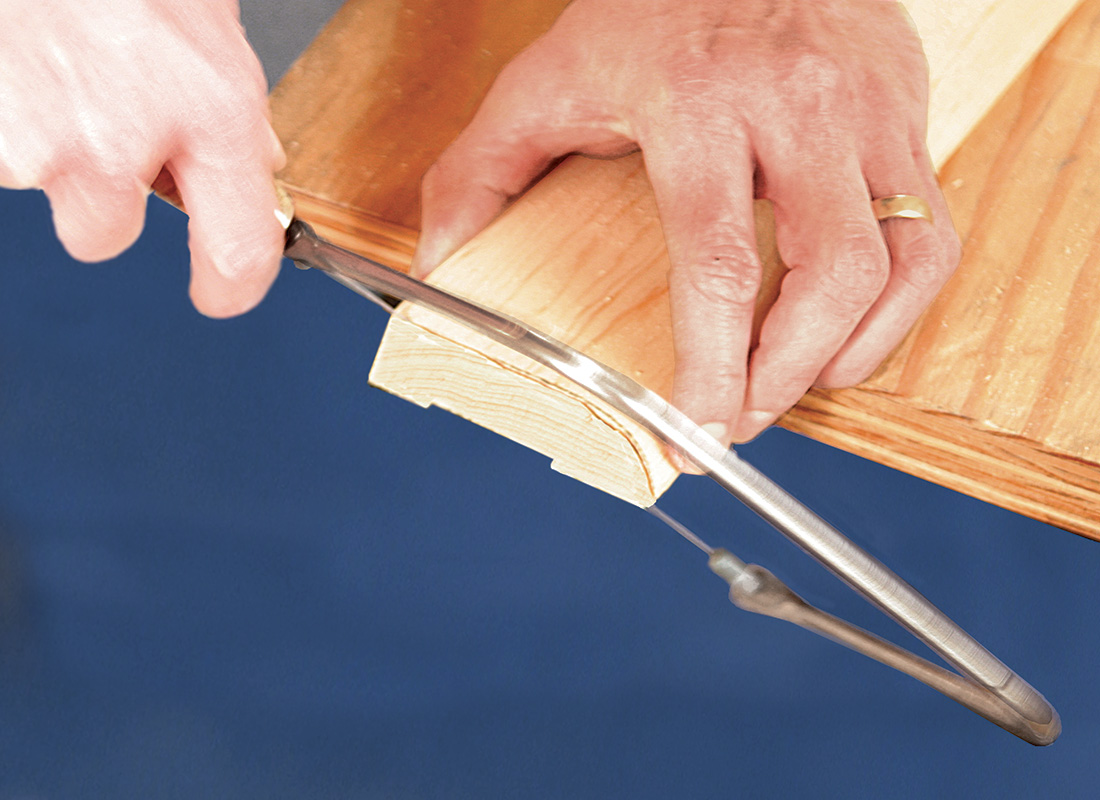
coping saw into blade to cut wood
Angle the blade into the work so that the face of the cut becomes slightly proud of the back side. This slight angle is called a back bevel, or back cut.


Coping moldings PDF spreadsheet

For complete step-by-step instructions for producing perfect coped joints, click the View PDF button below to read the entire article.

From Fine Homebuilding #164


Sign up for eletters today and get the latest how-to from Fine Homebuilding, plus special offers.

Sign Up
View PDF
Previous: Router Tricks for Trim Next: How to Make a Zero-Clearance Miter Saw Fence

Guide

Finish & Trim Carpentry

Chapter

Interior Trim Basics

Log in or create an account to post a comment.

Sign up Log in

Become a member and get full access to FineHomebuilding.com

Finish & Trim Carpentry

Finish & Trim Carpentry

Trusted, comprehensive guidance from the pros for creating perfect trim details in any room of the house

View Project Guide

View All Project Guides »

Become a member and get unlimited site access, including the Finish & Trim Carpentry Project Guide.

Start Free Trial

Trim Design
  • Trim Style and Design
Tools and Materials
  • Tools
  • Materials
Interior Trim Basics
  • Tips and Tricks
  • Techniques
  • Using Jigs
Window and Door Casings
  • Windows
  • Doors
Baseboard and Crown Molding
  • Baseboard
  • Crown Molding
  • Specialty Crown Situations
Wainscot and Paneling
  • Beadboard Wainscot
  • Paneled Wainscot
  • Chair Rails
  • Wall Treatments
Mantels and Fireplace Surrounds
  • Design
  • Installing Mantels and Surrounds
Coffered Ceilings

Fine Homebuilding

Follow

  • twitter
  • facebook
  • instagram
  • pinterest

Newsletter

Get home building tips, offers, and expert advice in your inbox

Sign Up
This site is protected by reCAPTCHA and the Google Privacy Policy and Terms of Service apply.
See all newsletters

Membership & Magazine

  • Online Archive
  • Start Free Trial
  • Magazine Subscription
  • Magazine Renewal
  • Gift a Subscription
  • Customer Support
  • Privacy Preferences

Taunton Network

  • Green Building Advisor
  • Fine Woodworking
  • Fine Gardening
  • Threads
  • About
  • Contact
  • Advertise
  • Careers
  • Copyright
  • Terms of Use
  • Site Map
  • Do not sell my information
  • Privacy Policy
  • Accessibility
  • California Privacy Rights

© 2022 The Taunton Press, Inc. All rights reserved.

X
X
This is a dialog window which overlays the main content of the page. The modal window is a 'site map' of the most critical areas of the site. Pressing the Escape (ESC) button will close the modal and bring you back to where you were on the page.

Main Menu

  • How-To
  • Design
  • Tools & Materials
  • Video
  • Blogs
  • Forum
  • Reader Projects
  • Magazine
  • Members
  • FHB House

Podcasts

  • FHB Podcast
  • ProTalk

Webinars

  • Upcoming and On-Demand

Account

  • Log In
  • Join

Podcasts

  • FHB Podcast
  • ProTalk

Webinars

  • Upcoming and On-Demand

Popular Topics

  • Kitchens
  • Business
  • Bedrooms
  • Roofs
  • Architecture and Design
  • Green Building
  • Decks
  • Framing
  • Safety
  • Remodeling
  • Bathrooms
  • Windows
  • Tilework
  • Ceilings
  • HVAC

Magazine

  • Current Issue
  • Past Issues
  • Magazine Index
  • Subscribe
  • Online Archive
  • Author Guidelines

All Access

  • Member Home
  • Start Free Trial
  • Gift Membership

Shop the Store

  • Books
  • DVDs
  • Taunton Workshops

More

  • FHB Ambassadors
  • Reader Projects
  • Podcast
  • Customer Support

Account

  • Log In
  • Join

Newsletter

Get home building tips, offers, and expert advice in your inbox

Sign Up See all newsletters

Follow

  • twitter
  • facebook
  • instagram
  • pinterest

Join All Access

Become a member and get instant access to thousands of videos, how-tos, tool reviews, and design features.

Start Your Free Trial

Subscribe

FHB Magazine

Start your subscription today and save up to 70%

Subscribe

We hope you’ve enjoyed your free articles. To keep reading, become a member today.

Get complete site access to expert advice, how-to videos, Code Check, and more, plus the print magazine.

Start your FREE trial

Already a member? Log in