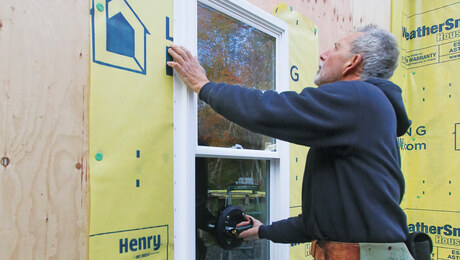
Installing and Flashing Windows Before Housewrap
Use proper prep and flashing details to install weathertight windows before the water-resistive barrier goes on.
There are a few good reasons why builders and installers may choose to install windows before housewrap—open-stud construction, windy conditions, project scheduling, and the building inspection process, to name a few. Sometimes it’s just local custom. With proper flashing techniques and protection around the rough opening, you can install windows before adding the mechanically fastened water-resistive barrier (housewrap), and ensure they’re just as well-protected from the weather.
You may be skeptical about the water resistance and extra work that seemingly is involved if you haven’t seen a windows first installation, but you’ll find that it’s likely not much different than what you’re already doing, and in some instances, this method may even be a bit more water resistant.
In this video, Mike Guertin walks through the process, finishing with installing the housewrap on the wall:
You’ve probably seen a lot of housewrap-first installations, with the windows installed after the housewrap is done. This is a different way of installing windows that you might not be familiar with: installing the windows first and then putting the housewrap on afterward.
You are probably skeptical if you haven’t seen a windows-first installation and you might be concerned about the water resistance and the extra work that might be involved, but it isn’t that much different than what you’re already doing—the difference is only in sequence.
Start with the apron
The manufacturers of most windows and housewrap call for about a 1-ft. piece that extends at least 1 ft. to the left and 1 ft. to the right of your rough opening. I prefer to cut the piece of apron wide enough to either reach over the foundation or, if you’re working on an upper floor where you’ll have a wall below, leave it long enough so that it’ll reach over the top of the housewrap roll that’ll come across underneath.
I’m only going to put staples along this top edge and leave the bottom loose—this will be loose for the remainder of your job. That could be weeks, so just take a couple of cap staples or cap nails and install those and they’ll hold the housewrap down so it doesn’t blow around and get damaged. Then you can just use the claw of your hammer and pop those staples out when the time comes so that you can tuck another piece of housewrap under in the event you’re working on a second-floor window.
Slope the sill
The next step is to slope the sill (or use a back dam) and then install the sill pan flashing. I use a piece of straight flashing across the front and fold that down and then put flexible flashing tape to the left and the right.
Because we’ve got a beveled sill, I want to have support for the window, so I use the same type of or the same pieces of bevel siding that I used for the sill pan as shims that I can adjust in and out before putting the window in, so I don’t have to fuss with the window once it’s installed.
At this point, I’m ready to put the window in and dry-fit it and make sure everything’s centered right. I make sure everything looks level and plumb and then I pop it out and get ready to do the second part of the prep.
Install the window
At this point, there are three different main options for putting the window in. One way is to is to put a bead of sealant around the perimeter except along the bottom edge and then put the window in right over that. Once it’s plum, level, and square, flashing tape goes over the side.
Another way to do it is to put strips of housewrap on the left and the right side of the opening. Manufacturer’s installation instructions will vary, but many of them are going to show those strips just sitting flush with the rough opening and then hanging down maybe 4 in. or 5 in. below the rough opening and about 3 in. or 4 in. inches above the rough opening on the sides. Rather than using housewrap, you could use a piece of flashing tape. Whether I’m using the housewrap piece or the flashing tape piece, I make sure to extend that into the rough opening, which means making this strip a little bit wider, maybe about 16 in. or 18 in. wide.
The third main method that you’ll see some manufacturer’s describe is a sort of a hybrid where you take a piece of housewrap about 2 ft. wider than the rough opening and tall enough to go about 16 in. to 18 in. above the rough opening, and install the housewrap over the rough opening. With this method, you don’t even need to put the apron piece at the bottom because this sheet will end up being the apron.
The manufacturer of the window will dictate whether or not you use sealant to seal the flange of the window to the wrap at the left and the right side and at the head. Don’t ever put sealant down at the bottom at the sill pan because then you’re defeating the purpose of the draining sill pan because the water won’t weep out.
You can put the sealant on the wall, or you can put a bead along the flange. I like to put it on the flange even though it can get a little messy because then you know you’re going to have a bead of sealant in the right place. Sometimes if you put the bead of sealant on the outside of the wall and then you put the window in, you go a little too far away from the opening and it doesn’t actually seal into the bead. I like suction cups for installing windows because I don’t have to grab the window by the flange and get my fingers all gooped up with that caulking.
We center it in the opening and check it to make sure that it’s still nice and level. I’ll put two fasteners at the top and then check it for plum and square. Then I use the level as a straightedge to make sure that the jamb itself is good and straight and it doesn’t have a bow in or a bow out in the middle. Then we fasten it according to the manufacturer’s fastening schedule, which is usually every other hole.
Add side and head flashing
Some manufacturers of windows would say at this point, the sides are finished and you just smooth out any of the squeeze-out. And later on, when it comes time to put the housewrap on, we would just bring the housewrap around that. Other manufacturers—and I agree with—them call for putting some flashing tape between the flange and this piece of housewrap. That can be done at this stage of the installation process before the housewrap goes on weeks or months from now. Or you could wait till the day that you’re going to be installing the housewrap across the whole wall and install the flashing tape then. In either case, it’s a good step to do.
I cut this flashing tape about 6 in. or 8 in. taller than the height of the window so that I can go about 3 in. above the top flange of the window, and then it will extend below the bottom of the bottom flange.
By having this flashing tape there, when eventually I put some siding in, any water that leaks in this joint between the end of the siding and the side of the window will be drained down either on the flange or on the flashing tape, which is layered over that side piece of the housewrap, which is also layered over the bottom of the flashing pan. As water comes out of the rough opening onto the apron, it’s going to drain down over the top of the foundation and do no harm. Or, if this was a second-floor window, we’d have another piece of housewrap from the sheet below, which would be tucked up under about 6 in. So everything’s layered-style all the way down the wall.
The final step before we put our housewrap on is to install head flashing, and this will just seal the wall sheathing above the window to the top flange of the window. You can think of it as counterflashing in a way where the flange of the window at the top is your flashing to the head of the window. I cut this piece so that it is 14 in. or 16 in. longer than the width of the window. That way, it extends a little bit past the flashing on the right and left sides.
Finally, install the housewrap
Now this can sit for weeks or a month or more until the point after the final inspection of the nailing of the wall sheathing and the window installation and then the housewrap can go on the outside. There’s no need to cut the window opening out as you’re rolling the housewrap over, just make sure that you tack it along the top and leave it loose around the perimeter, and go back later and cut it out. I use a few cap staples along the top edge to hold it in place and then nail off the field with cap staples after I cut the window out.
When you’re putting on housewrap on inside corners, the last thing you want to do is bridge or get a hollow spot behind that inside corner when you’re putting the housewrap on because then it’s vulnerable to being punctured when you put on inside corner boards or siding that butts up inside the corner.
To get it tight, you should push it in, but your fingers aren’t always that good. Some people will use a piece of 2×4 or 1x like I’ve got here. The trouble is that the radius edges on those can also leave a hollow. And if the wall isn’t nice and straight and it’s got a little bit of a bow to it, then that board is not going to push the housewrap tight.
I like to take a piece of clapboard bevel siding, maybe 2 ft. or 3 ft. long, and nail a handle on it. Then I round the corners and use that to push nice and tight on the inside corner. In that way, I’m almost assured that I’m not going to have that bridging problem on the inside.
To cut the housewrap out around the window, I could use a utility knife if I’m really careful, but I’m always reluctant to use a utility knife because if you puncture through, you’ll hit the flashing tape that’s back there and do some damage. Instead, I use a pair of scissors and make the cut about 1 in. away from the window edge, and that way it’ll give me an opportunity to seal the edge of the housewrap around the perimeter of the window by sealing it to the flashing tape that’s underneath there.
You have options for how you seal the housewrap to the flashing system around the window. If you put the fasteners too close, you limit the options that are available to you. One option that you’ll see illustrated by manufacturers is to do nothing—just staple around the edge and figure that the overlap is enough that any water that gets shed from the housewrap over the head flashing or that comes down the side here is unlikely to migrate horizontally to get to the wall sheathing.
Another option is to put a bead of sealant. You can run a bead of caulking right around the perimeter and then press that in and then staple it off. That sealant is going to prevent water from moving sideways.
This isn’t the final option, but the way I like to do it is just take a piece of housewrap tape and run that right over the housewrap and the flashing tape that was installed over the flange of the window, and that holds it in place so that it’s not gonna blow around until you get the cladding on. And it does a decent job of sealing that joint.
The other option is to use flashing tape to seal the flashing tape that’s over the flange to the housewrap. There’s four different options above—you pick the one that you feel most comfortable with and that coincides with the manufacturers’ installation instructions for the products that you’re using.
Here across the top, I could install one piece of housewrap tape to go the whole length and seal it this way. But some contractors and some housewrap manufacturers recommend doing what’s called skip taping. Skip taping is where you take short pieces of tape and you install them with gaps in between. The thinking there is that in the event that water ever gets behind your housewrap further up the wall and is traveling down the wall, it would hit the top edge of the flashing tape, which is sealed to your wall sheathing. And if the water dribbles on the face of the flashing tape and it gets down to this point and you’ve sealed it horizontally with a piece of tape across here, the water is not going to be able to get out and it’s going to kind of puddle up. By skip taping, you’re getting a pretty good seal to keep the housewrap from moving around and it allows for the water that might be back there to weep out between those little spots.
But we’re not done with the head of the window. We still would like to have a head flashing piece. I made it the width of the window and I gave it some end dams. End dams are one method of terminating the end of the flashing. The other method is to downturn the end and have it down the side of the window. The reason you might want to put an end dam on is because it any water that’s moving sideways—rather than dribble down the side of the window—would be directed off the front of the window.
Finishing details.
Some of you might be looking at what I’m doing now and shaking your heads thinking the last thing you want to do is put the flashing on top of the housewrap. But because we’ve already got our housewrap over the flashing tape, I’d rather not be tucking this flashing underneath. This flashing is mainly there to deflect water that gets between the gap that we’re going to leave between the bottom butt edge of our cladding that goes over here. Any water that gets wind-driven up into that gap is just going to see this flashing and then drain down, so it’s really a deflector more than anything.
To add a little extra water resistance, I put either a piece of housewrap tape or I could use a piece of flashing tape across the top. And even though this is an adhesive seal and it may be prone to a little bit of water getting behind there and getting down behind the flashing, that’s not a big deal because under the flashing, we already have it flashed to the flange, but water that is dribbling down will hopefully drain on the top of that flashing and then over the top of the window.
Now we have to detail the bottom of the window, and we have a couple of things we can do. We can tape all of the loose edges of the housewrap pieces that we’ve installed previously just to keep them in place until the siding goes on. But what I really like to focus on at the bottom of the window is the issue of an unsealed bottom flange here that was done on purpose. We didn’t put any sealant along the back of the bottom flange so that if water ever gets to the horizontal point, it’ll drain out. But if wind-driven rain is coming in this direction, the wind pressure can actually blow water up under that flange and then into the flashing pan itself. To help resist that wind-driven rain, we can put on a high-pressure wind skirt (a rain skirt), a piece of housewrap that gets installed under the window and taped to the bottom.
Now, if wind-driven rain is being blown against the side of the building and gets behind the siding, it’s going to hit this high-pressure wind skirt, which will act as a deflector that will drain the water down a little bit further than the level of the flange.
Just as we did not tape or seal the bottom flange of the window, we’re not going to seal the bottom of this high-pressure wind skirt. We’re just going to staple it or skip tape it again. That way, if any water does get collected by the flashing pan, it’ll drain out behind this high-pressure wind skirt on top of the apron piece we installed earlier, and then it can drain out between the pieces of tape.
—Mike Guertin, editorial advisor
RELATED STORIES


View Comments
Curious about the flashing tapes with NO labels. The black flashing tape in particular is a mystery to me. The red housewrap tape appears to be 3M, and flex tape looks like Dupont (best one IMHO and short pieces makes a roll go a long way).
I often install Tyvek writing side toward the house (backwards) because I hate seeing the writing and prefer a blank white canvas. I also do not need to worry about the writing being upside down. Many years ago dupont told me that was fine...and tyvek really has no front/back.
The blank black tape in video would be nice compliment to blank white tyvek.