FHB Logo Facebook LinkedIn Email Pinterest Twitter X Instagram Tiktok YouTube Plus Icon Close Icon Navigation Search Icon Navigation Search Icon Arrow Down Icon Video Guide Icon Article Guide Icon Modal Close Icon Guide Search Icon Skip to content
Subscribe
Log In
  • How-To
  • Design
  • Tools & Materials
  • Restoration
  • Videos
  • Blogs
  • Forum
  • Magazine
  • Members
  • FHB House
  • Podcast
Log In

Fine Homebuilding Project Guides

Finish & Trim Carpentry

Guide Home
  • Trim Design
  • Tools and Materials
  • Interior Trim Basics
  • Window and Door Casings
  • Baseboard and Crown Molding
  • Wainscot and Paneling
  • Mantels and Fireplace Surrounds
  • Coffered Ceilings
How-To

How to Build a Coffered Ceiling with Box Beams

Built of plywood and MDF, these beams go up quickly, resist movement, take paint well, and even level a wavy ceiling.

By Joseph B. Lanza Issue 197
  • X
  • facebook
  • linkedin
  • pinterest
  • email
  • add to favorites Log in or Sign up to save your favorite articles
Photo: Charles Bickford

Synopsis: Open areas might be nice, but they can seem cavernous without a way to differentiate the space. For architect and builder Joseph Lanza, one way to overcome that obstacle is with coffered ceilings. In this article, Lanza focuses on the construction of the box beams that he uses as the basis for the coffered ceilings he builds out of medium-density fiberboard and plywood. He also offers advice on dividing ceiling space and leveling wavy ceilings.


Like many of us, my clients tend to do most of their living in open rooms that serve multiple purposes. But in the small older houses in southeastern Massachusetts where I do most of my design and remodeling work, large rooms are rare, so I end up taking down walls or building additions to create them. Removing walls and adding small bump-outs change the scale of a space, which can make it look and feel awkward. When this happens, a coffered ceiling can create a more comfortable scale and restore order by dividing a big space into separate areas. Even though most of the beams in a coffered ceiling are hollow, they should look like a convincing structural system. Once the beams are built, each recess is typically finished with molding, but I’m focusing here on creating the box-beam grid.

Make use of existing beams

Nonstructural hollow box beams can carry a lot of architectural weight, but it’s often necessary to combine them with a structural beam when walls have been removed.

In the kitchen/dining/living area shown here, we bumped out a 40-ft.-long exterior wall by 6 ft. and replaced it with a 16-in. LVL beam supported by two 3-1/2-in.-sq. columns. The beam bisected the ceiling into long, narrow areas disproportionate to one another. I needed to divide the ceiling into sections that made sense visually while incorporating the LVL and columns.
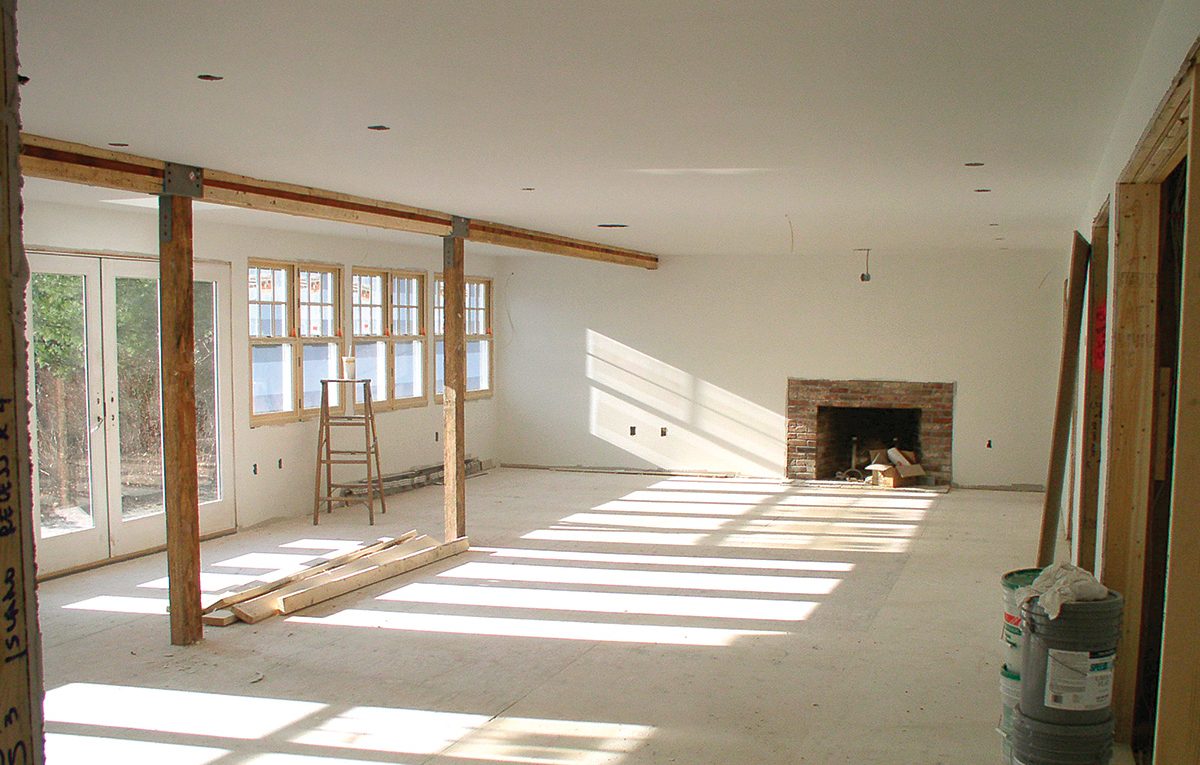
room with plain white ceilings
BEFORE. Photo: Joseph Lanza

Box beams hide and divide

A pair of columns and a long LVL beam replaced an exterior wall in this 6-ft.- wide by 40-ft.-long bump-out addition. The space that resulted was big, open, and, except for the fireplace, featureless—a blank slate for good trim-carpentry work. I designed the box-beam layout to hide the LVL, to divide the room into functional zones, and to emphasize the fireplace as a focal point.

illustration of the final plan for coffered ceiling


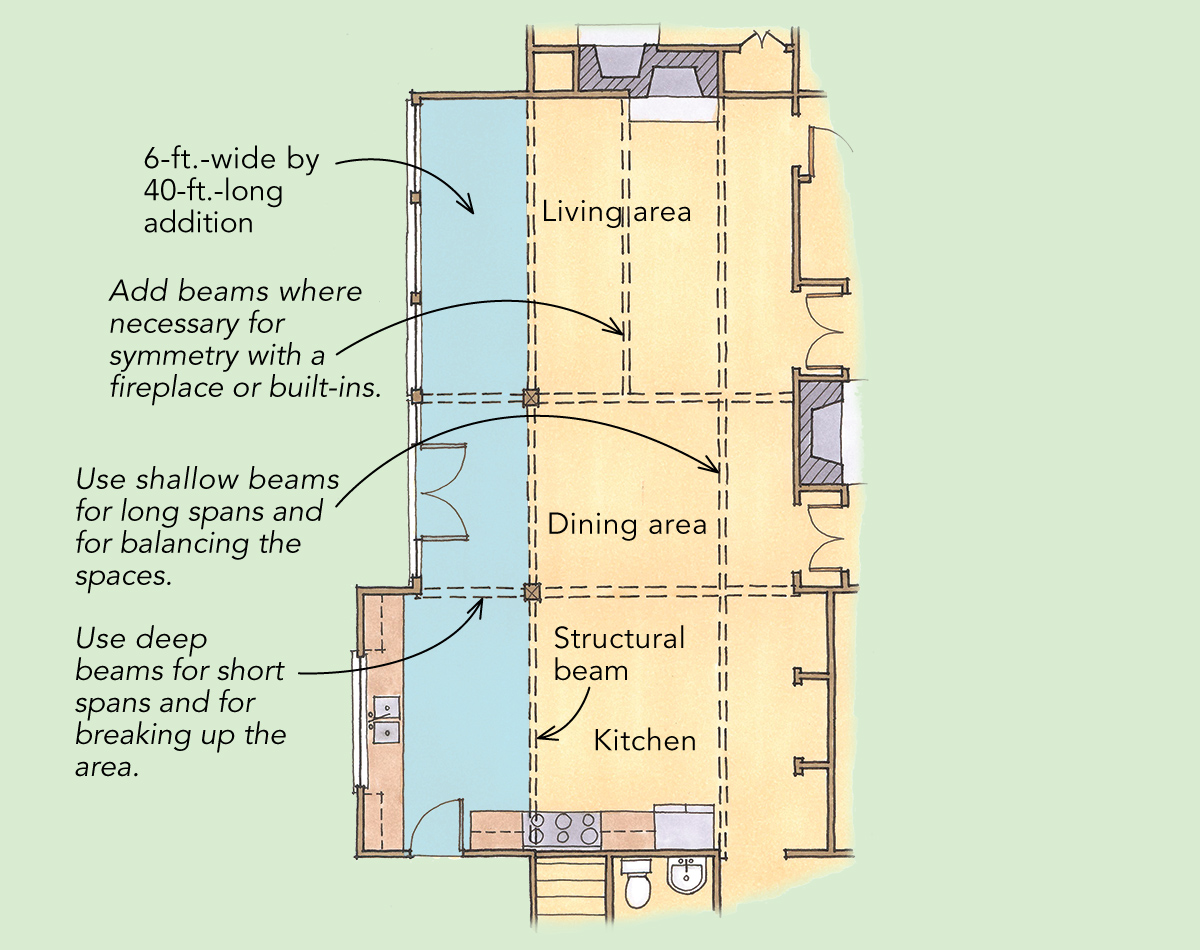
To mark the divisions between the three areas, I began by adding two large box beams measuring roughly 9 in. by 9 in. Because most of the LVL was buried in the ceiling, I was able to make the two bigger box beams appear to carry the structural beam. To balance the design, I ran a box beam on the right side of the fireplace, parallel to and the same size as the wrapped LVL.

This extra beam made the main-ceiling sections roughly symmetrical throughout the room, but put the fireplace off center. To anchor and balance the fireplace, I added a matching beam to the left, but stopped it at the larger beam that divides the living and dining areas. The additional beam serves an important function in the living room. But carrying that beam through the space would have divided the dining area and the kitchen in an awkward, unnecessary way.


The Anatomy of a Box Beam

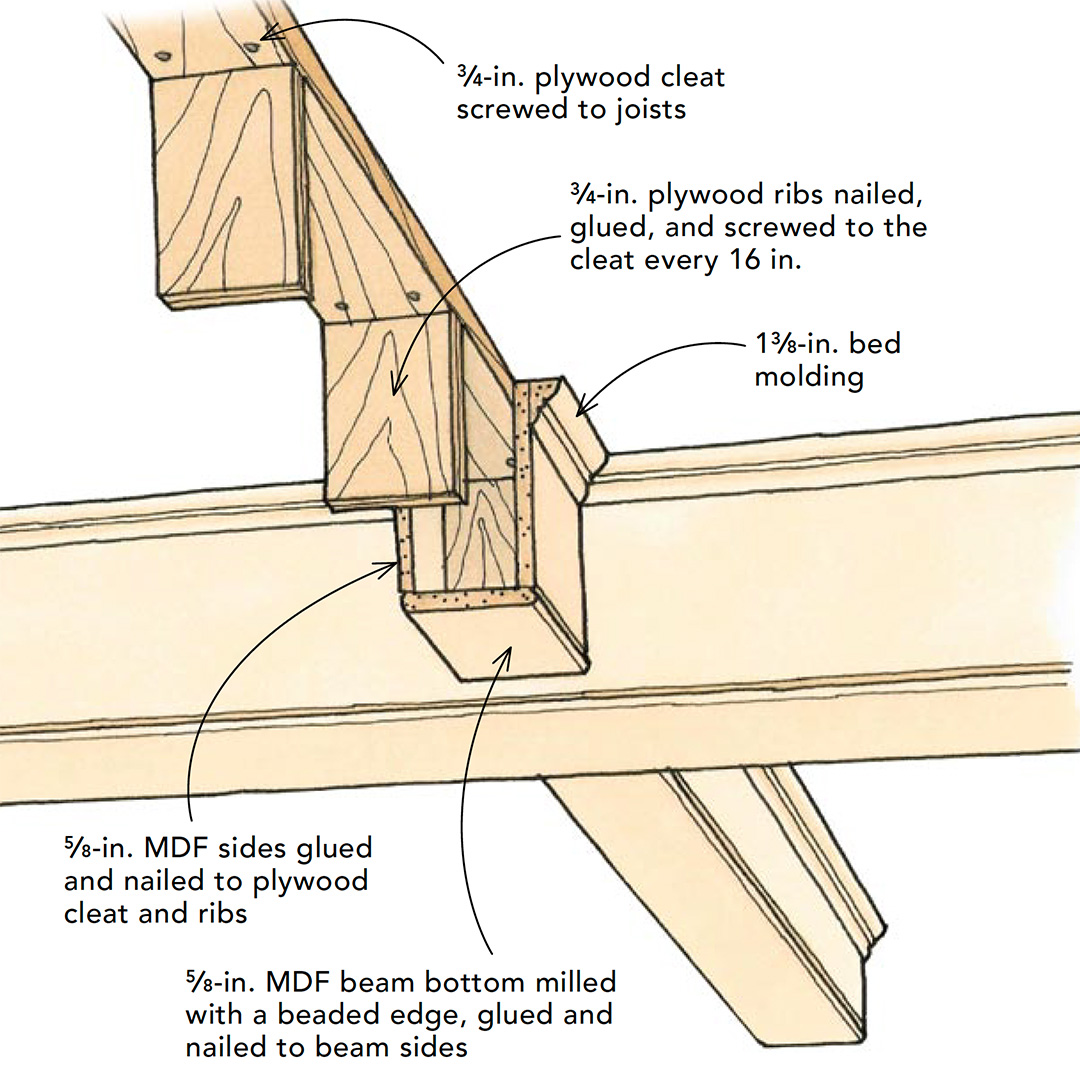
Most box beams are made of pine or poplar and 2x framing material. But those materials can be expensive and labor-intensive to work. poor dimensional stability is another limitation. use cabinet-grade plywood for blocking and MDF for the finished surface instead; both are relatively inexpensive and stable. structural beams also can be wrapped with MDF.

inside a box beam

It’s not really symmetrical, but the layout works because at first glance it makes visual sense. The beams are big enough to make the ceiling look like a plausible structural system. If they were smaller, they wouldn’t look believable. The largest beams mark the major divisions in the room. Reducing the size of the beams between them, as you would if they were real beams, has the added benefit of making all the intersections between beams simple butt joints, which are fast and easy to execute.


A flat, level ceiling isn’t necessary

Deep box beams can conceal out-of-level ceilings, so I make the bottom face level no matter what the ceiling is doing. Establishing a level plane with the beam bottoms means that the ceiling can wander up and down quite a bit without being too noticeable.

Keep in mind that the farther out of level the ceiling is, the deeper the beams need to be. The beams should also be sized to look convincing. A 1-1/2-in. difference might not look too bad if you’re going from a 7-1/2-in.-deep beam on one end to 9 in. on the other, but a beam that climbs from 3-1/2 in. to 5 in. will really jump out. In any case, don’t use beams that are too small, which is an easy error to make—especially with a low ceiling. The ceiling in the room I’m working on here is 7 ft. 6 in. tall, and the smallest beams are about 7-1/2 in. deep.

When it comes to a wavy ceiling, I don’t waste time scribing the beam sides. The blocking for each beam run should be sized to fit the low point in that run, while the sides of the beams establish a level surface for the bottom of the beam. Usually, the sides can be ripped to a single width to fit at the low point; adding molding covers the resulting gap. If the ceiling is so bad that the molding won’t cover the gap, scribe the sides of the beams.

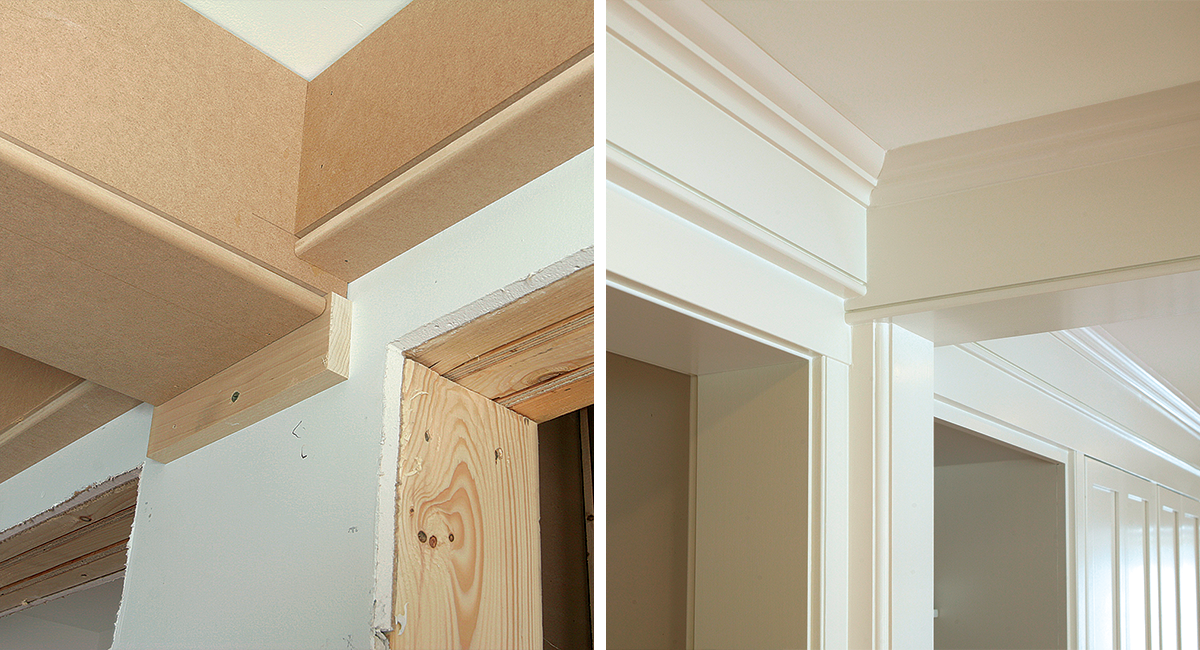
Because the ceiling was fairly wavy in this room, I used a relatively small 1-3/8-in. bed molding. It was flexible enough to follow the ceiling and left enough space between the bottoms of the beams and the bottom of the molding to hide the fluctuations. In other more-level rooms, I’ve used 4-5/8-in. crown, which gives the ceiling a more-formal look. In rooms with beadboard ceilings, I’ve used 1-3/8-in. base cap against the ceiling to maintain a shadowline between the molding and the ceiling.


Blocking gives the beams a sturdy backbone

making a level beam
Make the beam bottoms level. I build the deep beams first, then run a stringline between them as a reference for level. Measuring down from the ceiling enables me to find the low points. Next, I cut all the ribs for the blocking using this measurement, taking into account the cleat and beam-bottom thicknesses, and the beam’s height. I then glue, nail, and screw the ribs to the cleat every 16 in. on center. I use two 2-in. screws per rib.
installing runs in sections
Long runs go up in sections. I build and install a full 8-ft. section first, then build the remaining section to fit. The doubled-up ribs at adjoining ends become the backing for the side’s joints. Each blocking section is glued to the ceiling with construction adhesive, then screwed into ceiling joists and furring strips that I installed beforehand. For each joist, I use two screws long enough so that at least 1 in. sinks into the joists or furring.

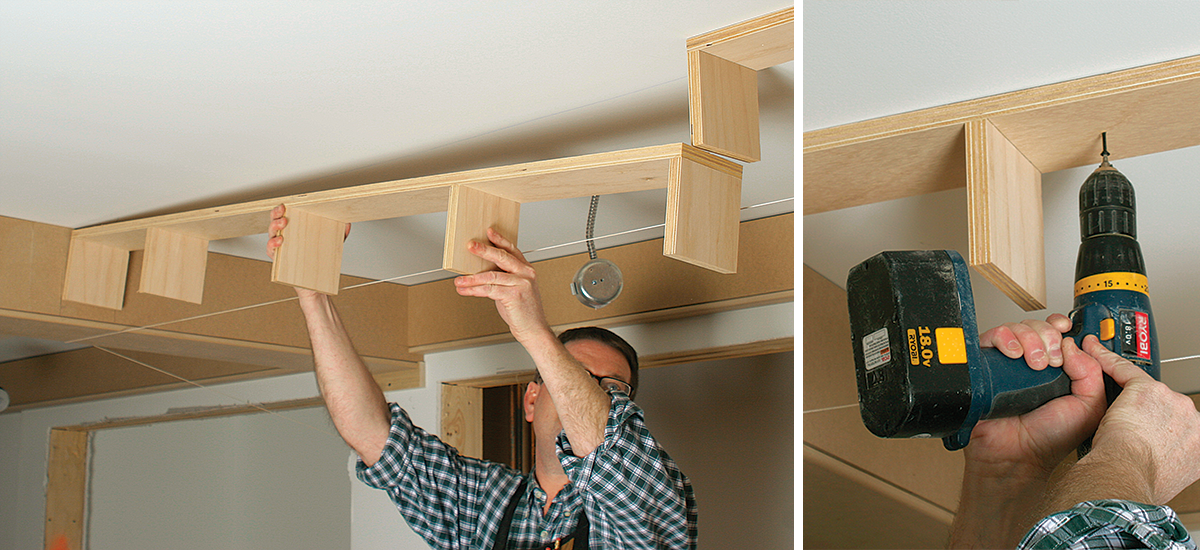
Sheet goods are inexpensive and easy to work with

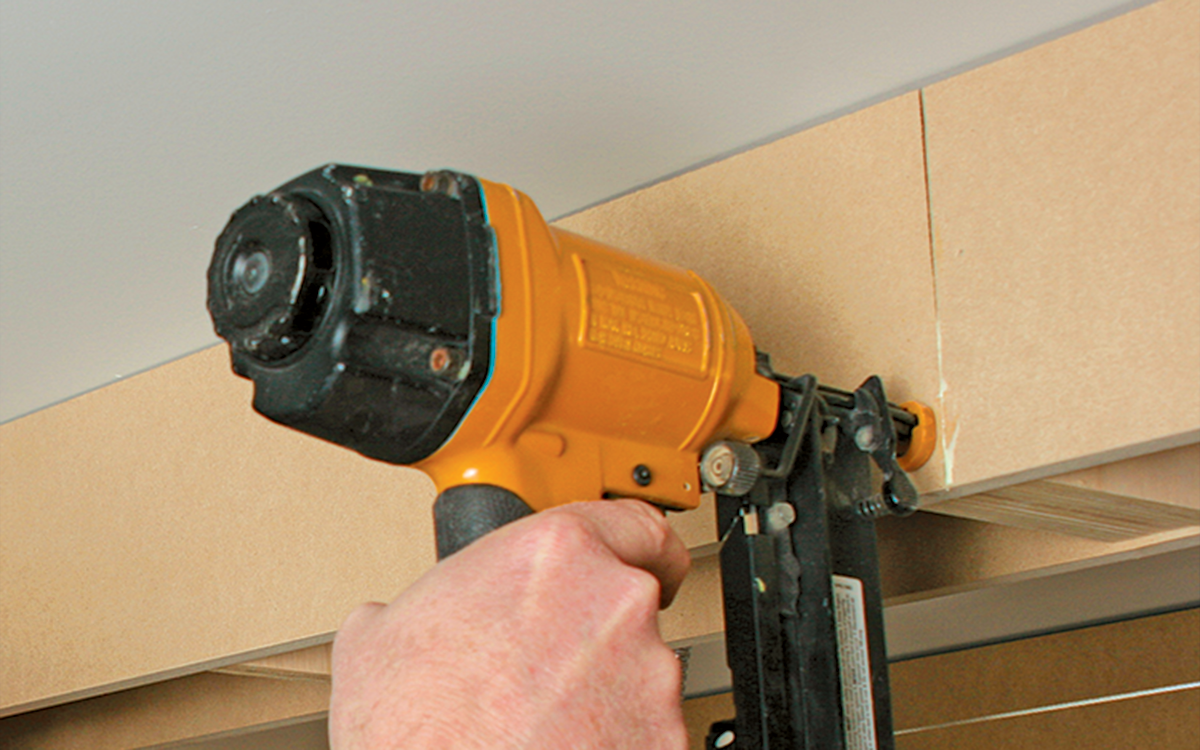
With the exception of the bed molding at the top, the beams are made with 4×8 sheets of plywood and MDF. The backbone of the beam defines the shape, which is why I use low-grade 3/4-in. cabinet plywood like lauan or shop birch to build the blocking assemblies. Cabinet-grade plywood is more consistent and dimensionally stable than framing lumber and has better gluing faces than CDX plywood. I use 5/8-in. MDF to finish the beam’s sides and bottom because it’s more stable, flatter, smoother, and easier to mill than pine or poplar. MDF also takes paint well and is much less expensive. Milling MDF produces fine dust, and inhaling MDF dust is a legitimate health concern. I use a dust-collection system and wear a respirator whenever I’m milling MDF.

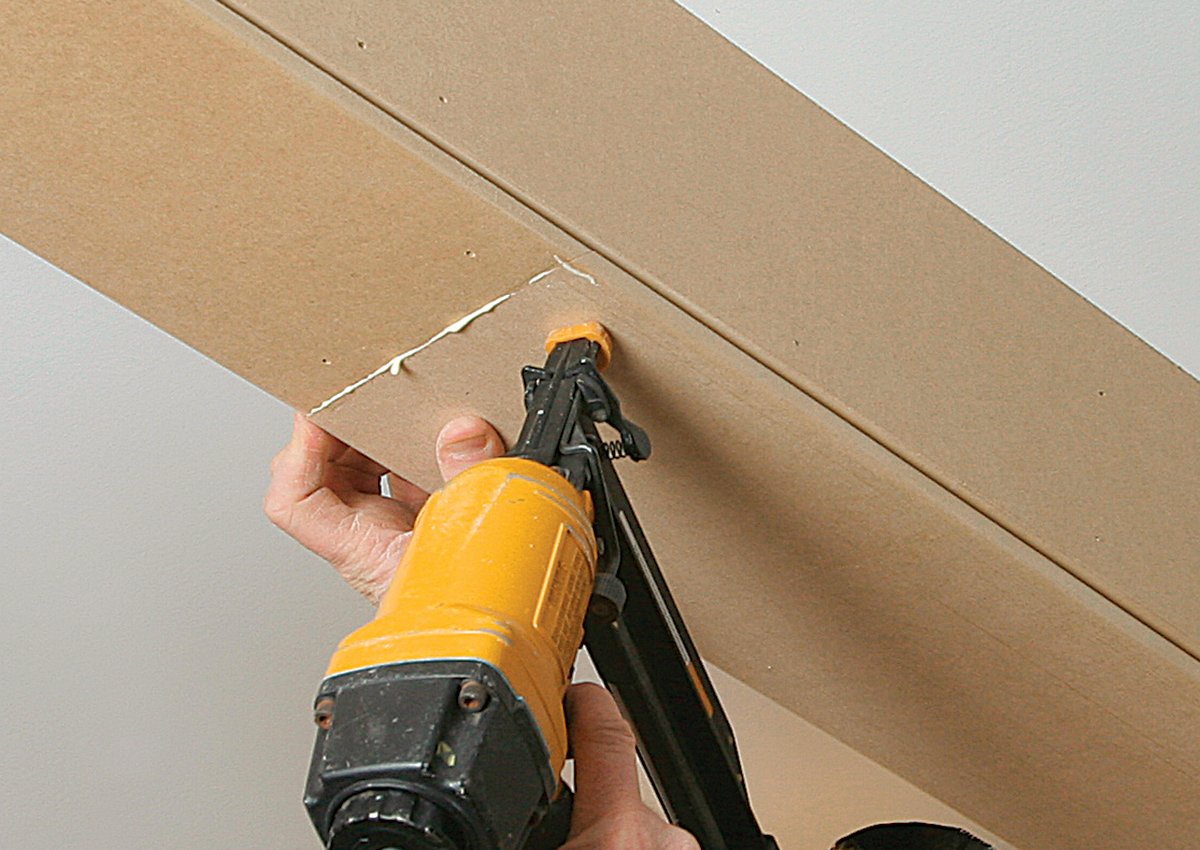
Because all the parts are ripped from sheet goods, most beams have at least one joint on each surface. I find this has advantages over using full-length pieces of framing lumber and 1x stock such as pine or poplar. It lets me avoid measuring for most of the work, and it makes cutting precise joints easier. After I assemble and install one 96-in. section of plywood blocking, I hold the top piece (or cleat) of the next section in place and mark it to length. Then I take the piece to my saw and make the cut without pulling out a tape.

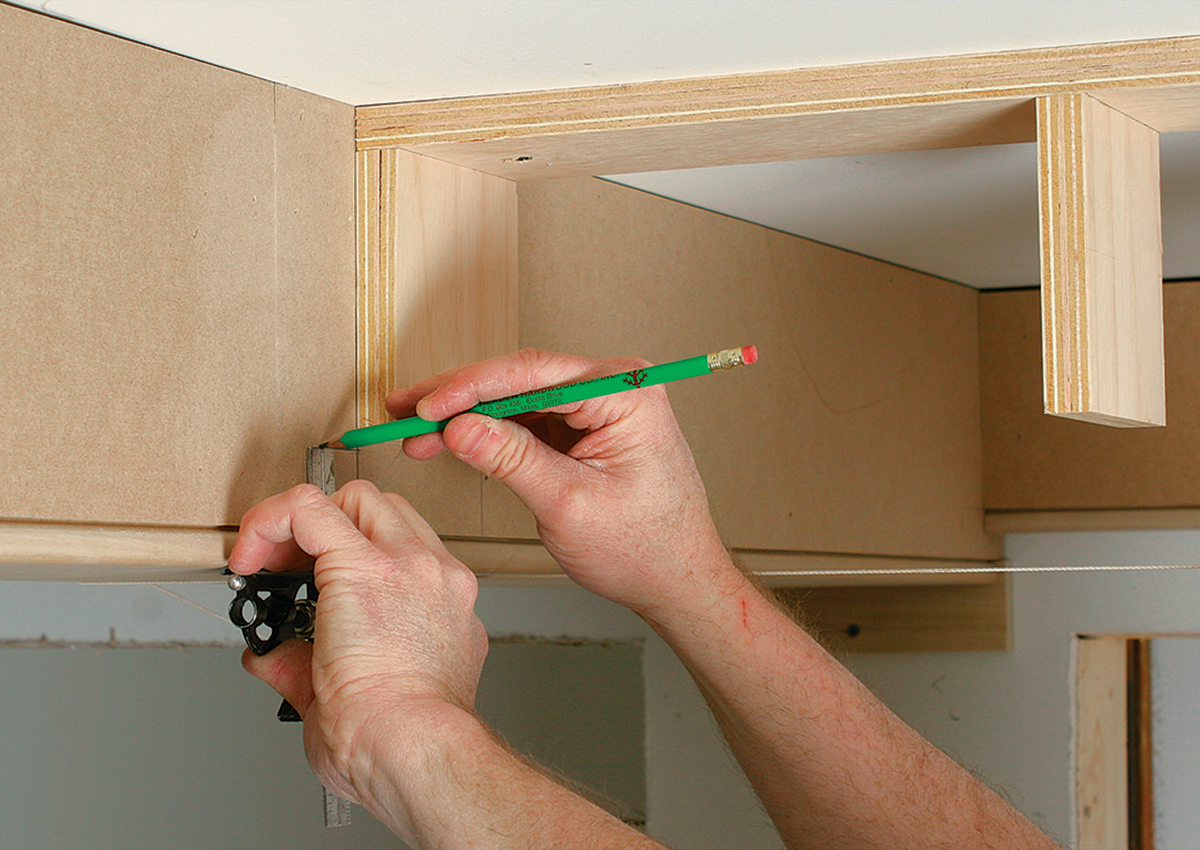
The limited length translates into an advantage when fitting the MDF side pieces as well. Each section of the blocking assembly has a 3/4-in. rib at each end. When two sections come together, I have a 1-1/2-in.-wide block centered 96 in. from the end of the run. Because MDF runs closer to 97 in. long, I can trim it to land in the center of the block.

The square butt joints fit well most of the time, but when they don’t, they’re easy to scribe in place and trim to fit if necessary. After gluing and nailing the first piece, I hold the next one in place against the opposite end to check the fit of the butt joint. Once that’s set, I mark the other end of the piece in place for the beveled-joint cut. When it’s necessary to scribe butt joints, this method can add up to four cuts per side (or bottom), but without any measuring. Because I’m making precise cuts on pieces shorter than 8 ft., it’s easy to keep an eye on the beveled-joint and butt-joint fit of that piece.


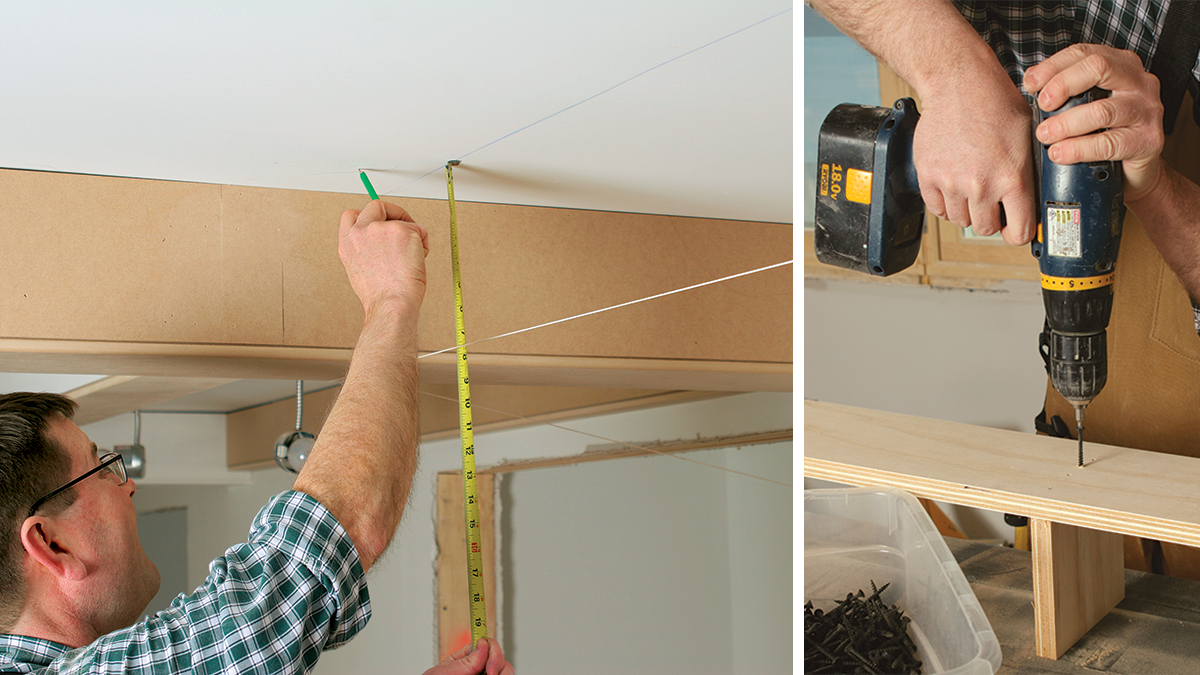
Sides follow the stringline, not the ceiling

mark the low point of the sides
Intersecting beams provide a good reference. Deep beams are level along their bottom edges, so the reveal between them and the shallower beams should be uniform. This helps to fool the eye into thinking that the ceiling is level. I mark the low point of the sides on the deep beams using a combination square.
With the side piece in place, measure up from the stringline
Test-fits reduce the proliferation of four-letter words. I rip the sides based on the ceiling’s low point. With the side piece in place, I then measure up from the stringline to make sure the board is the right width to maintain a straight, level run. When I’m working alone, a cleat nailed to the cross beam provides a helping hand.
nailing front to ribs
Cleats and ribs offer plenty of nailing options. Although temperature and seasonal changes don’t affect MDF much, I still like to nail it well. I apply glue to the blocking assembly and run two or three 2-in. finish nails into each rib, as well as two nails into the cleat between each rib. To save time, I eyeball the short-point cut for the beveled joint instead of measuring.
gluing beveled joint
Beveled joints make long runs look seamless. Once the long piece is nailed, I scribe and install the short piece. I tune the beveled and butt ends of this piece as needed for the best fit. Gaps at the ceiling will be covered by bed molding.

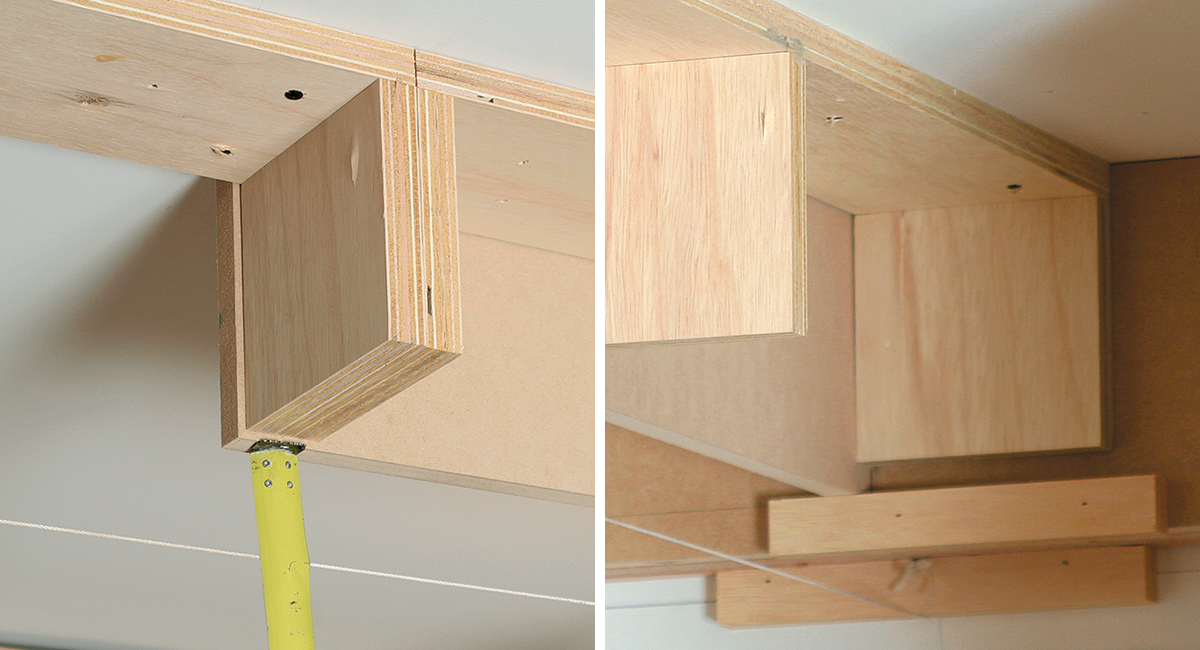
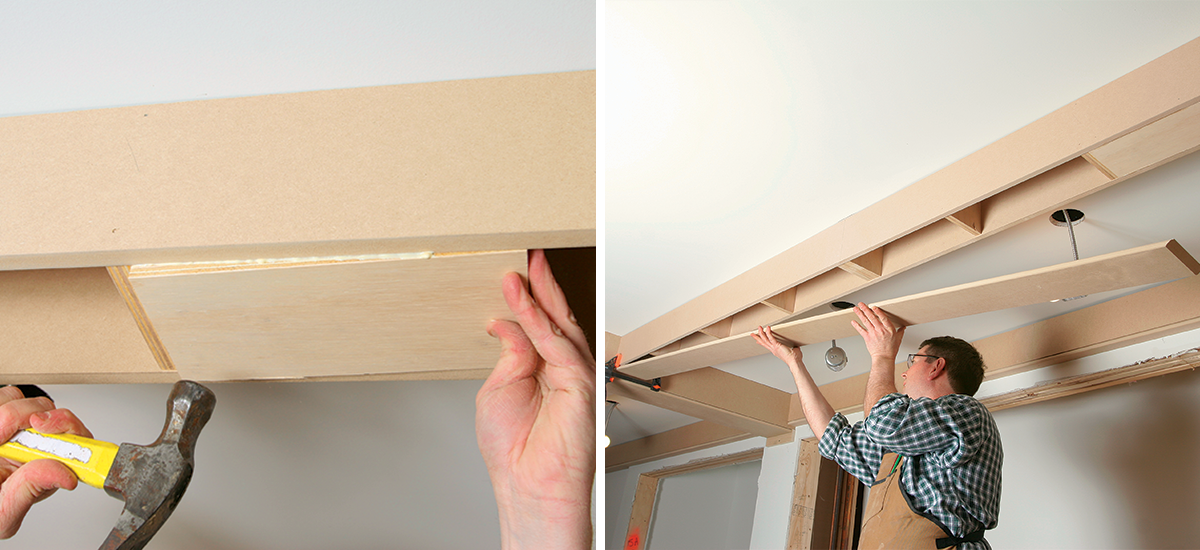
Build to a level plane, not from the ceiling

Before starting, get to know the room. You need to establish a level plane and work up from it. It’s also critical to find the low points of the ceiling because they become the reference point for building the first beams. I have yet to cough up the money for a laser level, so I level the ceiling the old-fashioned way. I snap a level line around the room, then run stringlines across the room in a few places until I find the low points. I leave a few of the stringlines in place while I build the deep beams, which I do first. Then I run a stringline across the deep beams to build the shallow ones.

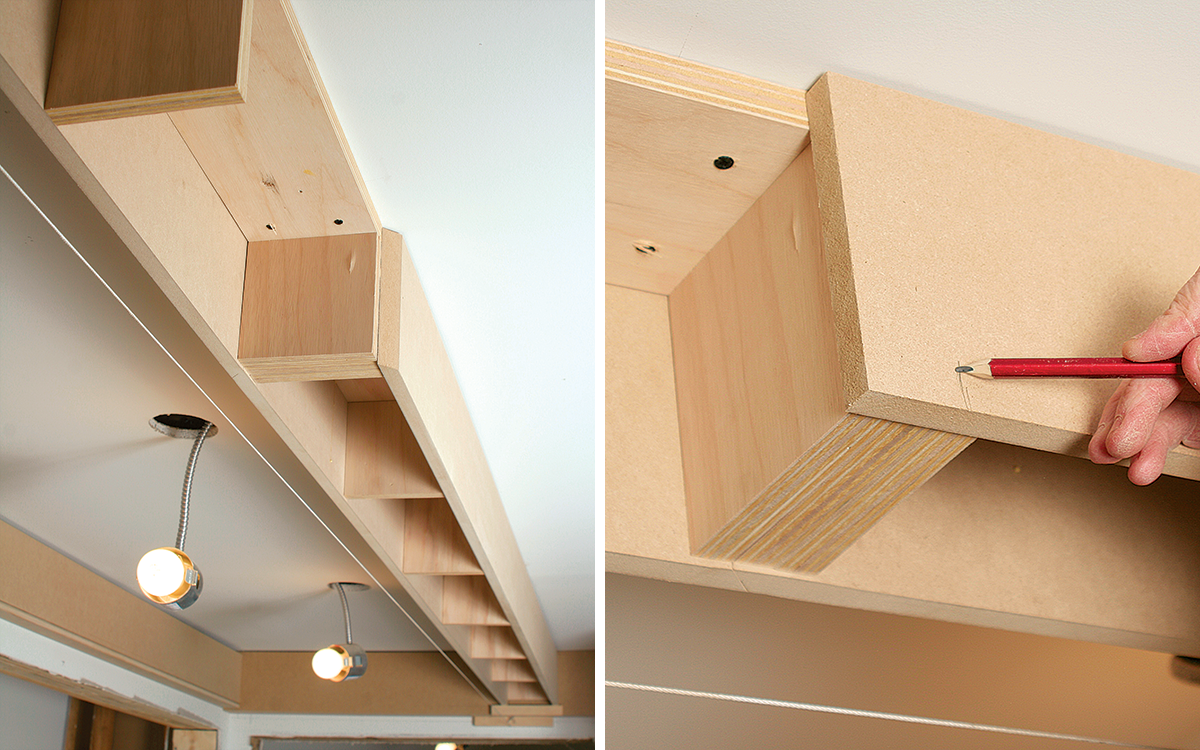
Once I’ve decided on the layout and determined the beam sizes, I mill as much of the stock as possible ahead of time to make the job run more efficiently. I start by ripping the plywood for the blocking assembly 1-1/4 in. narrower than the final beam width to allow for the two 5/8-in. MDF sides. some of the ripped plywood is used for the assembly’s cleats, and the rest is crosscut into ribs and attached to the cleats. The crosscut-rib measurements are based on the low points in the ceiling, which vary for each beam run. So I cut the ribs and then rip the beam sides as I go.

Next, I mill the beam bottoms out of MDF. The edges align with the beams’ sides, so I rip them to the final beam width. To add visual interest to the beams, I use a 1/4 in. roundover bit to create a quirked bead at the edges.

No matter how you approach it, a box-beam ceiling is a big undertaking. As a carpenter, I’m always up for a challenge—unless I can avoid it. I haven’t done a project yet where points were awarded based on degree of difficulty. Until I do, I’ll always be looking for the easiest way to do a job well. I arrived at the method shown here over the course of a few projects as I tried to make a complicated job as simple as possible.


A beaded bottom completes the beam

roundover bit and beaded bottom
Photos: Krysta S. Doerfler

After ripping the beam bottom to width, I mill the edges on a router table with a 1/4-in. roundover bit. I make one pass with the bit depth set to mill a simple roundover. I then raise the bit 1/8 in. and flip the stock for a second pass that creates a quirked, or shouldered, edge, which conceals the joint.

installing beam bottom
Add blocking no matter where this joint lands. In most finish-carpentry jobs, staggering the joints is a good rule to follow. When running the beam bottoms, I start with a full 8-ft. run as I did with the blocking assembly and sides. But I make sure the joint lands on the other end of the beam. Even if the joint falls on or near a rib, I install extra blocking for a larger nailing surface.
gluing beam bottom
Don’t be afraid of the glue. After scribing the final piece to fit, I glue and nail it in place. I start with the beveled joint and work back so that I can move the piece as needed to get a better-looking joint. I nail the bottom into the sides every 8 in. and run a couple of nails into each of the blocking ribs. While the glue is wet, I sand the joint smooth with 120-grit sandpaper.
where the beams terminate
Transitions and terminations require some forethought. In low ceilings when the beam terminates into door or window casing, I hold the beam bottom back using a scrap piece of trim. When I install the trim, I remove the block and slide the casing in its place. I also run beams around the perimeter of the room. Using only part of the beam width implies their structural function, and provides a way of tying in door and window casing as well as built-in cabinetry throughout the room. Photo (right): Charles Bickford

From FineHomebuilding #197

Drawings: Martha Garstang Hill

Photos by Chris Ermides, except where noted

Previous: The Craft of Coffered Ceilings Next: Coffered Ceilings: Introduction

Guide

Finish & Trim Carpentry

Chapter

Coffered Ceilings

Sign up for eletters today and get the latest how-to from Fine Homebuilding, plus special offers.

Signing you up...

This site is protected by reCAPTCHA and the Google Privacy Policy and Terms of Service apply.
See all newsletters
See all newsletters

Log in or create an account to post a comment.

Sign up Log in

Become a member and get full access to FineHomebuilding.com

Finish & Trim Carpentry

Finish & Trim Carpentry

Trusted, comprehensive guidance from the pros for creating perfect trim details in any room of the house

View Project Guide

View All Project Guides »

Become a member and get unlimited site access, including the Finish & Trim Carpentry Project Guide.

Start Free Trial

Trim Design
  • Trim Style and Design
Tools and Materials
  • Tools
  • Materials
Interior Trim Basics
  • Tips and Tricks
  • Techniques
  • Using Jigs
Window and Door Casings
  • Windows
  • Doors
Baseboard and Crown Molding
  • Baseboard
  • Crown Molding
  • Specialty Crown Situations
Wainscot and Paneling
  • Beadboard Wainscot
  • Paneled Wainscot
  • Chair Rails
  • Wall Treatments
Mantels and Fireplace Surrounds
  • Design
  • Installing Mantels and Surrounds
Coffered Ceilings

Fine Home Building

Newsletter Sign-up

  • Fine Homebuilding

    Home building tips, offers, and expert advice in your inbox.

  • Green Building Advisor

    Building science and energy efficiency advice, plus special offers, in your inbox.

  • Old House Journal

    Repair, renovation, and restoration tips, plus special offers, in your inbox.

Signing you up...

This site is protected by reCAPTCHA and the Google Privacy Policy and Terms of Service apply.
See all newsletters

Follow

  • Fine Homebuilding

    Dig into cutting-edge approaches and decades of proven solutions with total access to our experts and tradespeople.

    Start Free Trial Now
    • Facebook
    • Instagram
    • X
    • LinkedIn
  • GBA Prime

    Get instant access to the latest developments in green building, research, and reports from the field.

    Start Free Trial Now
    • Facebook
    • YouTube
  • Old House Journal

    Learn how to restore, repair, update, and decorate your home.

    Subscribe Now
    • Facebook
    • Instagram
    • X

Membership & Magazine

  • Online Archive
  • Start Free Trial
  • Magazine Subscription
  • Magazine Renewal
  • Gift a Subscription
  • Customer Support
  • Privacy Preferences
  • About
  • Contact
  • Advertise
  • Careers
  • Terms of Use
  • Site Map
  • Do not sell or share my information
  • Privacy Policy
  • Accessibility
  • California Privacy Rights

© 2025 Active Interest Media. All rights reserved.

Fine Homebuilding receives a commission for items purchased through links on this site, including Amazon Associates and other affiliate advertising programs.

  • Home Group
  • Antique Trader
  • Arts & Crafts Homes
  • Bank Note Reporter
  • Cabin Life
  • Cuisine at Home
  • Fine Gardening
  • Fine Woodworking
  • Green Building Advisor
  • Garden Gate
  • Horticulture
  • Keep Craft Alive
  • Log Home Living
  • Military Trader/Vehicles
  • Numismatic News
  • Numismaster
  • Old Cars Weekly
  • Old House Journal
  • Period Homes
  • Popular Woodworking
  • Script
  • ShopNotes
  • Sports Collectors Digest
  • Threads
  • Timber Home Living
  • Traditional Building
  • Woodsmith
  • World Coin News
  • Writer's Digest
Active Interest Media logo
X
X
This is a dialog window which overlays the main content of the page. The modal window is a 'site map' of the most critical areas of the site. Pressing the Escape (ESC) button will close the modal and bring you back to where you were on the page.

Main Menu

  • How-To
  • Design
  • Tools & Materials
  • Video
  • Blogs
  • Forum
  • Project Guides
  • Reader Projects
  • Magazine
  • Members
  • FHB House

Podcasts

  • FHB Podcast
  • ProTalk

Webinars

  • Upcoming and On-Demand

Podcasts

  • FHB Podcast
  • ProTalk

Webinars

  • Upcoming and On-Demand

Popular Topics

  • Kitchens
  • Business
  • Bedrooms
  • Roofs
  • Architecture and Design
  • Green Building
  • Decks
  • Framing
  • Safety
  • Remodeling
  • Bathrooms
  • Windows
  • Tilework
  • Ceilings
  • HVAC

Magazine

  • Current Issue
  • Past Issues
  • Magazine Index
  • Subscribe
  • Online Archive
  • Author Guidelines

All Access

  • Member Home
  • Start Free Trial
  • Gift Membership

Online Learning

  • Courses
  • Project Guides
  • Reader Projects
  • Podcast

More

  • FHB Ambassadors
  • FHB House
  • Customer Support

Account

  • Log In
  • Join

Newsletter

Get home building tips, offers, and expert advice in your inbox

Signing you up...

This site is protected by reCAPTCHA and the Google Privacy Policy and Terms of Service apply.
See all newsletters
See all newsletters

Follow

  • X
  • YouTube
  • instagram
  • facebook
  • pinterest
  • Tiktok

Join All Access

Become a member and get instant access to thousands of videos, how-tos, tool reviews, and design features.

Start Your Free Trial

Subscribe

FHB Magazine

Start your subscription today and save up to 70%

Subscribe

You have 1 free article remaining.

Get complete site access, including thousands of videos, how-to tips, tool reviews, and design features.

Start your FREE trial

Already a member? Log in

We hope you’ve enjoyed your free articles. To keep reading, become a member today.

Get complete site access to expert advice, how-to videos, Code Check, and more, plus the print magazine.

Start your FREE trial

Already a member? Log in

Privacy Policy Update

We use cookies, pixels, script and other tracking technologies to analyze and improve our service, to improve and personalize content, and for advertising to you. We also share information about your use of our site with third-party social media, advertising and analytics partners. You can view our Privacy Policy here and our Terms of Use here.

Cookies

Analytics

These cookies help us track site metrics to improve our sites and provide a better user experience.

Advertising/Social Media

These cookies are used to serve advertisements aligned with your interests.

Essential

These cookies are required to provide basic functions like page navigation and access to secure areas of the website.

Delete My Data

Delete all cookies and associated data