
How to Install Crown Molding Alone
Chuck Miller shares three tips to make crown-molding installation go smoothly.
We recently developed our first Video Workshop on Installing Built-Up Crown Molding with finish carpenter and frequent Fine Homebuilding contributor Tucker Windover. We thought while we were at it we’d share three of our most clever crown installation tips.
The video directly below features a better way to install crown molding solo (for those times when you don’t happen to have a FHB editor on site). And, scroll down below the video to find two classic tips we think you’ll find useful: “Easier coping with the jigsaw” and “Fitting crown molding.” Each of these tips should help make your crown installation project go more smoothly.
How can a golf ball help you cope crown molding?
Jim Delvin of Des Moines, WA writes:
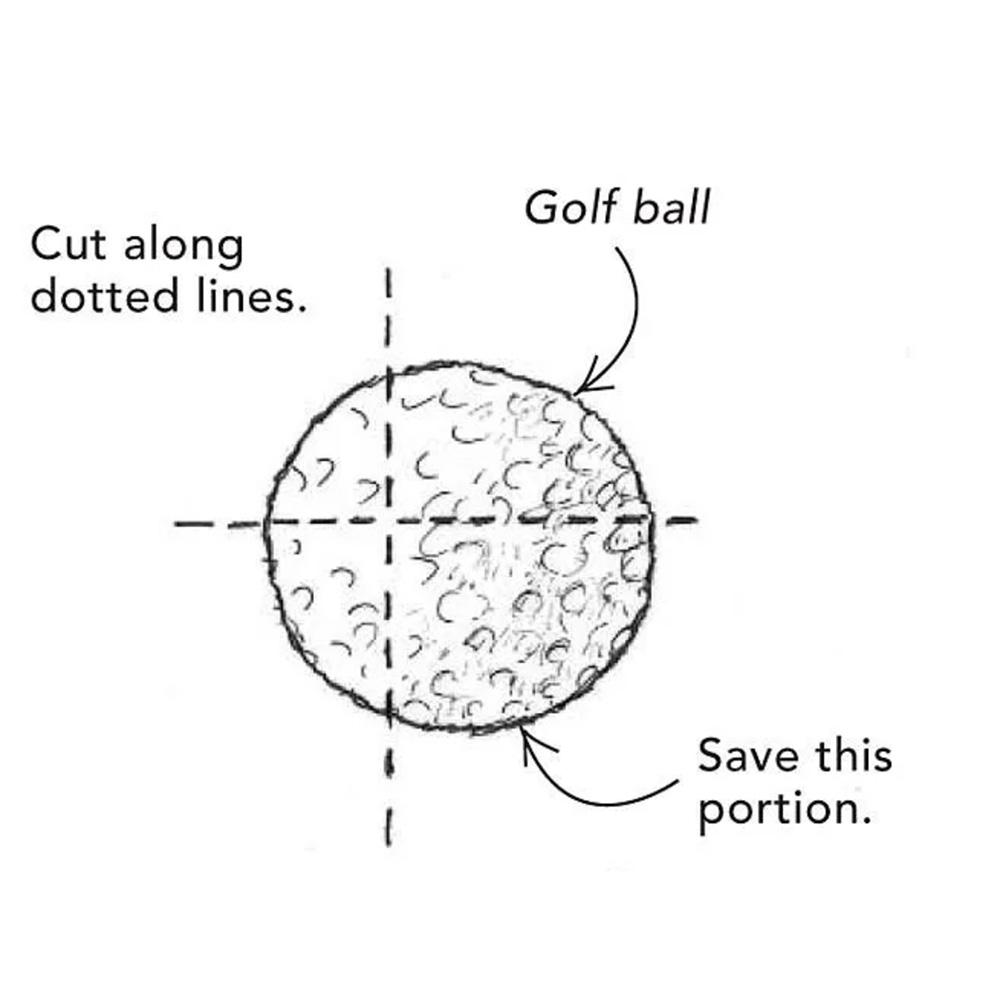
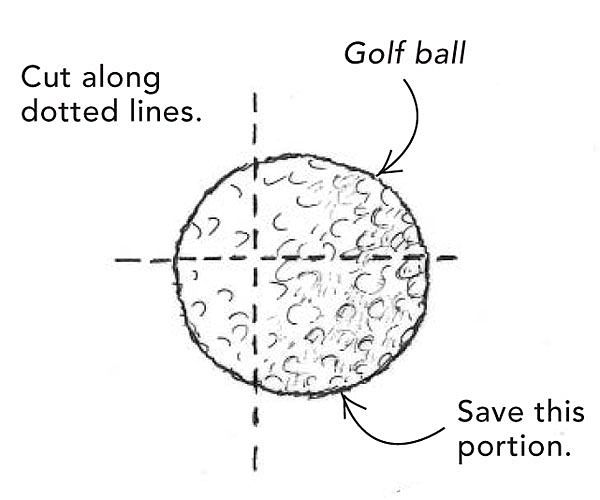
Coping crown molding with an electric jigsaw is much easier when you attach a radiused auxiliary base to the jigsaw’s standard flat base. But I was stumped about making this modification until I spotted a golf ball on my shop bench.
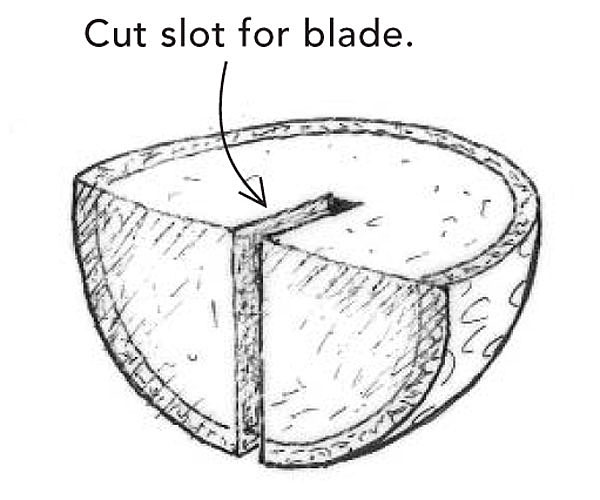
As shown in the drawings, I started by cutting the ball into unequal parts. I did the cutting on my bandsaw after driving a couple of 3-in. drywall screws into opposite sides of the ball to act as handles. The screws kept my fingers a safe distance from the blade. Then I made a perpendicular cut in the larger portion. Still at the bandsaw, I cut a slot to accommodate my jigsaw’s blade.
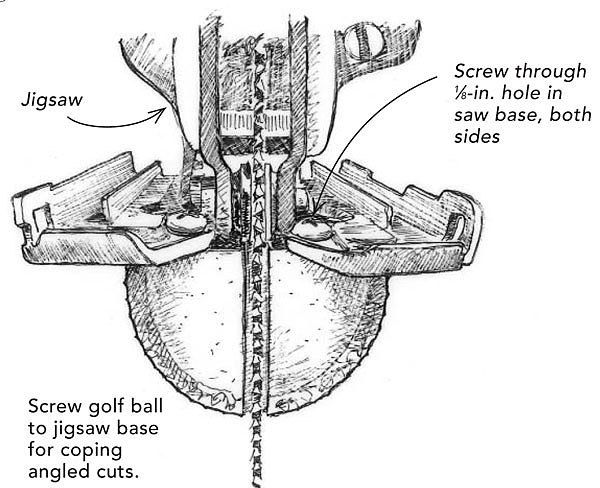
Next, I drilled a couple of 1/8-in. holes in the saw’s base, on opposite sides of the blade, for a pair of screws. I positioned the slotted golf ball as shown in the drawing and affixed it to the base with a couple of small screws.
This jig provides a pivot point right where the blade enters the back side of the molding. As a result, I have the control to make exact relief cuts. I have found that longer blades are useful for cutting big crowns. Different configurations could be obtained by cutting the ball into segments of various sizes.
 |
 |

Get a hook on crown
Bob Brereton of St. Paul, MN writes:
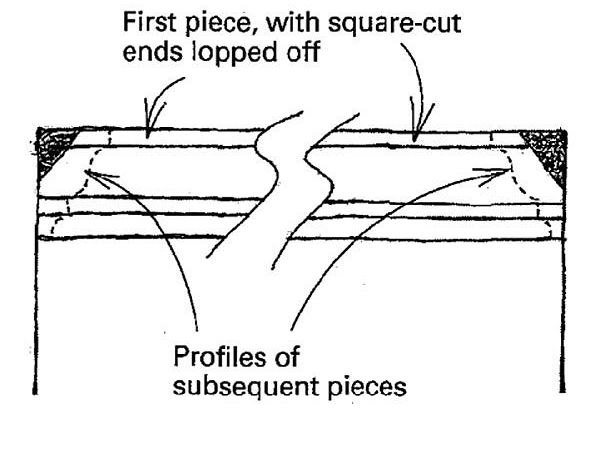
When running crown molding, I often have to pull a piece down to do a little fussing with the cope cuts or to tweak a piece up or down. Even if the molding is nailed loosely, this can be hard to do when it’s a tight fit. As shown in the drawing, I’ve taken to removing a bit of the upper square-cut corner of a piece of crown so that I can hook my finger behind it to move it. On the first piece of crown, I always square-cut both ends and then remove the corners. The lopped-off corners end up behind the coped piece that abuts it. Subsequent pieces have one coped end, and one square-cut end.

For more on crown molding check out the Crown Molding Video Workshop with Tucker Windover.


View Comments
Very interesting post.
I don't think I have ever seen this strategy used to install crown molding. I've always used the traditional methods for molding, but this would be worth a shot. Definitely looks like a noteworthy alternative to crown molding installation.
Thanks for the tip!
Mary
http://www.invitinghome.com/Crown_Molding/Mouldings_Enter.htm
Coping crown is not hard! Get the cuts right by understanding the following: 1st Spring Angle, 2nd the proper miter and bevel settings for each spring angle and the pretents on your compound miter saw, 3rd caulk only the ceiling and wall lines not the miters and copes, 4th lay-out lay-out lay-out, no complex pieces (avoid any pieces that have both a cope and a miter, sometimes you can't avoid it but proper lay-out can minimize these complex pieces). 5th Cut copes first in long stock and check the fit often, If the fit is off re-cut the cope, then cut the piece to length.
Get rid of the golf ball and the jig saw. Get the right coping saw blades change them often and improve you coping skills. Get a set of files, curved and flat, cut close to the cope line and file or sand away the excess. Take your time this isn't supposed to be the fastest part of the job but it can go quick if you get good at it. Good luck
The golf ball trick is interesting to me because it creates an option to outfit my current Bosch jigsaw to perform like it had a Collins Co. coping foot attached. I used that attachment for years which allows you to run the jigsaw on the back edge of the crown ( or any moulding . I would think the user that came up with this trick was familiar with the Collins Coping foot. If not, look it up on the internet because it is a safer way to get the same results if you have a jigsaw designed to work with it.
As far as getting rid of the jigsaw I don't agree with that. I've coped both ways and using the collins coping foot with the proper blade ( Bosch 244 I believe ) is faster than using a coping saw. You still need to have files on hand for fine adjusments though.
I'm all for creative uses for everyday things but cutting up a golf ball on a bandsaw sounds like my clumsy fingers just begging to get into the blade. I've got bandsaw scars enough already without trying for more. Even with drywall screw handles that's a small, round, hard awkward object to hang onto. Some golf balls have liquid centers too, even among the ones that don't some have rubber band type cores that when cut into go through a weird sizzling deconstruction when it is sliced. As you can see I've cut through exactly two golfballs before and this was the result but have screwed into or epoxied them onto various things over the years and know how handy they can be for alternative uses. I better stick to coping saw skills for safety's sake on this one.