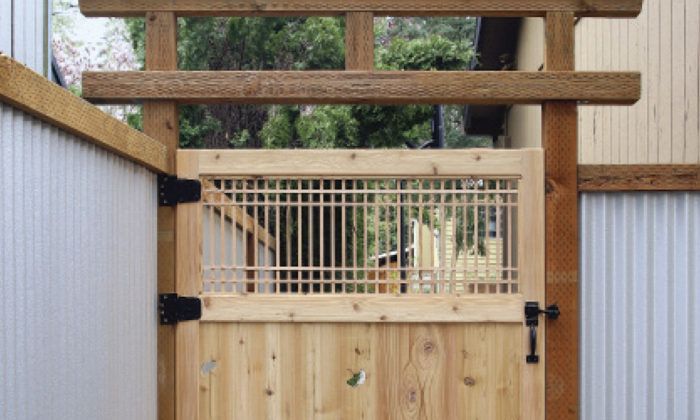
Build a Japanese-Style Garden Gate
Versatile assembly can be adapted to any gate design.
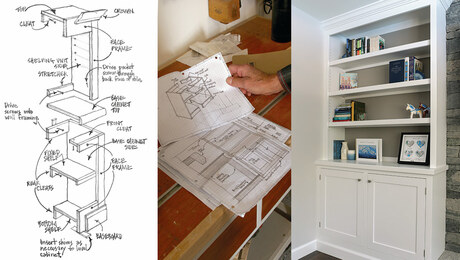
Synopsis: This article outlines the process of building a garden gate with a pattern of ginkgo leaves in the lower panel and traditional Japenese gridwork at the top. The author includes details about wood choice, building the jigs to create the mortises in the rails and stiles of the frame, milling the tenons, and assembling the panel boards and rails as well as the gridwork. The article includes a detailed drawing of the gate assembly with dimensions for the rails, tenons, panels, stiles, and gridwork strips.
When we moved west and bought a fixer-upper in Portland, Oregon, one of my first to-do items was replacing a broken-down fence with one of my own design. I hired pros to set the posts, but did everything else myself, including building a Japanese-style arch over the gate opening. The plan was to cook up an eye-catching gate in a similar style.
I’ve learned not to rush the design stage, so I visited the excellent Portland Japanese Garden, took pictures of every door and gate I found there, and did some digging online. This gate, with falling ginkgo leaves pierced through the lower panel and traditional Japanese gridwork at the top, is the result.
Water, weather, and weight are tough on gates, and over the years they tend to sag. The usual solution is a diagonal rod, surface-mounted and tightened with a turnbuckle. But in my research, I didn’t see any Japanese carpenters resorting to such contrivances, so I didn’t plan to either. Like them, I relied on the right materials and robust joints to keep the gate square and swinging smoothly. After more than a year, it hasn’t sagged a centimeter in its 4-ft. opening. Better yet, the gate is obviously custom-made, and never fails to grab visitors’ attention.
Sturdy frame for gates of any size
The first step in the engineering was to choose the wood, which was easy. Widely available and affordable, western red cedar offers an excellent combination of strength, weight, and weather resistance. I started by picking very straight, 1-1⁄2-in.-thick decking boards out of the lumberyard pile, and milled them down to 1-1⁄4 in. using my thickness planer. This gave me boards that are thick enough to resist warping and bowing, and to accommodate the 1⁄2-in.-thick tenons I was planning, without being an ounce heavier than they needed to be.
When using a softer wood like cedar, the walls of the mortises should be at least 3⁄8 in. thick to have enough strength to resist flexing out when the tenons are inserted. A word of advice: Avoid boards that have sections of cream-colored sapwood in them. That part of a cedar log is far more prone to rot.
As for the deep tenons, I used slip-tenon (or loose-tenon) joinery, an approach that makes a traditional joint much simpler. Rather than being integral parts of the rails, the tenons are made from other stock, ripped and shaped on the tablesaw and router table to fit into matching 2-in.-deep mortises in the frame pieces.
The beauty of this approach is that the tenons are completely separate pieces, so you can simply run them through your planer to achieve a perfect fit. I have a slick way to rout the matching mortises, too, borrowed from Gary Rogowski in the pages of Fine Woodworking magazine (“Arts and Crafts Bed,” FWW #156). I went 2 in. deep into both sides because that’s the maximum depth possible with a standard 1⁄2-in.-diameter spiral router bit.
I designed the bottom rail wider than the two upper rails. The upper rails each get single wide tenons, while the extra width of the bottom rail accommodates two narrower tenons, adding to the strength. A wider bottom rail also just looks good in a frame-and-panel assembly, grounding it. Altogether, that adds up to eight deep, thick mortises and tenons, four down each side—enough to keep this wide gate square for the long haul.
I added one more detail to increase the gate’s longevity: To prevent water from pooling in the groove of the bottom rail, I drilled 3⁄8-in.-diameter holes, spaced about 6 in. apart, down through it before assembly.
The details are up to you
Once you know how to make a big, sturdy frame like this, you can design any gate you like. In my case, I filled the lower frame with 1⁄2-in.-thick cedar boards, and the upper one with Japanese-style gridwork.
The thin lower boards are lightweight and so were easy to pierce with the ginkgo leaf shapes I had planned. To prevent big gaps from appearing between the boards as they shrink and expand over the years, I fired a single brad through the rail into the ends of each board, both top and bottom. This allows the wood to shrink and expand without splitting, and will prevent the boards from moving relative to one another in the frame.
For the Japanese gridwork up top, the key is to drop it in separately after the gate is assembled. I cut the pieces to fit the opening, and then used a tablesaw jig (pictured above) to make the little interlocking notches I needed to join them together. To install the gridwork, I simply nailed thin wood strips on both sides of it, like glass stops. If the gridwork ever gets damaged, it will be a cinch to pop it out and repair or replace it.
As for the finish, I didn’t use any. My feeling on outdoor projects is choose the right woods and then let them weather naturally. The cedar will eventually turn gray, as will the pressure-treated wood, blending with the color of the galvanized panels over time.
Before hanging the door, I trimmed its outside edges a little for a perfect fit in the opening. For hardware, I used a self-closing gate kit from Everbilt, which included adjustable, spring-loaded hinges and a matching latch.
For more information, detailed drawings, and a step-by-step photo guide to tenons, click the View PDF button below.