FHB Logo Facebook LinkedIn Email Pinterest Twitter Instagram Plus Icon Close Icon Navigation Search Icon Navigation Search Icon Arrow Down Icon Video Guide Icon Article Guide Icon Modal Close Icon Guide Search Icon Skip to content
Subscribe

In every issue you'll find...

  • Expert insights on techniques and principles
  • Unbiased tool reviews
  • Step-by-step details to master the job
  • Field-tested advice and know-how
Subscribe Now!
Subscribe
  • How-To
  • Design
  • Tools & Materials
  • Videos
  • Blogs
  • Forum
  • Magazine
  • Members
  • FHB House
  • Podcast
  • Join
  • Log In
Subscribe
Ask the Experts

Dropped First-Floor Framing

Are there any ways to build the first floor with a reduced number of steps? One of our building experts explains how to reduce entry steps.

By Mike Guertin Issue 305 - Feb/March 2022
Three ways to lower a floor. Installing floor joists flush with a foundation wall instead of on top is a great way to reduce the number of steps required to enter a home. This can be done three ways: (left) by creating an inward-facing shelf on which to rest the joists, (right) by using joist hangers, or (below) with wall framing on the inside face of the foundation. Drawing: Dan Thornton

I’m designing a house, and I want as few steps into it as possible at the entry. According to the local inspector, we have to leave 8 in. of the foundation showing above the surrounding soil. Add that to the height of the mudsill, plus the 14-in. engineered joists, and the top of the finished floor will be four stair risers above grade. I’d prefer no step, or just one. Are there any ways to build the first floor with a reduced number of steps?

—Steward Kim, via email

Editorial advisor Mike Guertin replies: You may be wondering where the code-required 8-in. height between grade and top of foundation comes from. The International Residential Code (IRC) has two sections that guide how much the foundation must extend above the surrounding grade. Section R404.1.6 requires a minimum of 6 in. between finished grade and the top of the foundation unless there will be masonry-veneer cladding. In that case, the minimum requirement is only 4 in.

I think your inspector is citing a different subsection that describes where naturally durable wood or preservative-treated wood is required. Section R317.1 requires pressure-treated wood for “framing members that rest directly on concrete or masonry exterior foundation walls and are less than 8 inches from the exposed ground.” That implies untreated framing lumber can be used if the top of the foundation is 8 in. or more above grade.

Presuming that you’re not cladding the exterior with masonry veneer, the minimum height above grade to the top of the foundation is 6 in. There’s no requirement that you stack the floor framing on top of the foundation. Instead, you can install the floor joists between the foundation walls so they’re flush with or slightly higher than the top of the foundation. The trick is supporting the joists. I’ve used three different methods; one will probably work for you.

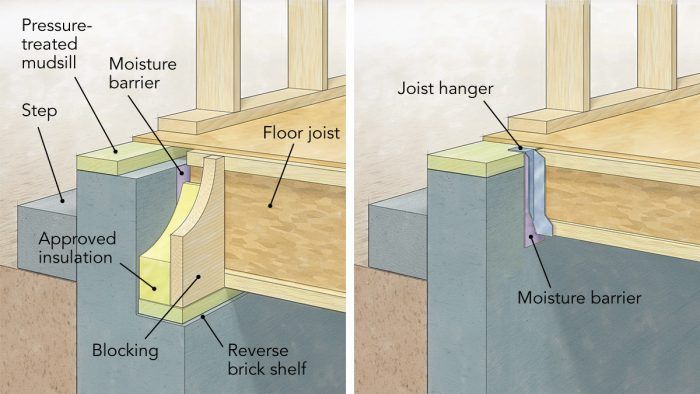
The first option is to create a reverse brick shelf. Ask the foundation installer to form an inward-facing brick shelf about 6 in. deep and 14 in. tall with anchor bolts on the shelf. If you’re using concrete masonry units for the foundation, the mason can build up the wall with 10-in. or 12-in. blocks and then use 6-in. blocks for the top two courses to create the same shelf effect. The joists can rest on the shelf and will be roughly flush with the top of the foundation, leaving a single step into the house. Frame the floor by installing pressure-treated 2x mudsills on both the top of the foundation and the shelf. The top of the joists will flush out with the top of the upper mudsill, and when the subfloor sheathing is installed, it will bridge across the gap and tie the floor together from outside of the foundation along one side to the opposite. You may need to install solid block between the I-joists if required by the manufacturer’s instructions.

Another way to go about this foundation-level floor is to hang the joists. Instead of forming a reverse brick shelf, form it with a regular flush inside face. Install a mudsill on top of the foundation as you ordinarily would, but make it the full width of the concrete. Use top-flange-style joist hangers to support the joists hung from the mudsill. The floor sheathing can bridge over the hangers and onto the mudsill perimeter.

wall framing on the inside face of the foundation

The last method I’ve used to support the joists on the inside is to form a regular foundation and place the slab inside. Install a mudsill on the foundation’s outer face. Then frame up walls on the inside face of the foundation 14 in. shorter than the top of the mudsill for the first-floor joists to rest on. The floor sheathing will plane across the mudsill and the joists.

All three approaches require a capillary break between the untreated joists and the masonry surface of the foundation wall. To accomplish this, cut the joists to allow for a 1/2-in. gap between the two, or install a moisture barrier such as butyl or bituminous flashing tape or strips of thick polyethylene.

Because all these approaches add a 1-1/2-in.- thick mudsill on top of the 6-in. exposed foundation wall, the distance from the grade to the top of the door threshold will be around 8 in. to 9 in. You can install one step with two short risers to enter the house, or you can check with the building inspector to see if this idea may be acceptable: Place concrete or pavers for a walkway that is higher than the surrounding grade by a few inches and about 7 in. below the top of the entry-door threshold. This will leave you with just one riser to enter the house.

From Fine Homebuilding #305


RELATED LINKS

  • Replacing a Door Threshold
  • How to Safely Poor Concrete Against Siding
  • Designing Accessible Entries
  • Code-Compliant Landings for Exterior Doors

Sign up for eletters today and get the latest how-to from Fine Homebuilding, plus special offers.

Signing you up...

This site is protected by reCAPTCHA and the Google Privacy Policy and Terms of Service apply.
See all newsletters
See all newsletters
×

Get home building tips, offers, and expert advice in your inbox

Signing you up...

This site is protected by reCAPTCHA and the Google Privacy Policy and Terms of Service apply.
See all newsletters
See all newsletters

New Feature

Fine Homebuilding Forums

Ask questions, offer advice, and share your work

View Comments

  1. User avater
    suzieb | Jan 19, 2022 05:25pm | #1

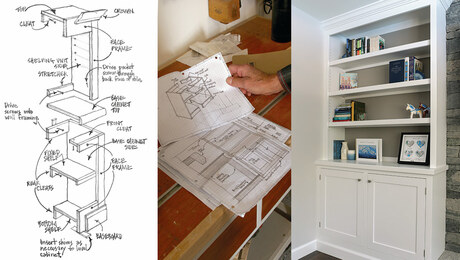
    I too wanted as few exterior steps as possible into a house for which I just finished the construction drawings. I employed the first of the three solutions proposed here by Mike Guertin - the one using the inward-facing shelf. Last week the contractor looked at the drawings for the first time and upon seeing this detail asked, “How am I supposed to get my electric from the panel in the basement up to the first floor?” I did not have an answer for him, but I hope someone in the FHB community does.

    To help with visualizing things I’ve attached a detail of the more-often-used arrangement of joists on top of the mud sill, rather than below the mud sill as illustrated in this article. (Click on icon below.) One can see how in this standard detail, wire/cable easily passes through the basement perimeter joist space and up into first floor perimeter walls.

    My ramblings: If there were enough interior partitions on the first floor, perhaps one could run wiring across the basement ceiling/ joists and up through the interior partitions rather than up perimeter walls?? If this is indeed a viable solution though, an added issue with my particular house as to why this solution wouldn’t work is that the first floor is mostly open plan with few interior partitions and the second floor is a more traditional layout with many interior partitions for bedrooms, bathrooms and closets. There aren’t enough interior partitions on the first floor through which to run wiring up to the second floor. Help!!

    File format
    1. rangerdoug | Mar 07, 2022 03:36pm | #2

      I'm wrestling with the same issue in my design. I started out with the idea of a lower floor stud wall supporting the main floor joists but had some concerns with building that stud wall level on top but sitting on a slab that will no doubt have some variation. My other concern was the same as yours, difficulty with electrical and with some plumbing to outside faucets.

      For those two reasons I'm now revising my design to the ledge approach. My main floor will use double exterior walls and the ledge method now gives access for electrical as the inner wall will be above the space created by the ledge.

      That doesn't work in your situation unless you have some unusually thick exterior walls. Here are some possible ideas:
      1) Go up through partition walls wherever practical.
      2)Consider building out one or more wiring chases where possible. If your HVAC is coming from the basement, how does it get to the second floor? If you need a chase for HVAC maybe you can run electrical there.
      3)Can you accommodate some short pony walls in selected locations - essentially making a double wall that would allow you to feed electrical into the short wall and then into the outer wall. The pony wall(s) could be built to make a shelf, bookcase, or other built-in giving it some purpose.

      None of these are great ideas but that's all I can come up with at this point.

    2. User avater
      mike_guertin | Jul 08, 2022 10:20pm | #5

      utilities (plumbing and electric) can be run vertically from the basement into any interior wall that runs perpendicular to the exterior wall and then horizontally through the interior wall into the exterior wall.

  2. user-6816423 | Apr 28, 2022 11:05am | #3

    How might option two work with an ICF foundation with 2-5/8" foam on the interior?

  3. User avater
    mike_guertin | Jul 08, 2022 10:17pm | #4

    With an ICF foundation you can use the Simpson Strong Tie ICF ledger brackets. They embed in the foam before the concrete is placed in the forms. A ledger is then fastened along the interior face of the wall to hang the joists from rather than resting the joists on top of the foundation.

Log in or create an account to post a comment.

Sign up Log in

Become a member and get full access to FineHomebuilding.com

More Ask the Experts

View All
  • Efflorescence on Brick Below a Window
  • Will Insulating a Crawlspace Save Me Money?
  • Setting Bases for Porch Posts
  • How Many Outlets Per Circuit?
View All

Up Next

Video Shorts

Featured Story

5 Steps for Flashing a Deck Ledger

A multilayered approach keeps water out of the house at this critical connection.

Featured Video

Builder’s Advocate: An Interview With Viewrail

Learn more about affordable, modern floating stairs, from design to manufacturing to installation.

Related Stories

  • 6 Ways to Make a Small Lot Live Big
  • First Aid for an Old, Sagging Roof
  • Illuminating an Indoor Staircase
  • Why You Should Pay Attention to Manufacturer Instructions

Discussion Forum

Recent Posts and Replies

  • |
  • |
  • |
  • |
  • |
  • |
View More Create Post

Highlights

Fine Homebuilding All Access
Fine Homebuilding Podcast
Tool Tech
Plus, get an extra 20% off with code GIFT20

"I have learned so much thanks to the searchable articles on the FHB website. I can confidently say that I expect to be a life-long subscriber." - M.K.

Get home building tips, offers, and expert advice in your inbox

Signing you up...

This site is protected by reCAPTCHA and the Google Privacy Policy and Terms of Service apply.
See all newsletters
See all newsletters

Video

View All
  • How to Frame an Arched Doorway
  • Podcast Episode 67 — Siding Next to a Stepped Foundation
  • Installing Ceramic Tile with Thinset
  • Build a Built-in Mudroom Series: Simple Solid-Wood Edging
View All

Inspections and Permits

View All Inspections and Permits Articles
  • A man in a workshop next to an I joist
    The Hole Truth: How to Properly Place, Cut and Drill Holes in TJI’s
  • An affidavit being signed and sealed
    Affidavit in Lieu of Inspection
  • Podcast 411: PRO TALK With Electrician David Shapiro
    Podcast 411: PRO TALK With Electrician David Shapiro
  • An image of Bryan crouching down by the fan of the blower door apparatus
    Find Air Leakage With the Minneapolis Blower Door
View All Inspections and Permits Articles

BOOKS, DVDs, & MERCH

Shop the Store
  • Code Check Building 4th Edition
    Buy Now
  • 2022 Fine Homebuilding Archive
    Buy Now
  • 2023 Tool Guide
    Buy Now
  • Pretty Good House
    Buy Now
  • Shop the Store

Fine Homebuilding Magazine

  • Issue 313 - Feb/March 2023
    • Practical System for a Seismic Retrofit
    • Fine Homebuilding Issue #313 Online Highlights
    • Practical System for a Seismic Retrofit
  • Issue 312 - Dec 2022/Jan 2023
    • Tool Test: Cordless Tablesaws
    • Gray-Water System for a Sustainable Home
    • Insulate a Cape Roof to Avoid Ice Dams
  • Issue 311 - November 2022
    • 7 Steps to a Perfect Exterior Paint Job
    • Options for Smarter Home-Energy Tracking
    • The Fine Homebuilding Interview: James Metoyer
  • Issue 310 - October 2022
    • Choosing a Tile-Leveling System
    • Choosing Between HRVs and ERVs
    • Custom Built-in Cabinets Made Easy
  • Issue 309 - Aug/Sept 2022
    • 10 Steps to Install Crown Molding on Cabinets
    • How to Get Sturdy Walls Without OSB
    • Choosing the Right Construction Tape for the Job

Fine Homebuilding

Follow

  • twitter
  • facebook
  • instagram
  • pinterest

Newsletter

Get home building tips, offers, and expert advice in your inbox

Signing you up...

This site is protected by reCAPTCHA and the Google Privacy Policy and Terms of Service apply.
See all newsletters
See all newsletters

Membership & Magazine

  • Online Archive
  • Start Free Trial
  • Magazine Subscription
  • Magazine Renewal
  • Gift a Subscription
  • Customer Support
  • Privacy Preferences

Taunton Network

  • Green Building Advisor
  • Fine Woodworking
  • Fine Gardening
  • Threads
  • About
  • Contact
  • Advertise
  • Careers
  • Copyright
  • Terms of Use
  • Site Map
  • Do not sell or share my information
  • Privacy Policy
  • Accessibility
  • California Privacy Rights

© 2023 The Taunton Press, Inc. All rights reserved.

X
X
This is a dialog window which overlays the main content of the page. The modal window is a 'site map' of the most critical areas of the site. Pressing the Escape (ESC) button will close the modal and bring you back to where you were on the page.

Main Menu

  • How-To
  • Design
  • Tools & Materials
  • Video
  • Blogs
  • Forum
  • Reader Projects
  • Magazine
  • Members
  • FHB House

Podcasts

  • FHB Podcast
  • ProTalk

Webinars

  • Upcoming and On-Demand

Account

  • Log In
  • Join

Podcasts

  • FHB Podcast
  • ProTalk

Webinars

  • Upcoming and On-Demand

Popular Topics

  • Kitchens
  • Business
  • Bedrooms
  • Roofs
  • Architecture and Design
  • Green Building
  • Decks
  • Framing
  • Safety
  • Remodeling
  • Bathrooms
  • Windows
  • Tilework
  • Ceilings
  • HVAC

Magazine

  • Current Issue
  • Past Issues
  • Magazine Index
  • Subscribe
  • Online Archive
  • Author Guidelines

All Access

  • Member Home
  • Start Free Trial
  • Gift Membership

Shop the Store

  • Books
  • DVDs
  • Taunton Workshops

More

  • FHB Ambassadors
  • Reader Projects
  • Podcast
  • Customer Support

Account

  • Log In
  • Join

Newsletter

Get home building tips, offers, and expert advice in your inbox

Signing you up...

This site is protected by reCAPTCHA and the Google Privacy Policy and Terms of Service apply.
See all newsletters
See all newsletters

Follow

  • twitter
  • facebook
  • instagram
  • pinterest

Join All Access

Become a member and get instant access to thousands of videos, how-tos, tool reviews, and design features.

Start Your Free Trial

Subscribe

FHB Magazine

Start your subscription today and save up to 70%

Subscribe

We hope you’ve enjoyed your free articles. To keep reading, become a member today.

Get complete site access to expert advice, how-to videos, Code Check, and more, plus the print magazine.

Start your FREE trial

Already a member? Log in