Conditioning an Attached Garage
To maintain healthy living spaces in the home, isolate the garage by building it as if it were a separate house.
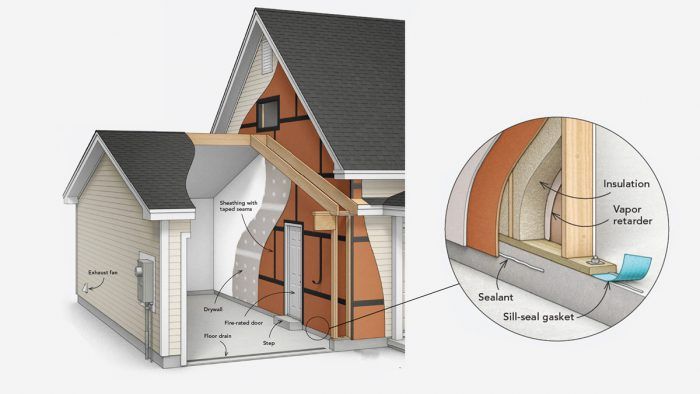
Synopsis: Build attached garages as if they are a separate home, because according to Randy Williams, you do not want the air from the garage to have any effect on the air that is in the home. Best practices include managing air quality and water vapor, and choosing the right HVAC system for your needs.
I live in Grand Rapids, Minn., where winter can be frigid, and I have to admit that during the period when I had a heated garage attached to my house, it was nice not having to scrape ice or brush snow off my vehicles. Having a warm car when it’s below zero outside was a bonus. But that convenience cost me about $100 per month in December, January, and February. There was also the added cost of the heating equipment and extra insulation needed when building the garage. And there was always moisture in the space, both liquid and vapor, that needed to be dealt with.
While a nice luxury, there are many health, safety, and building-longevity concerns associated with having a heated garage attached to a home. In my work as a residential energy auditor, I’ve seen everything from potentially dangerous fumes seeping into the home to severe moisture damage in wall cavities. These problems are avoidable if you control both liquid water and water vapor, pay attention to air-sealing, insulate thoroughly, and condition the space thoughtfully in the ways presented here.

Air
Negative air-pressure conditions inside a home can pull in makeup air from the garage, and that’s dangerous. Carbon monoxide and other harmful fumes in the garage must not be allowed to pass through the shared walls and ceiling and floor systems. Creating a robust air barrier between a garage and living spaces isn’t just a plus; it’s also required by the International Residential Code (IRC).
The most straightforward way to achieve this separation with an attached garage is to first frame, sheathe, and air-seal the house, then frame and sheathe the garage. The common wall should be framed and sheathed as part of the house, with the panel seams taped and the perimeter of the sheathing sealed to the framing and/or foundation before the garage is framed. Use a good sill-seal gasket between the bottom plate and the foundation, and, if possible, lap the sheathing over the foundation step between the house and the garage, and seal the sheathing to the foundation. If any sheathing panels bridge the garage and house framing on the exterior, apply beads of acoustical sealant to the abutting framing before installing the panels to maintain the house/garage separation.
Space
Attached garages usually open directly to the home—often to a mudroom, kitchen, or other shared space. It’s best to have at least one step up from the garage elevation to the living space so that bulk water from melting snow is less likely to end up inside the home. This also can help prevent engine exhaust and vapors from a fuel or chemical spill that hold close to the floor from entering the home. For an even better separation, include a small breezeway or airlock/vestibule with well-sealed exterior doors connecting it to the garage and the living space, and even to the outside if you want.
 |
 |
 |
It’s hard to recommend any one air-sealing strategy for a retrofit, because every situation is different. Regardless, the air barrier in both new builds and retrofit situations should be verified with a blower door and smoke pencil or fog machine, and additional air-sealing measures should be taken if any smoke makes its way from the garage to the living space.
Fire
Whether or not a garage is conditioned, the IRC states that garage walls shared with the living space and walls supporting floors with living space above them must be covered with minimum 1⁄2-in. drywall or material with equivalent fire resistance on the garage side of the wall. Garage ceilings under habitable rooms require a minimum 5⁄8-in. Type X drywall or the equivalent. Any penetrations through walls shared by the house and garage have to be carefully air-sealed and fireblocked to maintain the air and fire barriers. While the code allows for penetrations through wall and floor/ceiling assemblies shared by the house and garage—say for plumbing or HVAC—it’s best to avoid those whenever possible. The only connection between the garage and home should be a door, and this door needs to be a fire-rated, self-closing exterior door with good seals.
Moisture
Regardless of your insulation strategy, plan to include a vapor barrier under the slab to keep moisture from rising through the concrete in a conditioned garage. This is most often done with polyethylene sheeting, 6 mil or thicker, but high-density closed-cell spray foam provides both insulation and vapor control, and it does a great job of air-sealing around penetrations as well.
Adding a floor drain will help manage snow and rainwater brought into the garage by vehicles. But check with your local building official first; some jurisdictions will not allow garage drains to empty into the city water-treatment system. Others do not want garage drains to be daylighted or may require a way to separate oil and gas from water.
Also, consider installing a wall covering that is less sensitive to moisture than standard drywall. Georgia-Pacific’s DensArmor, for example, has a fiberglass facing rather than paper and is less likely to mold; as an added benefit, it’s more durable than drywall.
Insulate like a home
Even if it is never conditioned, a well-insulated garage will also help keep the living spaces in the home warmer in the winter and cooler in the summer.
Foundation
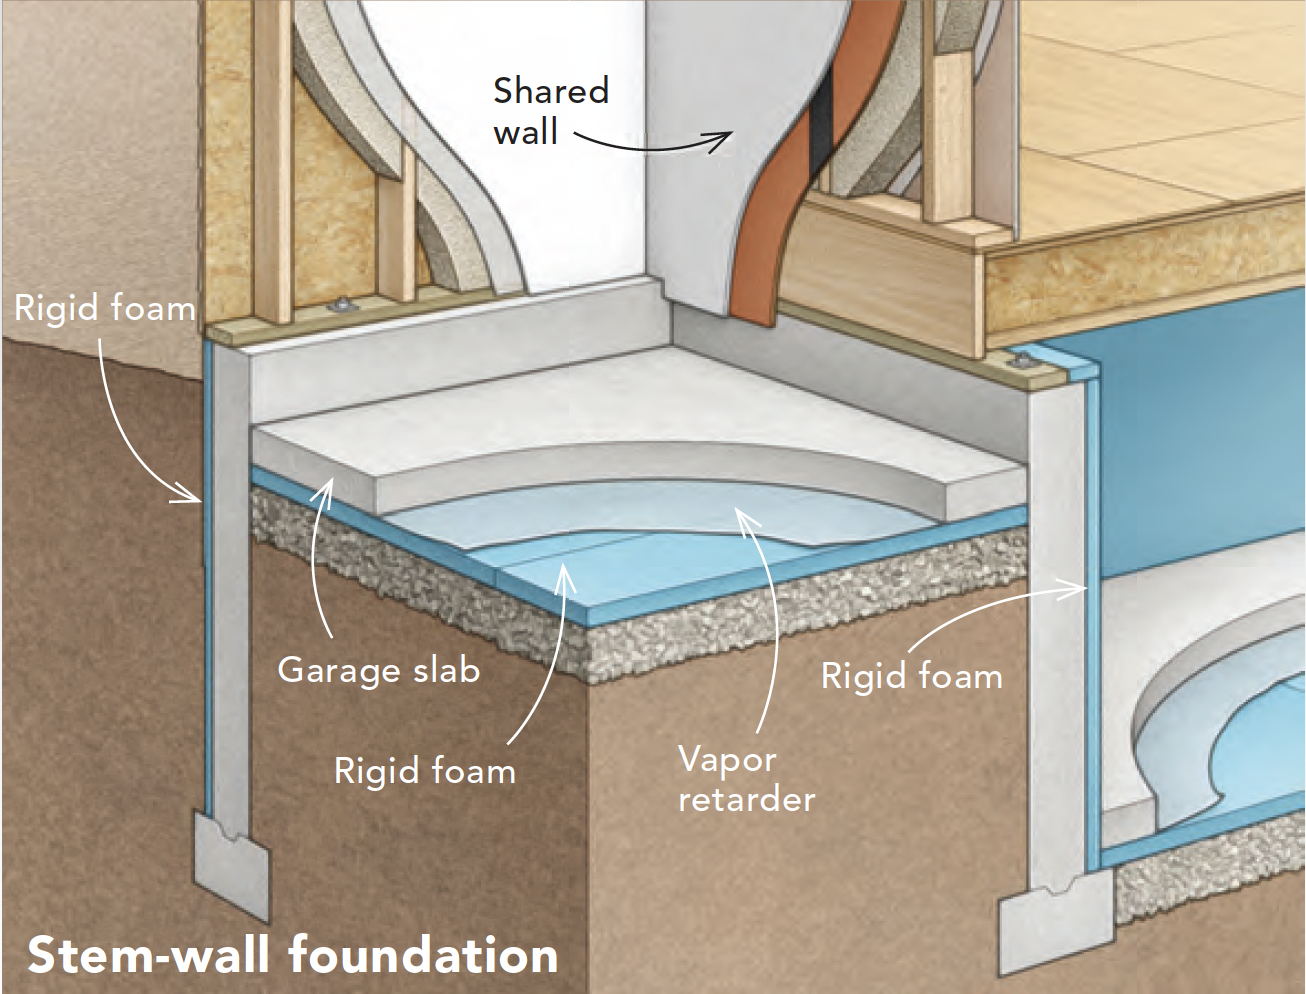
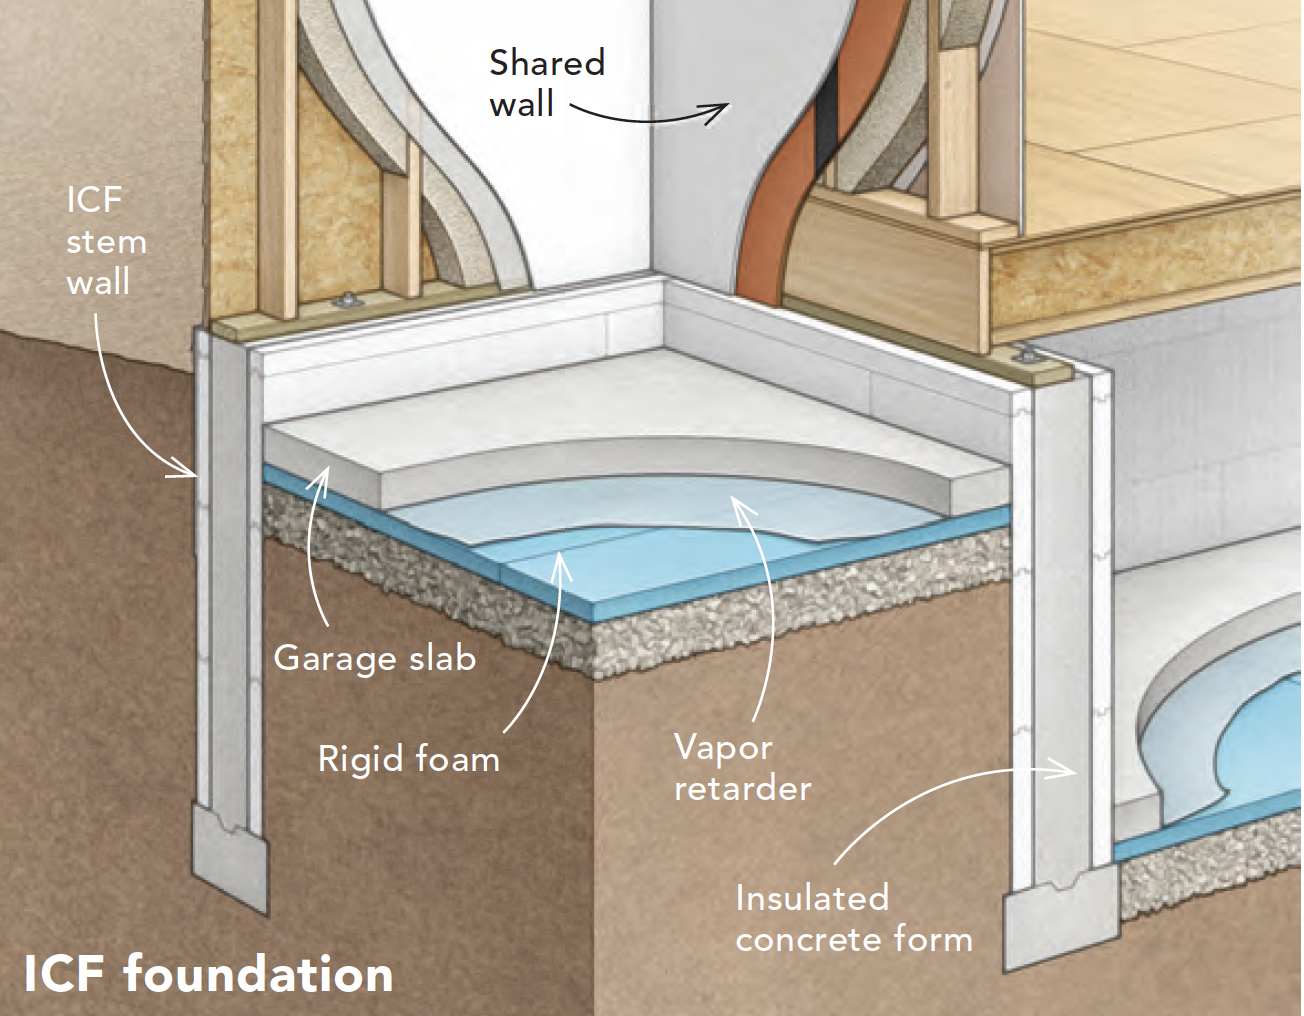
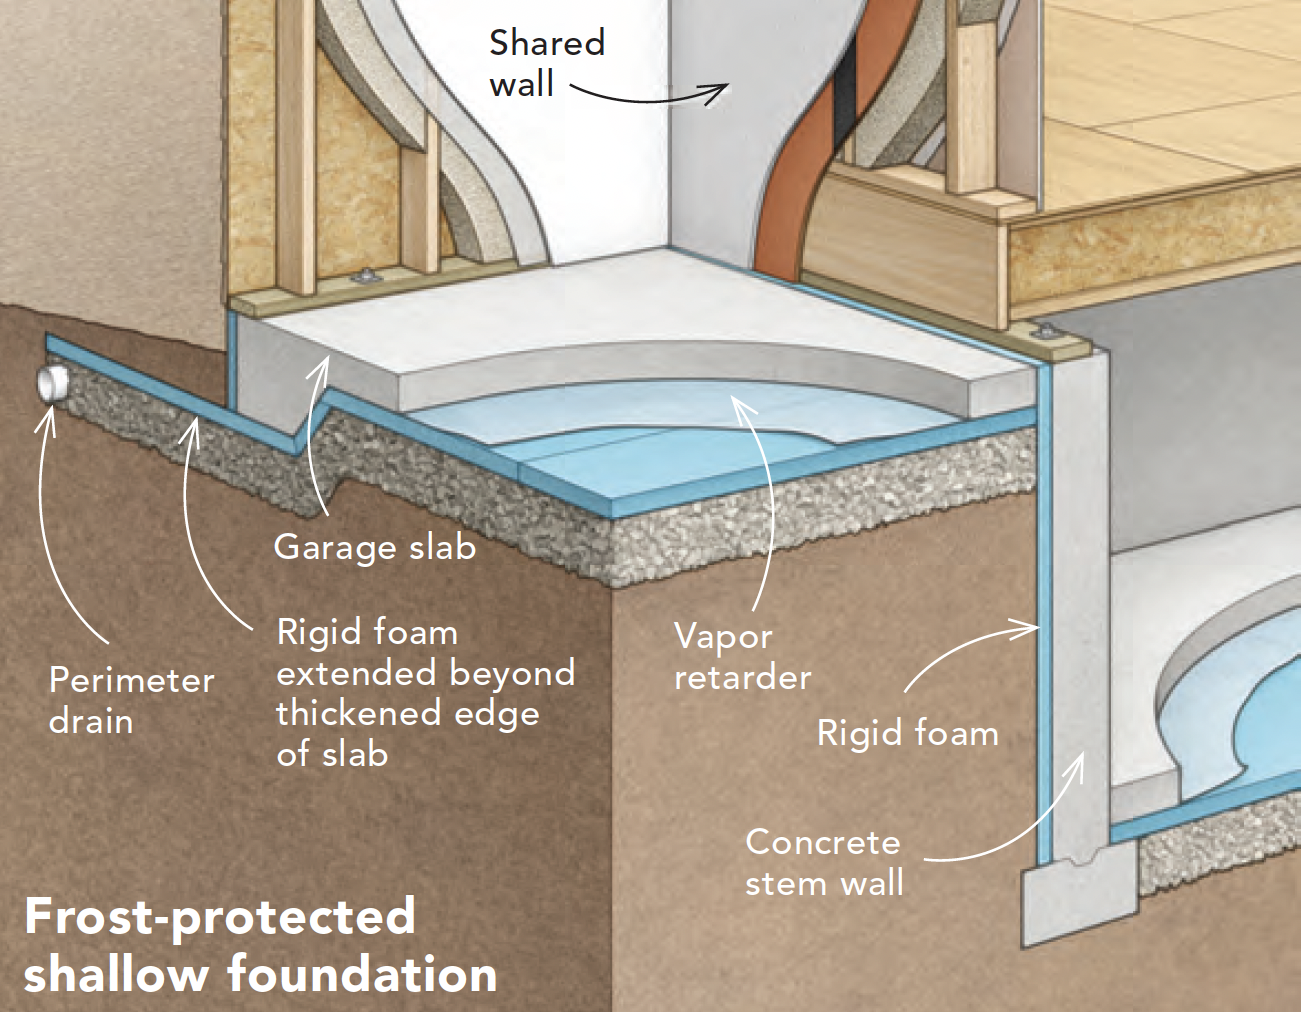
In cold climates, it’s a good idea to insulate the foundation of a conditioned garage, both around the perimeter and underneath the slab. It’s not uncommon for homes in my area (climate zone 7) to have a foundation built using insulated concrete forms (ICFs) or concrete masonry units (CMUs) with rigid insulation on the outside. Another option used by some high-performance builders is the frost-protected shallow foundation (FPSF). It includes vertical insulation around the perimeter of the slab’s thickened, load-bearing edge, and horizontal insulation under the slab, around the perimeter, and beyond the structure to create a thermal break between the concrete and the ground and to trap the ground’s heat under the building to prevent frost heave. For more information on this topic beyond what you’ll find in the IRC, check out Design and Construction of Frost-Protected Shallow Foundations (SEI/ASCE 32-01). It isn’t free, but it may be the best $48 a builder could spend for proven details on high-performance, slab-on-grade foundations. Down the road, someone may decide that paying to condition the garage isn’t worth it, so be sure to install a thermal break between the house and garage foundations.
In warmer climates where frost heave isn’t a concern, vertical insulation around the perimeter may be all that’s required to handle thermal bridging between the garage foundation and the outside air and soil. Whether you want to spring for underslab insulation in warmer climates depends on the ground temperature and the temperature you want to keep your garage. If both are near 55°F, there’s not enough temperature differential to drive heat in any direction.
Walls and windows
Once the garage is framed, insulate and air-seal as in the rest of the house. Likewise, install quality windows flashed and air-sealed just as well as those in the house. This is critical if you’re going to condition the space and want to conserve energy and save money. Even if you’re not going to condition the garage, taking these measures will keep it more comfortable year-round and may preclude the need for heating or cooling altogether. In my climate, a well-insulated garage rarely drops below freezing, even when the temperatures are well below 0°F.

Garage door
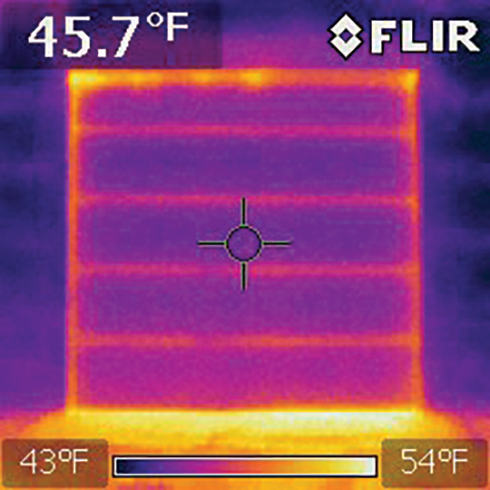
One thing to realize is that no matter how good a job you do with air-sealing and insulating walls, floors, and ceilings, it’s nearly impossible to seal a garage door perfectly. Still, it’s important that the garage door be insulated and that you install the best door seals you can find—ones that compress at the bottom to seal against the slab or threshold, with exterior vinyl that conforms to the door at the sides and head. Insulated garage doors are available in different thicknesses; the thicker the door, the more insulation and the more expensive they are. But be wary of the listed R-values on garage doors. The actual R-value could be about one-third of what some manufacturers claim.
There are also off-the-shelf, DIY options for insulating garage doors that are less expensive and perhaps just as good, if not better. Ready-made kits of vinyl-faced fiberglass batts are one option; cut-and-cobble rigid foam such as Thermax—a brand of foil-faced polyisocyanurate rigid foam—is another that some have had success with. Despite the various insulation options and add-on weatherstripping products, garage doors remain notoriously leaky.
With that in mind, one garage door is better than two. The perimeter of the garage door is the weak link in most air-sealing and insulation strategies. Simply reducing the linear footage of the door perimeter goes a long way toward improving comfort and energy efficiency. For example, the perimeter of two 8-ft. by 8-ft. doors is 64 ft. The perimeter of one 8-ft. by 16-ft. door is 48 ft. By going with one big door rather than two smaller ones, you reduce the leaky perimeter by 16 ft.
The space above
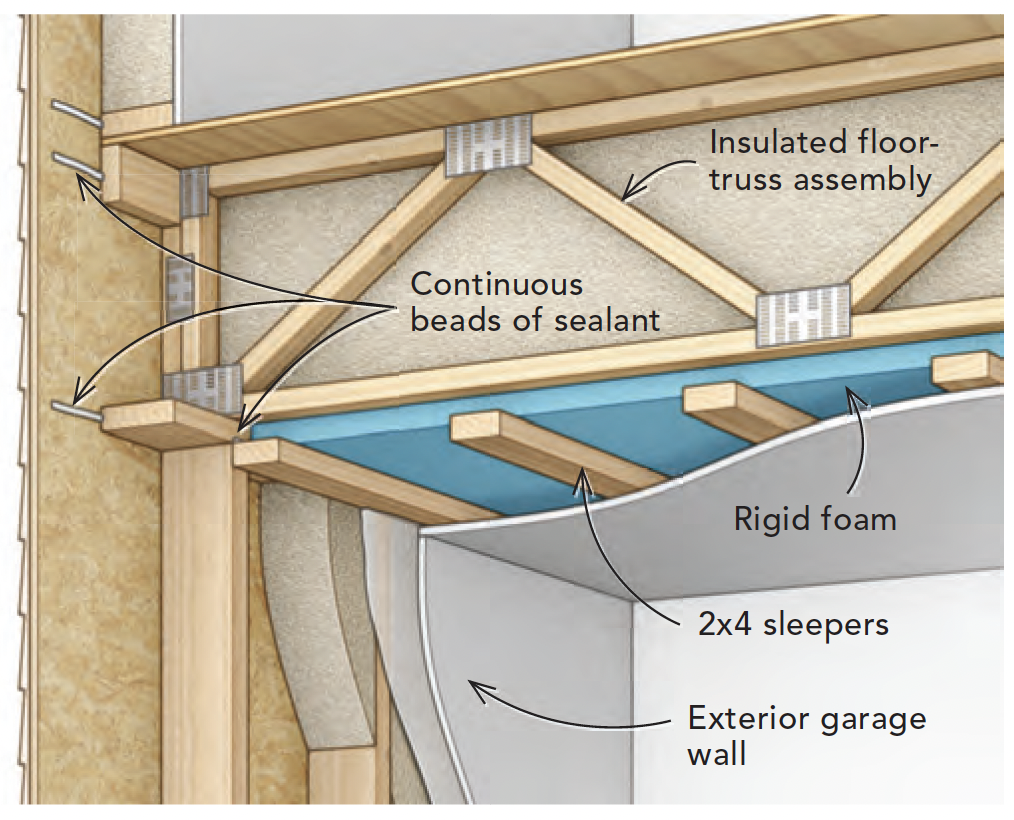
Garage attic space can be insulated with the same methods used on the house. But if there’s to be living space above a garage, create an air barrier by taping the joints in the floor sheathing and gluing or sealing the sheathing to the floor framing below, paying particular attention to the rim-joist area. If any pipes or ducts run through that space, install them up against the floor sheathing and then insulate below them to prevent them from freezing when someone decides they don’t want to heat the garage anymore.
Manage air quality and water vapor
Petroleum-burning cars, trucks, lawn equipment, and toys can produce a lot of noxious fumes in a short period of time. Also, some of the water brought in on vehicles will probably end up as water vapor. In a typical leaky, unconditioned garage, neither of these issues are major worries because air changes are generally quick enough to carry away pollutants without forced ventilation. Conditioned garages that have been carefully air-sealed and insulated are a different story.
Exhaust
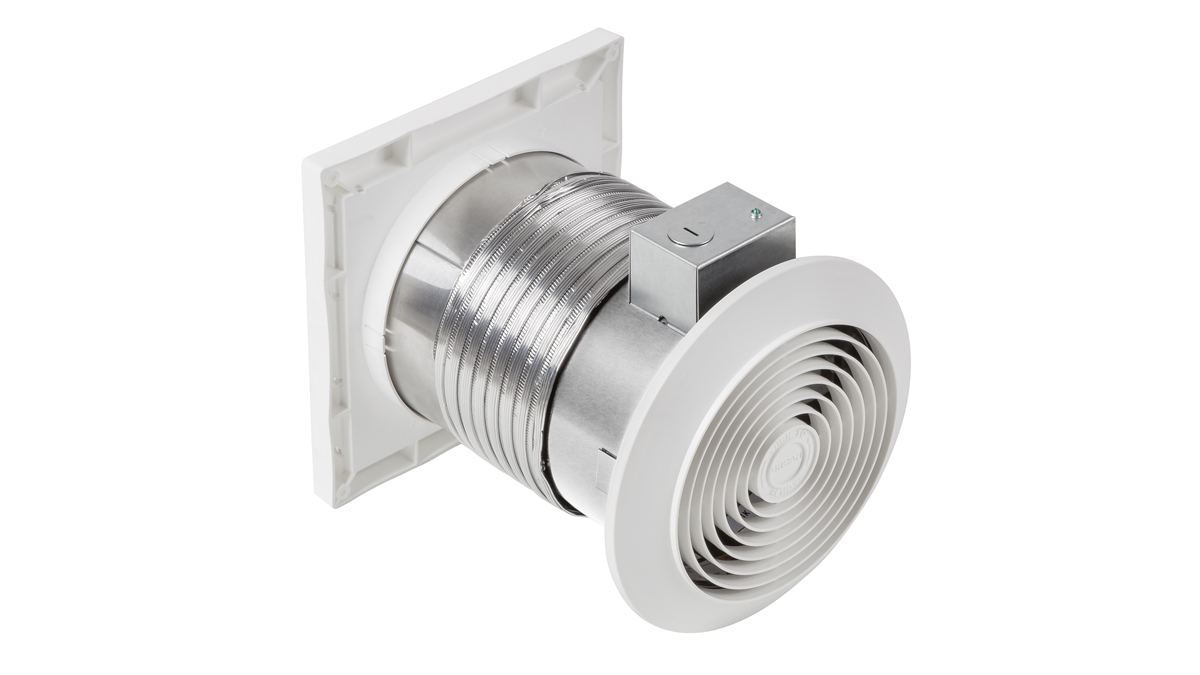
Dealing with water vapor in colder months is relatively easy. Cold air holds little moisture, so simply exhausting the humid air out will draw in dry outside air through the gaps in the garage doors. This exhaust-only method also takes care of exhaust fumes from vehicles and puts the garage under slightly negative pressure to keep fumes from getting sucked into the house.
A bath fan is a simple solution for facilitating this basic air exchange. If controlled by a humidistat, it will switch on automatically when the humidity rises above the set point. Connecting a fan that turns on and runs for a set period when the garage door opens is a great way to control air pollutants. Another option is a product I recently discovered, the Humidex garage exhaust fan, which senses both humidity and carbon monoxide and starts automatically if either is present.
There are two downsides to these exhaust-only options: (1) If you’re conditioning the garage air (as opposed to radiant heating and cooling, which heats and cools objects and people), your conditioning costs are going to go up; and (2) if these automatic systems run in regions where it’s humid in summer, they’re going to draw warm, wet outside air into a space that is likely cooler and less humid, which can lead to moisture problems.
Exchange
If you plan to condition the air in the garage year-round, you may decide to install a heat-recovery ventilator (HRV) or energy-recovery ventilator (ERV) to save some money on conditioning, though the cost of buying and installing either is a heck of a lot more than a bath fan and might not be worth it. Both systems have exchangers to temper incoming outdoor air with exhaust air. HRVs only exchange heat, while ERVs exchange both heat and humidity. In either case, the unit would have to serve the garage alone so as not to mix with the air in the house. These units can only be installed in conditioned spaces, so if your plan is to intermittently condition the garage, they won’t do much good, and you’ll probably void the warranty. Deciding which to use is something best left to an HVAC professional; there are too many factors involved to sum up here.
Dehumidify
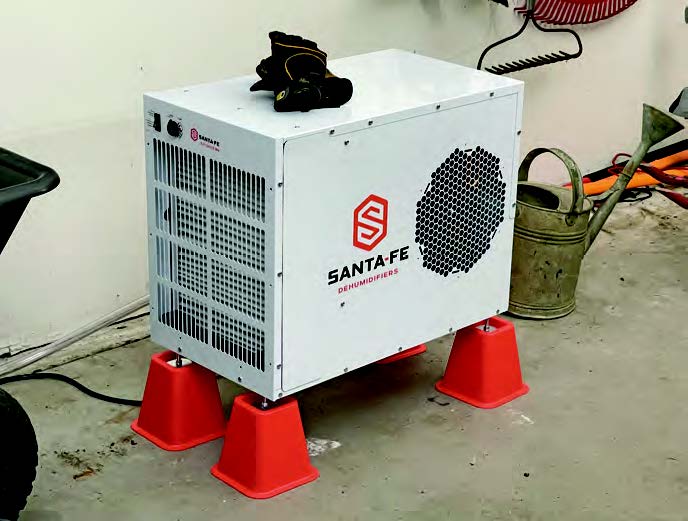
If you condition the air in the garage in summer and still have moisture problems, you probably need a dehumidifier. They work, but at a cost. I have tested many dehumidifiers during energy audits over the years, and they can cost up to $50 per month to operate, compared to an HRV, which costs less than $10 per month, or a Humidex, which costs less than $5 per month in my area, where electricity rates are 12¢ per kwh. A dehumidifier can be the best option for a homeowner especially when running exhaust ventilation that can draw humidity inside, but my advice is not to spring for dehumidification until you’ve established that summer humidity is going to be an issue. In many cases, it won’t be.
Ductless minisplit
For constant heating and cooling, a ductless minisplit is a great option, especially if your electric rates are low. These systems can dehumidify the air while they cool it in summer and can maintain warm temperatures in winter. They aren’t a good solution for intermittent use, though, as they are most efficient when they’re running at a constant low level, which they must do to provide dehumidification in summer. And they may not provide adequate warmth in climate zone 7 or 8, where you’re likely to need supplemental heat in December through February. If all you need is constant cooling without heat, a window or wall air conditioner is another option for cooling and dehumidifying.
Ducted option
A ducted heat pump or conventional furnace is not the cheapest or easiest system to install, but they are efficient and deliver conditioned air exactly where you want it. One very important thing to note: If you are thinking about connecting the garage to the home’s forced-air heating and air-conditioning system, don’t. This would require a return air duct to equalize the building pressure, which is bad for occupant health and a code violation. No ductwork or forced-air appliances that condition the house should ever be in a garage, even if your municipality for some reason allows it.
Choose an HVAC system that makes sense
Do you plan to condition year-round, for just one season, or intermittently for certain activities? Do you want to warm and cool the air, or is warming people and things enough? Answers to these questions should inform the heating and cooling systems you choose, as well as whether or not to spring for an ERV or HRV.

Overhead radiant
For intermittent heating, radiant systems that heat objects and people rather than the air provide a quick response in a space with a lot of air leakage. They’re available in electric, natural gas, and propane models, so you can keep costs down by choosing one that’s cheapest to operate in your area. Adding a timer can warm vehicles before your daily commute.
In-floor radiant
An in-floor radiant system—whether it be hydronic or electric—doesn’t respond quickly enough for intermittent use. If it runs constantly, though, it does a good job of melting snow and keeping the floor dry. In cold climates, this can prevent snow from piling up or turning into ice. I’d estimate that two-thirds of the heated garages in my area use in-floor radiant heat.
Gas-fired heat
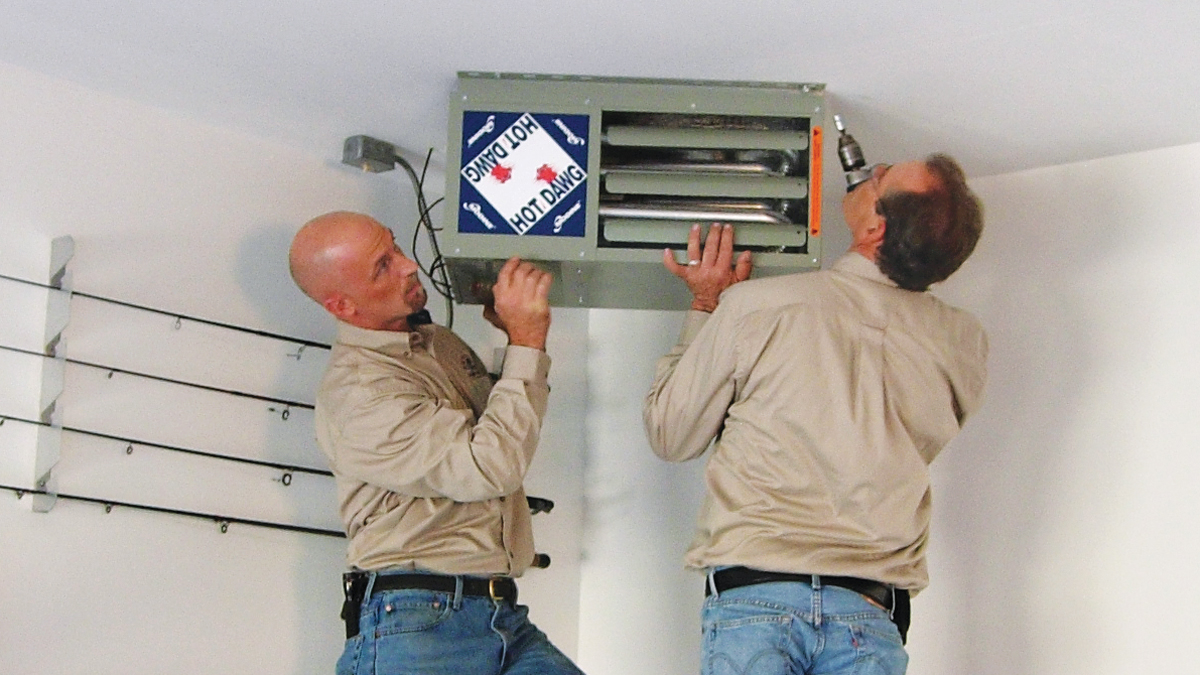
A ceiling-mounted, gas-fired, vented space heater set at a low temperature, between 40°F to 50°F, works well for sustained heat, and if you need to work in the space, it can quickly raise the temperature. The drawback with this heating system is that it might not dry the floor quickly, and the heat might not distribute evenly throughout the garage.

From Fine Homebuilding #304
To read the entire article, please click the View PDF button below.
RELATED LINKS
Fine Homebuilding Recommended Products
Fine Homebuilding receives a commission for items purchased through links on this site, including Amazon Associates and other affiliate advertising programs.

Great Stuff Foam Cleaner

Foam Gun

Utility Knife


View Comments
Good article. We were looking at an under-the-home garage/walkout basement and wondered the best way to do that. My thought would be that the upper floors (above garage) would be framed and sealed as its own space and the garage would get a similar treatment. Essentially an air tight and insulated box stacked on top of an insulated and pretty air tight box. I'm just curious how you would handle that ceiling? Would it be like the wall assembly and sheathed with ZIP, followed by rigid insulation and then sheetrock instead of cladding? Would probably need insulation on the other side of the ZIP too right?