Weaving a Vine Design into Sidewall Shingles
An eye-catching cedar shingle design may look complicated, but it's easy once you know how.

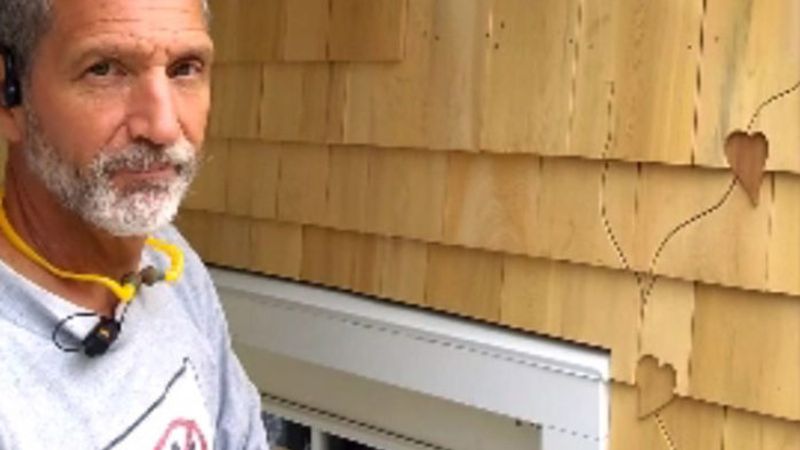
Cutting and layering a vine into cedar sidewall shingles is easy once you see how it’s done. The key is applying an undercourse that I call a backing layer to do three things — provide contrast in color (I use red cedar beneath white cedar or vs. vs.); create three-dimensional (relief) portions of the design (like the leaf that drops down from beneath the field course of shingles); and to weatherproof the cutout areas of the field course of shingles (the vines and top portion of leaves).
I start a design by sketching the route of the vine and approximately where leaves will be located on the housewrap. As each course of shingles is applied it covers the sketch so I duplicate the design in chalk on each shingle that covers the drawing beneath. I make the cutouts using a jigsaw or bandsaw. You could use a router but I’ve found the uneven width of the jigsaw vine cutout makes it look more natural than the uniform width a router bit. And rather than hand sketching out the leaves in place on shingles I draw and cut a series of leaves from thin cardboard (a cereal or cracker box works perfectly) making 6 or so slightly different looking ones. As the shingle courses go up and it’s time for a leaf, I select one and use it as a template. Each leaf can be used twice — once for each face.
The ‘cutout’ design feature: The field shingles are cut out exposing an extra thin layer beneath. A backing layer needs to be applied beneath any area getting a cutout. It’s made from the top lap of a shingle – basically a shingle with the exposure portion cut off. The bottom end of the backing layer shingles is about 1/4 in. thick. In a course where just a vine cutout occurs the backing layer only needs to be applied about two inches wider than the area the vine travels through as it makes its way up the shingle exposure. Ideally there shouldn’t be any joints occurring in the backing layer shingles beneath a cutout.
The backing layer shingles are aligned with the next exposure course line and nailed an inch in from the sides and up from the butt. Since the field shingles will overlay the backing layer the nails will be covered. Pay close attention to where cutouts will occur in the overlying course though — make sure there aren’t any nails placed where the cutout will travel.
Since the backing layer pads the overlying course of shingles off the wall you have two choices — Run the backing layer shingles across the entire course until it reaches a vertical element — cornerboard, window trim or door trim but that would burn up a lot of shingles; or install a tapered ramp to guide the design shingles down to the field level of shingles. Three ways to do this — plane the edge of a backing layer shingle (but that takes time and leaves a pretty steep ramp); successively shorter and shorter backing shingles can be installed next to one another until there’s just a feather sized shingle left; or what I usually do — make a ramp out of a 1 in. to 1 1/2 in. wide shingle. The overlying field shingles only need support along the bottom edge. The small space beneath the shingle causes no ill effects on the shingles or the design.
When you cut out a vine slot it only needs to go about 1/8 in. to 1/4 in. above the exposure line of the overlying course.
Any time the vine cutout slot goes diagonally across the exposure of the shingle more than 2 in. +/- in horizontal distance in a single course the wood beneath the slot ma split and fall off. To reduce the chance of this happening, I either bond the exposure shingle to the backing layer or apply a layer of 10 minute 2-part epoxy resin and a piece of fiberglass mat (this keeps the shingle grain intact even if it develops a slight split. In this video I just used polyurethane adhesive and clamped the design shingle and backing layer together for a couple hours until set.
The ‘drop down’ design element: The extra layer of shingle beneath the course above drops down beneath the exposure layer of the overlying shingles. Essentially a backing layer that is exposed below the butt line. A leaf is partly a ‘drop down’ and partly a ‘cut out’ where part of a backing shingle drops below the overlying course line and the upper part is exposed by a cutout in the next field course shingle. Cutting a leaf into the design is a two step process. Start with a full shingle and sketch the overlying exposure line across it. Sketch the route of the vine up the shingle and position a cardboard leaf template where you’d like it to go. I recommend that it hang between 1/4 and 3/4 of the height of the leaf down over the exposure line. Once placed, sketch a line on the bottom portion of the leaf that extends below the exposure line. Cut along the exposure line, down along the lower part of the leaf and then finish along the exposure line on the other side.
Nail the backing shingle / leaf in place on the wall. Hold a field shingle over the top of the leaf / backing shingle and reposition the leaf template orienting it to the drop down part of the leaf cut in the shingle beneath. Draw the outline of the leaf on the shingle, and sketch the path of the vine up to the next course exposure line. Cut the leaf outline out and the slot for the vine; then position and nail it in place.
You can have the vine split into multiple stems and vines can end in a tendril while the main branch grows further upward. You can wrap vines around woven corners and behind cornerboards. They can be simple or complex in the scope but the same steps using the ‘cut out’ technique and ‘drop down’ technique are all you need to know to complete a vine.
www.mikeguertin.com IG: @mike_guertin

