
How to Hang Drywall on Walls
Watch Justin Fink show you how to hang that first sheet of drywall—by yourself.
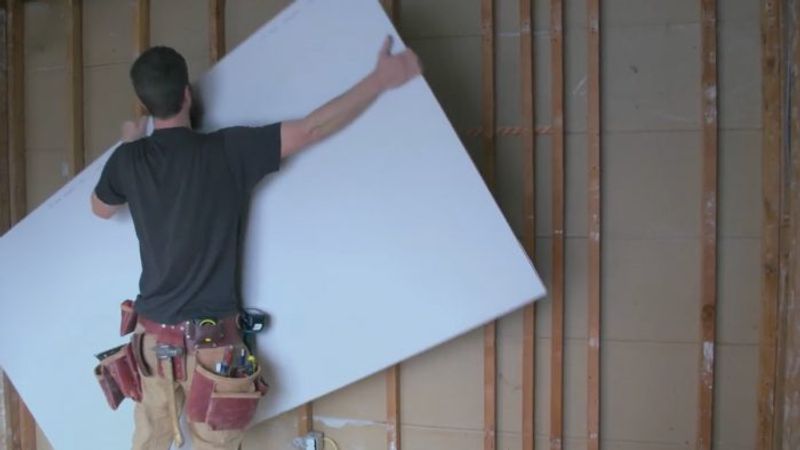
Hanging drywall on walls can be tricky to do by yourself, but with the right approach, it’s actually quite easy. With the ceiling drywall already in place, position your first sheet of drywall directly below where it will be installed on the wall. Mark each stud’s location about 6 in. from the top edge of the drywall to help you know where the screws will be placed. This avoids screws being driven into the top plate of the wall where settling could lead to cracks and fastener pops. Lift the sheet flush to the ceiling, brace the drywall with your shoulder while you take your screw gun from you belt and drive in the bottom center screw first. Add a screw moving out to each stud along the bottom edge. With the bottom fastened, put three more screws up each stud, evenly spaced.

View Comments
Simple, straightforward and functional. I didn't know about not putting screws into the top plate. Only thing I note is that our code specifies screw spacing at 8" OC, not 12".
Article completely ignores the what if it is too heavy for me to hold it on the wall - and I'm by myself.
When it has to be done - and I can't get someone to help me, I'll screw on a 2X just a quarter inch lower than the sheet will be mounted. That way I can rest the sheet rock on the 2x, and only have to lift it for a short time, and a short distance. I'm not saying this is a fast way to do it, but it gets the job done when there is no help. If you're young - build your strength. If you're an old guy like me and just want to get through another year without having injury, it seems to work and not strain my body.
I'd like to hear an explanation how fastening into the top plate would lead to cracks and fastener pops.
Its great your guy is using fine threaded screws intended for metal on those hard old wood studs, but shorter 1 1/4" screws would be less likely to hit wires, and he should be using a driver head that wont allow over driving.
Have him ditch the unnecessary stuff in his belt and replace the drill with an impact driver and his day will go easier.
Fasteners should be placed 8" apart. That means one at each edge, and unlike your video- I instruct my helper to place them close enough to the edge the tape will cover them, then one in the middle of the field at 24", then 2 equally spaced on either side of the middle one leaving 5 in the field or 8" spaced.
hanging drywall with a cordless gun is very inefficient not to mention he has no cone on the gun to control the depth of the screws which is asking for impefections in your job. i've worked on commercial projects for 35 yrs in the carpenters union and would have to give this "2 thumbs down"
In addition to the issues raised in previous comments, the screw placement shown does not comply with requirements of either the UBC or California BC, both of which specify screws at edges and closer spacing of screws. In all my 30 years of construction and design, I've never seen sheetrock that wasn't screwed to the top plate, and have never even heard of a failure due to the practice. There are places where failure , in terms of cracking or tape splitting can occur if the rock isn't placed properly, such as joints at header ends, but the top plate isn't one of the.
In addition to the issues raised in previous comments, the screw placement shown does not comply with requirements of either the UBC or California BC, both of which specify screws at edges and closer spacing of screws. In all my 30 years of construction and design, I've never seen sheetrock that wasn't screwed to the top plate, and have never even heard of a failure due to the practice. There are places where failure , in terms of cracking or tape splitting can occur if the rock isn't placed properly, such as joints at header ends, but the top plate isn't one of the.
In addition to the issues raised in previous comments, the screw placement shown does not comply with requirements of either the UBC or California BC, both of which specify screws at edges and closer spacing of screws. In all my 30 years of construction and design, I've never seen sheetrock that wasn't screwed to the top plate, and have never even heard of a failure due to the practice. There are places where failure , in terms of cracking or tape splitting can occur if the rock isn't placed properly, such as joints at header ends, but the top plate isn't one of the.
In addition to the issues raised in previous comments, the screw placement shown does not comply with requirements of either the UBC or California BC, both of which specify screws at edges and closer spacing of screws. In all my 30 years of construction and design, I've never seen sheetrock that wasn't screwed to the top plate, and have never even heard of a failure due to the practice. There are places where failure , in terms of cracking or tape splitting can occur if the rock isn't placed properly, such as joints at header ends, but the top plate isn't one of the.
In addition to the issues raised in previous comments, the screw placement shown does not comply with requirements of either the UBC or California BC, both of which specify screws at edges and closer spacing of screws. In all my 30 years of construction and design, I've never seen sheetrock that wasn't screwed to the top plate, and have never even heard of a failure due to the practice. There are places where failure , in terms of cracking or tape splitting can occur if the rock isn't placed properly, such as joints at header ends, but the top plate isn't one of the.
Indeed.
Thank you for sharing your skills with us! ××