
Airtight Drywall
These energy-smart details will help you build a tight house with ordinary drywall, caulk, and gaskets.
Leaky homes waste a lot of energy, so most building codes now include requirements calling for floors, walls, and roofs to be sealed against air leakage.
Builders can detail a house’s air barrier in several ways. By taping sheathing seams, the air barrier can be established at the exterior wall and roof sheathing. Using spray foam, the air barrier can be established inside the wall and ceiling cavities. Or the air barrier can be located on the house’s interior by using polyethylene sheeting or by implementing the airtight-drywall approach. Building scientists now realize that in all but the coldest climates, interior polyethylene causes more problems than it solves, so builders who favor interior air barriers usually choose the airtight-drywall approach.
Developed in Canada during the early 1980s, the airtight-drywall approach uses ordinary drywall as the chief air barrier. To achieve a high level of airtightness, you must pay close attention to potential leakage points at the perimeter of the drywall. Although air can’t leak through drywall seams sealed with paper tape and drywall compound, it can easily leak through cracks wherever drywall is screwed to framing lumber. The airtight-drywall approach relies on caulk and gaskets to seal these cracks.
If you climb into the attic of an average house during the winter and pull aside the insulation above a partition, you’ll discover warm air rising through the visible crack between the drywall and the top plates. Air usually enters partition walls through cracks at electrical boxes. The airtight-drywall approach addresses these cracks, as well as others.
You’ll need the right caulk, gaskets, and airtight electrical boxes

A wide variety of caulks can be used for airtight drywall, but most experts recommend polyurethane for sealing drywall to framing. Gaskets, however, outperform caulk in this application. At least three types of gaskets have been used successfully for airtight drywall sealing: opencell foam gaskets (available from Denarco, manufacturer of Sure Seal gaskets; 269-435-8404), EPDM gaskets ( www.conservationtechnology.com); or gaskets that are made from ripped lengths of foam sill seal.

You’ll also need airtight electrical boxes. Most include a flange that helps to seal the gap between the box and the drywall. Some airtight boxes have flanges with an integral gasket, while others have flanges that are designed to be caulked. In addition to sealing the crack between the box and the drywall, it’s also important to use caulk or spray foam to seal the leaks that exist around the holes in the back of a box where the electrical cable enters. It’s important to keep in mind that filling an electrical box full of spray foam is a code violation.
Manufacturers of airtightelectrical boxes include Airfoil (www.airfoilinc.com); Allied Moulded Products (www.alliedmoulded.com), which manufactures Vapor Seal electrical boxes; Lessco (www.lessco-airtight.com); and Thomas & Betts (www.tnbcanada.com), which manufactures NuTek airtight boxes.
Checklist for a Thorough Air Barrier
Any air barrier, including one incorporating the airtight-drywall approach, must be thorough. An air barrier is about more than just the drywall; it requires sealing areas like the rim joist and penetrations like electrical boxes. It also requires sealing all large holes, including attic hatches, access holes under bathtubs, exterior walls behind tubs or shower units, kitchen soffits, recessed lights,and zero-clearance fireplaces. Here’s a basic checklist to ensure a continuous air barrier.

Drywall perimeter
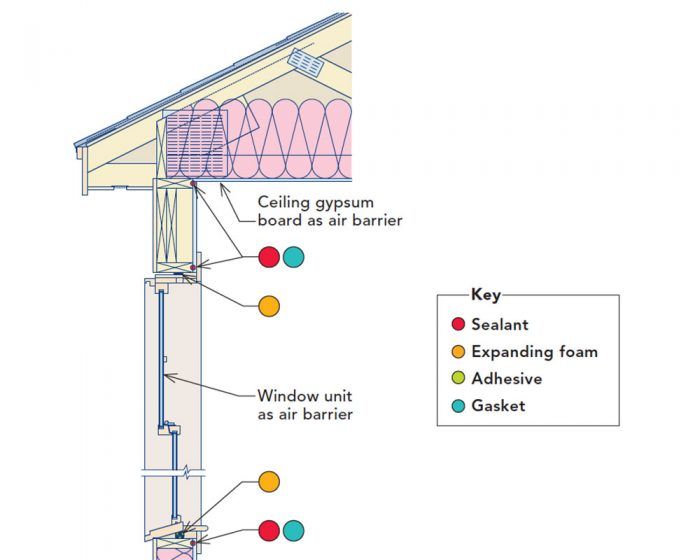
Use a continuous bead of caulk or drywall gaskets along the bottom plates and top plates of exterior walls, along the top plates of partition walls under insulated ceilings, and around the perimeter of all rough openings.
Intersecting walls
On partition walls that intersect exterior walls, seal both sides of the stud nearest the intersection. With caulk, seal the crack between the first stud in a partition wall and the partition’s bottom plate and top plate.
Windows and doors
Seal between window frames and window rough openings using low-expanding foam, gaskets, or backer rod and caulk. If your windows have drywall returns, install gaskets on the faces of the rough-opening studs (behind the drywall jamb extension) rather than the edges of the stud. Caulk window and door casings to the drywall.
Penetrations
All of the penetrations through the drywall need to be sealed, including electrical boxes. It’s also important to seal plumbing and wiring penetrations through top and bottom plates in exterior walls and partition walls.
Rim joist
Install sill seal between the foundation and the mudsill. When installing the rim joist, don’t forget to install a gasket or caulk between the bottom of the rim joist and the mudsill. Similarly, second-floor rim joists need a gasket or caulk between the bottom of the rim joist and the top plate it sits on. You can air-seal and insulate rim joists in one shot with spray foam.
Corners
Use caulk to seal the last floor joist to the intersecting rim joist. At corners of the building, it’s also important to seal the joint where one mudsill butts into another.
Subfloors
Install a continuous bead of subfloor adhesive between the subfloor and the perimeter joists. Install a gasket or caulk to seal between the subfloor and the bottom plates of exterior walls.
Slabs and foundation walls
Seal all penetrations with urethane sealant.

A good air seal never stops
Whether you are sealing around window and door frames with expanding foam or along plates and rough openings with sealant and gaskets, the key to a tight house is a continuous air seal. Along framing, you can use sealant or a gasket; the latter offers greater performance.
To see enlarged versions of the illustrations, please click the View PDF button below.

View Comments
Great article - how about one on retro-fitting for existing homes?
Awesome
Amazing concept.
Great job you done here!
Good concept. I liked it!
Appreciate it and keep posting.
Like it very much. Keep it up!