FHB Logo Facebook LinkedIn Email Pinterest Twitter Instagram Plus Icon Close Icon Navigation Search Icon Arrow Down Icon Video Guide Icon Article Guide Icon Modal Close Icon Guide Search Icon Skip to content
Main Menu
Subscribe

In every issue you'll find...

  • Expert insights on techniques and principles
  • Unbiased tool reviews
  • Step-by-step details to master the job
  • Field-tested advice and know-how
Subscribe Now!
Subscribe
  • How-To
  • Design
  • Tools & Materials
  • Videos
  • Blogs
  • Forum
  • Magazine
  • Members
  • FHB House
  • Podcast
  • Join
  • Log In
Main Menu Subscribe

Fine Homebuilding Project Guides

Drywall

Guide Home
Chapter
  • Drywall Basics
  • Tools and Materials
  • Hanging Drywall
  • Taping and Sanding
  • Special Installations
  • Drywall Repairs
  • Plaster
How-To

Repairing Popped Drywall Fasteners

Secure nail pops and similar problems with additional screws before fixing the visible damage.

By Myron R. Ferguson
Article Image

Popped nails and screws are one of the most common drywall problems. Fortunately, they’re also among the easiest to repair. The problem occurs when the drywall is not fastened tightly against the framing, when the framing lumber shrinks or twists, or when an object strikes the wall. With time or abuse, joint compound comes loose from the fastener and pops off, exposing the fastener head or pushing out the joint tape. Fastener pops may appear soon after the wall or ceiling is finished, or they may become visible several years later.

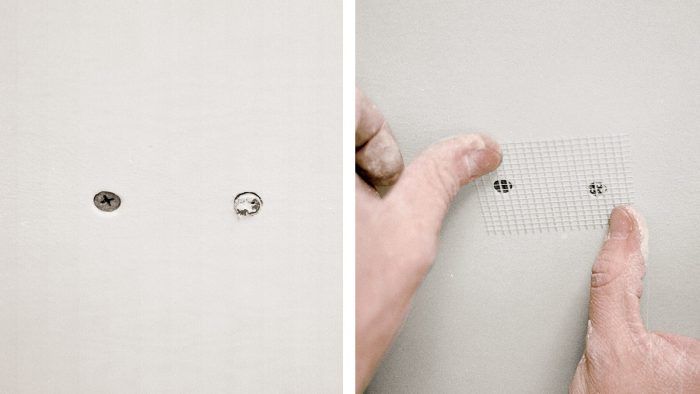
Whatever the cause, there’s a quick fix: Place another drywall screw about 1-1/2 in. away from the popped nail or screw, and then remove or reset the popped fastener. Apply hand pressure to the panel next to the area as you set the new screw. After the new screw or screws have been set, check the popped fastener and reset it again, if necessary (or simply remove it).

Secure the drywall
Secure the drywall: To repair a popped screw, place another screw 1-1/2 in. away, and then remove or reset the popped fastener.

Cover it with compound
Cover it with compound: Most depressions left from removing fasteners can be filled with compound alone, but if there is damage to the drywall surface, cover the heads with mesh tape before applying the compound.

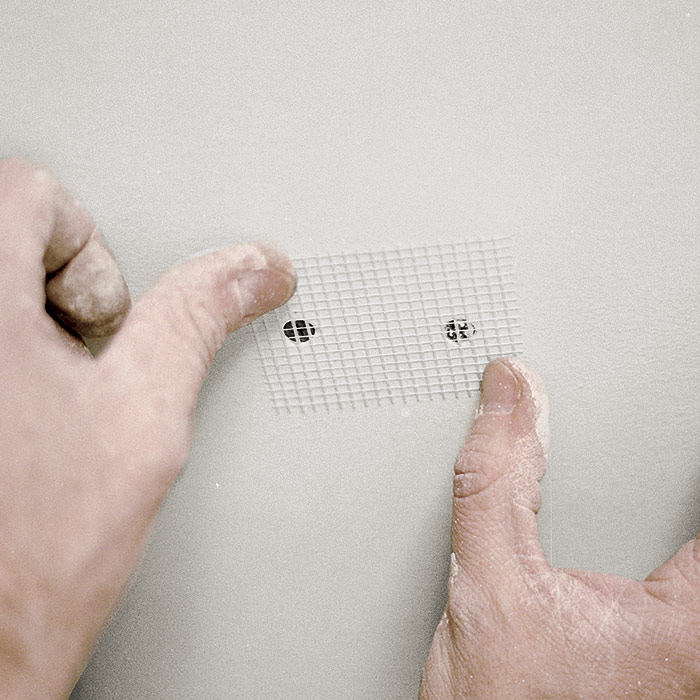
If the paper surface of the drywall has not been damaged, the fasteners can be finished with three coats of joint compound and sanded lightly. If the paper surface has been torn or the core of the drywall has been damaged, remove the loose material, fill the gap with joint compound, and then apply a small piece of mesh tape to the damaged area. Cover the repair with three thin coats of joint compound. Keep the compound thin over the patched area and feather it out as wide as necessary so that it blends into the wall.


WORK SMART: If the face paper is torn, apply mesh tape to reinforce the repair.


Fastener depressions

Areas around fastener heads where the joint compound is recessed below the surface of the panel are called fastener depressions. Depressions usually occur for one of two reasons: Either too little joint compound was applied during taping or the fastener was driven too deeply into the panel surface, damaging and weakening the panel’s face paper and gypsum core. When sanded, the compound is removed from the indentation because the drywall pushes in as you sand over the loose fastener. A fastener depression often isn’t visible until after it has been painted.

To diagnose the problem, push firmly against the drywall panel alongside the depression. If the panel is secure, you simply need to apply another coat or two of joint compound and then lightly re-sand the area to even out the depression. If the drywall moves in and out even a slight amount, the panel is damaged. To correct the problem, place a screw 1-1/2 in. away from the original fastener, and then press against the panel again to check for movement. If the panel is now tight, use a taping knife to remove loose material from around the original fastener, and then reset the nail or screw. Cut a piece of fiberglass-mesh tape to cover the fasteners, re-tape the area, apply three coats of joint compound, and lightly sand it once it’s dry.


Concealing Fastener Depressions

When hanging drywall, it’s easy to overdrive screws or tap nails in a little too deep. To repair the resulting depression, use joint compound and, in some cases, mesh tape.

Fasteners poorly set
Fasteners poorly set: Both the nail and the screw shown here are set improperly, creating the potential for a depressed area around the fastener, even after applying three coats of compound.

Tape and mud
Tape and mud: To repair a fastener depression, drive a drywall screw 1-1/2 in. away, remove loose material, and then reset the original fastener. Pre-filling and using mesh tape may be necessary if damage is extensive.


Sign up for eletters today and get the latest how-to from Fine Homebuilding, plus special offers.

Sign Up
X
X
Next: Repairing Holes in Drywall

Guide

Drywall

Chapter

Drywall Repairs

Log in or create an account to post a comment.

Sign up Log in

Become a member and get full access to FineHomebuilding.com

Drywall

Drywall

Trusted, comprehensive guidance for choosing, hanging, taping, sanding, and repairing drywall—the right way

View Project Guide

View All Project Guides »

Become a member and get unlimited site access, including the Drywall Project Guide.

Start Free Trial

Drywall Basics
  • Types and Uses of Drywall
  • Planning the Job
Tools and Materials
  • Hanging Tools
  • Taping Tools and Materials
  • Sanding and Finishing Tools and Materials
Hanging Drywall
  • Prep for Hanging
  • Measuring and Cutting Drywall
  • Guidelines for Hanging and Fastening Drywall
  • Hanging Ceilings
  • Hanging Walls
  • Hanging Airtight Drywall
  • Trim Accessories/Corner Beads
Taping and Sanding
  • Taping Basics
  • Taping Seams
  • Taping Inside and Outside Corners
  • Sanding
Special Installations
  • Tricky Transitions
  • Curved Surfaces
  • Other Special Installations
  • Decorating with Drywall
Drywall Repairs
  • Patching Holes, Cracks, and More
Plaster
  • Working with Lime Plaster
  • Plaster Repair
  • Classic Plaster Techniques

Fine Homebuilding

Follow

Newsletter

Get home building tips, offers, and expert advice in your inbox

Sign Up See all newsletters

Membership & Magazine

  • Online Archive
  • Start Free Trial
  • Magazine Subscription
  • Magazine Renewal
  • Gift a Subscription
  • Customer Support
  • Manage Preferences

Taunton Network

  • Green Building Advisor
  • Fine Woodworking
  • Fine Gardening
  • Threads
  • About
  • Contact
  • Advertise
  • Privacy Policy
  • Careers
  • Copyright
  • Terms of Use
  • Accessibility
  • CA Privacy Rights

© 2021 The Taunton Press, Inc. All rights reserved.

    Main Menu

  • How-To
  • Design
  • Tools & Materials
  • Video
  • Blogs
  • Forum
  • Reader Projects
  • Magazine
  • Members
  • FHB House
  • Podcasts

  • FHB Podcast
  • ProTalk
  • Account

  • Log In
  • Join

    Podcasts

  • FHB Podcast
  • ProTalk
  • Popular Topics

  • Kitchens
  • Business
  • Bedrooms
  • Roofs
  • Architecture and Design
  • Green Building
  • Decks
  • Framing
  • Safety
  • Remodeling
  • Bathrooms
  • Windows
  • Tilework
  • Ceilings
  • HVAC

    Magazine

  • Current Issue
  • Past Issues
  • Magazine Index
  • Subscribe
  • Online Archive
  • Author Guidelines

    All Access

  • Member Home
  • Start Free Trial
  • Gift Membership

    Shop the Store

  • Books
  • DVDs
  • Taunton Workshops

    More

  • FHB Ambassadors
  • Reader Projects
  • Podcast
  • Customer Support

    Account

  • Log In
  • Join

Newsletter

Get home building tips, offers, and expert advice in your inbox

Sign Up See all newsletters

Follow

Join All Access

Become a member and get instant access to thousands of videos, how-tos, tool reviews, and design features.

Start Your Free Trial

Subscribe

FHB Magazine

Start your subscription today and save up to 52%

Subscribe

We hope you’ve enjoyed your free articles. To keep reading, become a member today.

Get complete site access to expert advice, how-to videos, Code Check, and more, plus the print magazine.

Start your FREE trial

Already a member? Log in