FHB Logo Facebook LinkedIn Email Pinterest Twitter X Instagram Tiktok YouTube Plus Icon Close Icon Navigation Search Icon Navigation Search Icon Arrow Down Icon Video Guide Icon Article Guide Icon Modal Close Icon Guide Search Icon Skip to content
Subscribe
Log In
  • How-To
  • Design
  • Tools & Materials
  • Restoration
  • Videos
  • Blogs
  • Forum
  • Magazine
  • Members
  • FHB House
  • Podcast
Log In

Fine Homebuilding Project Guides

Windows & Doors

Guide Home
  • Choosing Windows
  • Installing Windows In New Walls
  • Retrofitting Windows
  • Window Repairs
  • Door Basics
  • Interior Doors
  • Exterior Doors
How-To

How to Install a Lockset in a Door

The keys to a successful installation are careful layout and sharp tools.

By Tom O'Brien Issue 174
  • X
  • facebook
  • linkedin
  • pinterest
  • email
  • add to favorites Log in or Sign up to save your favorite articles

cylindrical lockset

Unlike old-fashioned and complicated mortise locks, most of the locksets you see these days are of the cylindrical variety and are fairly easy to install. Basically, installation requires a large hole drilled through the face of the door and a smaller hole drilled through the edge. After the holes are drilled, the most difficult part of the job is cutting the mortises for the strike and latch plates.

There are two keys to a successful installation: careful layout and sharp tools. In addition to a tape measure, a combination square, and a hammer, you’ll need a scratch awl, a 21/8-in. hole saw, a 15/16-in. spade bit, and a 1-in. chisel. Assembling the lockset varies slightly from brand to brand, so it’s important to read the manufacturer’s instructions.


Steady The Door, Then Drill The Large And Small Holes

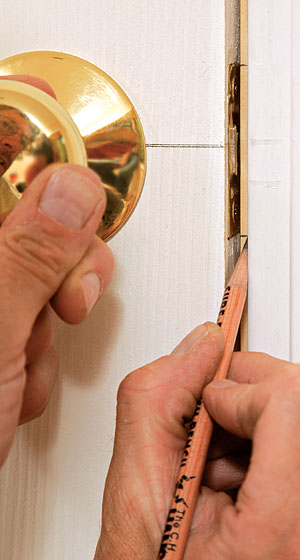
Step 1: Use a combination square for layout. Most lockset packages include a paper template for locating the face and the edge bore. It’s easier and more accurate to use a combination square, especially if you’ve got more than one lockset to install. Begin the job by wedging the door halfway open with a couple of shims under the bottom edge. Mark the face on both sides, 2 3/8 in. from the leading edge of the door (2 3/4 in. for exterior doors) and typically 36 in. from the floor. The edge bore is marked at the center of the door, in line with the face marks.
Mark the face on both sides, 2 3/8 in. from the leading edge of the door (2 3/4 in. for exterior doors) and typically 36 in. from the floor.
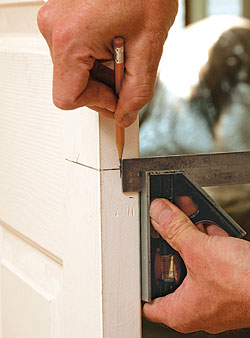
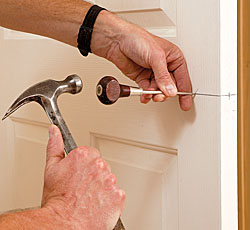
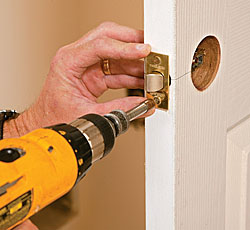
Step 2: Pilot holes pave the way for the big bits. To make sure the holes for the cylinders start in the right place and don’t wander, use a scratch awl to punch the precise starting points. Then drill pilot holes with a 1/8-in. bit in the edge and in both faces of the door.
use a scratch awl to punch the precise starting points.
Then drill pilot holes with a 1/8-in. bit in the edge and in both faces of the door.
Step 3: Drill the face bore first. Holding the tool level and square to the door, drill halfway through one side with a 21/8-in. hole saw. Then complete the bore from the other side of the door. Step 4: Use a nail to mark the center of the strikeplate hole. Close the door and hold it tight to the stop, then push a 6d nail through the 1/8-in. pilot hole in the door edge until it pierces the door jamb; a pry bar provides leverage if necessary.
Drill the face bore first. Holding the tool level and square to the door, drill halfway through one side with a 21/8-in. hole saw.
Use a nail to mark the center of the strikeplate hole
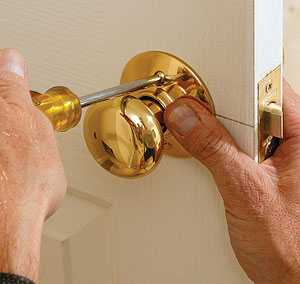
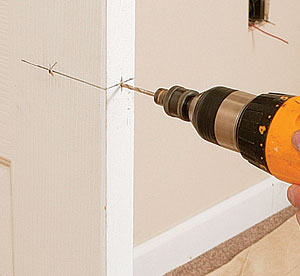
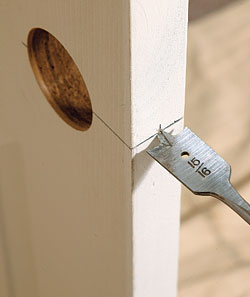
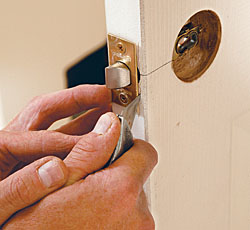
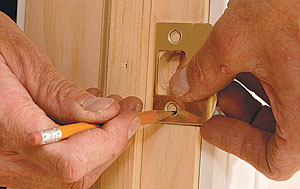
Step 5: Drill holes for the latch and the strike using a 15/16-in. spade bit. (A 7/8-in. bit is too small for most latch mechanisms, and the hole left by a 1-in. bit won’t be covered completely by the latch plate.) Step 6: Use the latch as a template. After drilling the edge bore, insert the latch mechanism and secure it with the screws provided; then trace around the edges with a sharp utility knife. Be especially careful when cutting vertically along the grain because the knife may wander. Some carpenters prefer to use a scratch awl to cut along the grain.
Drill holes for the latch and the strike using a 15/16-in. spade bit.
nsert the latch mechanism and secure it with the screws provided

then trace around the edges with a sharp utility knife.
Part Of Step 6
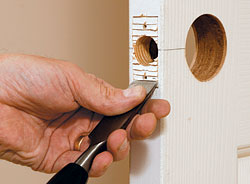
Step 7: Take your time with the chisel. Hold a sharp chisel at about a 45° angle to the work, and score the face of the mortise by gently tapping the chisel with a hammer; cut across the grain in increments of 1/8 in. or so. Now carve away the waste, working the chisel toward the center. Check the fit of the latch plate; it should lie flush with the door surface. If you end up carving too deep, cut a piece of cardboard to shim the latch plate flush with the edge of the door. Step 8: Align the strike with the latch. Close the door, and transfer the top and bottom edges of the latch plate to the door jamb. Now measure the space between the edge of the latch plate and the inside face of the door, and allow the same amount of space between the back of the strike plate and the doorstop. For a 1 3/8-in. door (if the latch is centered properly), that space should be a heavy 1/8 in.
Hold a sharp chisel at about a 45° angle to the work, and score the face of the mortise by gently tapping the chisel with a hammer
lign the strike with the latch. Close the door, and transfer the top and bottom edges of the latch plate to the door jamb.

allow the same amount of space between the back of the strike plate and the doorstop. For a 1 3/8-in. door (if the latch is centered properly), that space should be a heavy 1/8 in.
Part Of Step 8
Step 9: Cut the strike mortise following the same procedure used for the latch plate.
Cut the strike mortise following the same procedure used for the latch plate.


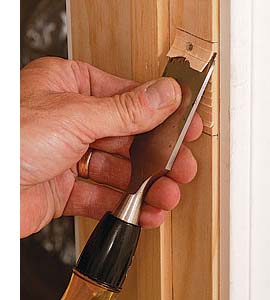
A Jig For Foolproof Hole Alignment

this plastic jig clamps onto a door edge and aligns the face and edge holes automatically

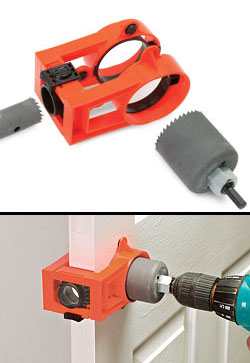
Carpenters who install door hardware for a living use commercial boring jigs that get the job done quickly and accurately. You can buy a light-duty version of the $250 jig for about $15.

Made by Black & Decker (www.blackanddecker.com), this plastic jig clamps onto a door edge and aligns the face and edge holes automatically. Two hole saws (21/8 in. and 1 in. dia.) and a common mandrel are included in the kit. The jig will handle both 2 3/8-in. and 2 3/4-in. backsets.


Photos by: Charles Bickford

Previous: Home Security: Dead Bolts vs. Rim Locks Next: How to Lay Out a Lockset on a Door

Guide

Windows & Doors

Chapter

Door Basics

Sign up for eletters today and get the latest how-to from Fine Homebuilding, plus special offers.

Signing you up...

This site is protected by reCAPTCHA and the Google Privacy Policy and Terms of Service apply.
See all newsletters
See all newsletters

Log in or create an account to post a comment.

Sign up Log in

Become a member and get full access to FineHomebuilding.com

Windows & Doors

Windows & Doors

Trusted, comprehensive guidance from the pros for choosing, installing, replacing, and repairing windows and doors on any house

View Project Guide

View All Project Guides »

Become a member and get unlimited site access, including the Windows & Doors Project Guide.

Start Free Trial

Choosing Windows
  • Window Types
  • Design and Materials
  • Energy-Efficient Windows
Installing Windows In New Walls
  • Installation, Start to Finish
  • Head Flashing for Windows
  • Video Series: Nail-Fin Window over Zip System Sheathing
  • Video Series: Nail-Fin Window over Exterior Rigid-Foam Insulation
  • Video Series: Nail-Fin Window over Housewrap
  • Video Series: Nail-Fin Window over Peel-and-Stick Housewrap
  • Video Series: Nail-Fin Window over a Fluid-Applied WRB
  • Video Series: Weatherproof Window Installation
Retrofitting Windows
  • Removing the Old, Installing the New
  • Video Series: How to Replace a Window
  • Video Series: Install a Full-Frame Replacement Window in a Brick Wall
  • Video Series: Install an Insert Replacement Window in a Brick Wall
  • Video Series: Retrofit a Flanged Window
Window Repairs
  • Restoring Old Windows
  • Repairs and Upgrades
Door Basics
  • Tools & Jigs for Door Hanging
  • How to Install Doors
  • Hinges
  • Handles, Knobs, and Locksets
  • Fixing Door Problems
Interior Doors
  • Prehung Doors
  • Pocket Doors
  • Other Types of Doors
  • Custom-Built Doors
Exterior Doors
  • Door Choices and Design
  • Installing Entry Doors
  • Building Exterior Doors
  • Installing French Doors
  • Replacing a Door
  • Adding Weatherstripping and Sweeps

Fine Home Building

Newsletter Sign-up

  • Fine Homebuilding

    Home building tips, offers, and expert advice in your inbox.

  • Green Building Advisor

    Building science and energy efficiency advice, plus special offers, in your inbox.

  • Old House Journal

    Repair, renovation, and restoration tips, plus special offers, in your inbox.

Signing you up...

This site is protected by reCAPTCHA and the Google Privacy Policy and Terms of Service apply.
See all newsletters

Follow

  • Fine Homebuilding

    Dig into cutting-edge approaches and decades of proven solutions with total access to our experts and tradespeople.

    Start Free Trial Now
    • Facebook
    • Instagram
    • X
    • LinkedIn
  • GBA Prime

    Get instant access to the latest developments in green building, research, and reports from the field.

    Start Free Trial Now
    • Facebook
    • YouTube
  • Old House Journal

    Learn how to restore, repair, update, and decorate your home.

    Subscribe Now
    • Facebook
    • Instagram
    • X

Membership & Magazine

  • Online Archive
  • Start Free Trial
  • Magazine Subscription
  • Magazine Renewal
  • Gift a Subscription
  • Customer Support
  • Privacy Preferences
  • About
  • Contact
  • Advertise
  • Careers
  • Terms of Use
  • Site Map
  • Do not sell or share my information
  • Privacy Policy
  • Accessibility
  • California Privacy Rights

© 2025 Active Interest Media. All rights reserved.

Fine Homebuilding receives a commission for items purchased through links on this site, including Amazon Associates and other affiliate advertising programs.

  • Home Group
  • Antique Trader
  • Arts & Crafts Homes
  • Bank Note Reporter
  • Cabin Life
  • Cuisine at Home
  • Fine Gardening
  • Fine Woodworking
  • Green Building Advisor
  • Garden Gate
  • Horticulture
  • Keep Craft Alive
  • Log Home Living
  • Military Trader/Vehicles
  • Numismatic News
  • Numismaster
  • Old Cars Weekly
  • Old House Journal
  • Period Homes
  • Popular Woodworking
  • Script
  • ShopNotes
  • Sports Collectors Digest
  • Threads
  • Timber Home Living
  • Traditional Building
  • Woodsmith
  • World Coin News
  • Writer's Digest
Active Interest Media logo
X
X
This is a dialog window which overlays the main content of the page. The modal window is a 'site map' of the most critical areas of the site. Pressing the Escape (ESC) button will close the modal and bring you back to where you were on the page.

Main Menu

  • How-To
  • Design
  • Tools & Materials
  • Video
  • Blogs
  • Forum
  • Project Guides
  • Reader Projects
  • Magazine
  • Members
  • FHB House

Podcasts

  • FHB Podcast
  • ProTalk

Webinars

  • Upcoming and On-Demand

Podcasts

  • FHB Podcast
  • ProTalk

Webinars

  • Upcoming and On-Demand

Popular Topics

  • Kitchens
  • Business
  • Bedrooms
  • Roofs
  • Architecture and Design
  • Green Building
  • Decks
  • Framing
  • Safety
  • Remodeling
  • Bathrooms
  • Windows
  • Tilework
  • Ceilings
  • HVAC

Magazine

  • Current Issue
  • Past Issues
  • Magazine Index
  • Subscribe
  • Online Archive
  • Author Guidelines

All Access

  • Member Home
  • Start Free Trial
  • Gift Membership

Online Learning

  • Courses
  • Project Guides
  • Reader Projects
  • Podcast

More

  • FHB Ambassadors
  • FHB House
  • Customer Support

Account

  • Log In
  • Join

Newsletter

Get home building tips, offers, and expert advice in your inbox

Signing you up...

This site is protected by reCAPTCHA and the Google Privacy Policy and Terms of Service apply.
See all newsletters
See all newsletters

Follow

  • X
  • YouTube
  • instagram
  • facebook
  • pinterest
  • Tiktok

Join All Access

Become a member and get instant access to thousands of videos, how-tos, tool reviews, and design features.

Start Your Free Trial

Subscribe

FHB Magazine

Start your subscription today and save up to 70%

Subscribe

You have 1 free article remaining.

Get complete site access, including thousands of videos, how-to tips, tool reviews, and design features.

Start your FREE trial

Already a member? Log in

We hope you’ve enjoyed your free articles. To keep reading, become a member today.

Get complete site access to expert advice, how-to videos, Code Check, and more, plus the print magazine.

Start your FREE trial

Already a member? Log in

Privacy Policy Update

We use cookies, pixels, script and other tracking technologies to analyze and improve our service, to improve and personalize content, and for advertising to you. We also share information about your use of our site with third-party social media, advertising and analytics partners. You can view our Privacy Policy here and our Terms of Use here.

Cookies

Analytics

These cookies help us track site metrics to improve our sites and provide a better user experience.

Advertising/Social Media

These cookies are used to serve advertisements aligned with your interests.

Essential

These cookies are required to provide basic functions like page navigation and access to secure areas of the website.

Delete My Data

Delete all cookies and associated data