
Making French Doors
Meticulous layout and milling yield new doors to match the original windows of a 19th-century Greek Revival style house.
Synopsis: Contributing editor Scott McBride details the construction of divided-light French doors intended for an 1820s Greek Revival style house in Virginia. He includes a discussion of both materials and construction techniques.
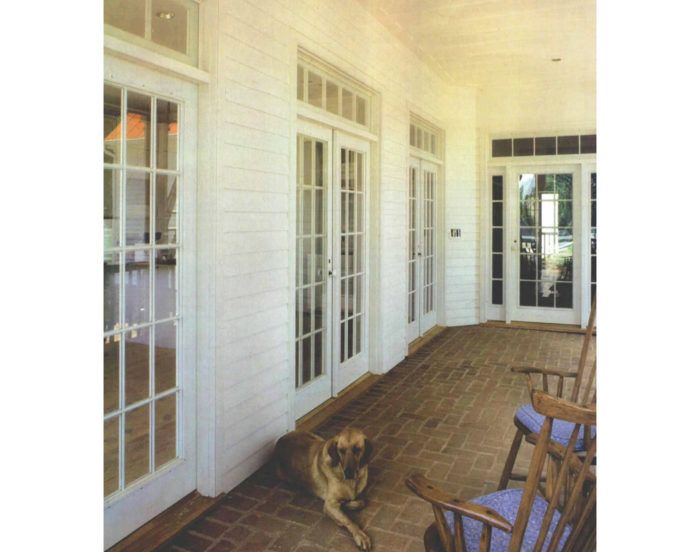
Summerduck Farm was staked out in the rich blackjack soil of central Virginia in the late 1700s. By the 1820s its owners were ready to build a Greek Revival manor house of modest proportions. The house remained virtually unchanged for the next 160 years until the present owners, pressed for space, decided to add wings to both ends of the structure.
I was hired by Home Tech Construction of Sperryville, Virginia, to build windows and French doors for the project. Although no French doors exist in the original structure, it was decided that the new doors should mimic the original window sash, using the same narrow muntin width and profile.
Muntins are a good historical indicator of a home’s vintage because they evolved in accordance with prevailing architectural fashions. The muntins at Summerduck are a slender 5/8 in. wide, molded with a simple profile consisting of two almost-quarter ellipses. The curves intersect in a clean arris without the intervening flat surface that is found on most muntins. This pattern is consistent with the austere Greek Revival detailing found throughout the house. The ancient Greeks and their American imitators based molding profiles on the ellipse rather than the circle, holding it to be the more graceful of the two forms.
Thicker doors are more stable
The first decision to be made about the doors was their thickness. The job required two different door heights: regular 6-ft. 8-in. doors in one wing and 7-ft. 4-in. doors in the other. I made the 6-ft. 8-in. doors from 8/4 stock, yielding a net thickness of 1¾in. For the taller version, I used 10/4 stock, which dressed out at 2 1/4 in. The added thickness gives the tall doors a solid feel when they close and makes them less likely to warp. A door that warps after all the work you’ve put into it is a real heartbreaker. There isn’t much you can do to fix it. The added cost of thicker stock is cheap insurance against this contingency.
Although my customers wanted the look of old French doors, they also wanted double glazing for energy-efficiency. With such a narrow muntin, the use of sealed, insulating-glass units was out of the question. The 1/4-in. wide rabbet would fail to hide the metallic spacer separating the two layers of glass. To meet the double-glazing requirement, we decided on a removable, single-pane “energy panel” set flush with the outside of the door. The original plan was to edge this panel with a thin aluminum frame, known in the glass trade as a C-sash. The panel would sit in a rabbet on the outside of the door, held in by turn buttons. But the owners decided that they couldn’t bear the look of plastic turn buttons, so we used a plain glass panel held in by moldings. A filler strip brings the glass panel flush with the face of the door. The moldings have to be pried off periodically to clean between the primary glazing and the energy panel.
To induce a slight airflow between the layers of glass, we left three -in. weep holes just above and below the energy panels. This allows any condensation to dry up. A small piece of foam keeps out insects
The width of the stiles and rails for the French doors was coordinated with the dimensions of the stock storm/screen combination doors that we planned to hang on the outside of the door frames. This alignment would prevent an obstructed view.
The lite configuration of the French doors is three wide by five high, which is standard. The horizontal cross muntins, which were made in one piece nearly the width of the door, are tenoned deep into the door stiles to tie the assembly together. Stub tenons prevent the vertical muntins, which are only one pane long, from moving side to side but are too short to provide any real tensile strength. The stiffness of the top and bottom rails is what locks everything together vertically.
Make Full-Size Drawings To Avoid Mistakes
Precise full-scale section drawings, both vertical and horizontal, are essential for this type of millwork project. I make mine on sheets of -in. plywood that I prepare with a coat of white primer. When all the details have been worked out graphically, I transfer the important dimensions to layout rods, one for height and one for width. The layout rods, which I make from rippings, then become the supreme reference throughout the construction process and allow me to avoid using a measuring tape. I try to do layout work in the quiet hours of the morning before the insanity of the day unfolds. A mistake on the rod will be mass-produced somewhere down the pipeline and will be difficult, if not impossible, to fix.
With all dimensions finalized on the rods, I prepare a cutlist. The list shows the name, quantity, net size and rough size of each part. Listing net size and rough size on opposite sides of the page keeps them from being confused. After checking and double-checking the cutlist, I attacked the lumber pile.
White Pine Is Easy To Mill
I purchased eastern white pine for the doors, buying a grade known as D & Better Select. This product is mostly clear, with a few defects that are easily culled during the initial breakdown into rough sizes. White pine is stable, is easily worked and has moderate decay-resistance. Unfortunately, the resin in pine builds up quickly on cutting tools and abrasives. Lacquer thinner, oven cleaner and a rubber belt-cleaning stick are the chief lines of defense.
lines of defense. For sash-and-door work, I prefer to buy rough lumber and dress it on my own machinery, even though the process is time-consuming. That way I can be assured of a truly flat face. The slightest twist in a hinge stile will be amplified over the width of a door, throwing the lock stile significantly out of plumb. A good long-bed jointer for flattening and straightening stiles is the doormaker’s best friend.
To get a decent price on my wood, I ordered it random width and length. Wholesalers charge mercilessly when they have to pick out specified sizes, if they’ll do it at all. Breaking down a stack of random-size boards into the desired parts can be something of a puzzle. The first pieces I hunted down were the long stiles and the wide bottom rails. Top rails came next, and then muntins.
Rather than rip the vertical muntins into individual parts during the rough-mill phase of the job, I left them in the form of wide blocks. I would rip the blocks only after completing the necessary end-forming operations—crosscutting, tenoning and coping—which I’ll discuss later. By ripping after end-forming, I can avoid crossgrain tearout on the finished pieces. Also, there’s less handling of small individual parts. To keep track of quantities during rough-milling, I figured an inch of block width per muntin, leaving a -in. allowance for ripping and dressing.
After face-planing and edge-planing, the parts were cut to net length. The stiles were left long, producing temporary “horns” that would stick out beyond the top and bottom of the door. Being able to pound on these sacrificial horns with a mallet makes it easy to disassemble a door that has been dry-fitted prior to glue up. It also protects the bottom of the door during handling. The horns are cut off at the job site or just prior to leaving the shop.
Mark Many Pieces At Once
To lay out the mortises on a given set of parts, I racked them up on edge and aligned their ends with a framing square. Then I transferred the layout from the appropriate rod to the two outermost pieces in the set and drew connecting lines across. Squaring across from a single layout mark works in theory but becomes inaccurate unless the boards are tightly packed and perfectly squared.
Mortising was done on a hollow-chisel mortiser (Sunhill Machinery, 500 Andover Park E., Seattle, Wash. 98188; 800-929-4321). This machine has a traveling table that allows successive mortises to be chopped without unclamping the stock. Stops regulate the side-to-side travel of the table, producing mortises of uniform width. A drill press also can be used for mortising, but the stock must be repositioned for each mortise.
The mortises in the stiles were blind; they didn’t extend all the way through the stile. The mortises in the cross muntins, however, were through mortises; a vertical muntin would be stubbed in from both sides (detail drawing, p. 71). Mortising all the way through a finished cross muntin would produce blowout as the chisel exited on the down-facing side. To prevent blowout, I left the cross-muntin stock in boards about in. wide (photo p. 71). This was wide enough to produce three finished muntins but narrow enough to be penetrated by the hollowchisel mortiser.
Cutting Tenons On A Shaper
For years I cut tenons on a table saw, using a high auxiliary fence to steady the stock vertically. The process was effective but awkward and dusty. By installing a pair of thin-kerf rip blades on my shaper’s 1-in. spindle, I can cut both cheeks of a tenon at the same time, with the rail stock lying comfortably on the table (photo left, p. 73). The gap between the sawblades is adjusted with spacer collars and plastic shims until a sample tenon fits snugly in a sample mortise.
Another advantage of tenoning this way is the sensitivity of the spindle-height adjustment. This device controls the distance between the tenon and the face of the stock, which must correspond precisely with the mortising setup to achieve a flush joint. When tenoning on the table saw, this adjustment is made by tapping the fence, an often frustrating process.
To run the shaper safely with sawblades, I reduced its speed by changing the shaper’s motor pulley to a smaller size. The wooden blade guard I built (photo top right, p. 73) also functions as a dust hood. To handle short pieces, such as rails for the sidelights I was also making, I made a cam clamp that attaches to the sliding table fence (photo top right, p. 73).
To complete the tenoning, I made shoulder cuts on my radial saw, with a stop block registering against the end of the stock.
Milling Parts To Match
To accept the glass, the doors were rabbeted twice. The outer rabbet houses the sheet-glass energy panel, and the inner rabbet houses the individual glass panes.
The rails needed to be undercut so that they would fit around the molded portion of the stiles (drawing p. 72). I did this on a router table with a shop-made sliding jig (photo bottom right, p. 73). I ground the coping bit from a high-speed steel rabbeting bit (sidebar).
To profile, or stick, the edges of the various parts, I ran them through a shaper. I used the knives that I had ground for the window sash, fitted into an aluminum cutterhead.
Feeding the stiles and rails past the cutter was no problem, but shaping the narrow muntins could be a real finger gobbler. I clamped featherboards to the shaper table to force the muntin stock against the infeed and outfeed fences. The pieces were fed through with their ends butted, like a freight train.
Stiles “Haunched” To Add Strength
My stack of boards was beginning to look like door parts, but a few operations still remained. A portion of each rail tenon had to be removed, thereby leaving some meat on the adjoining stile between the mortise and the end of the stile (top drawing, p. 71). Without this operation, the corners of the door would have a slip joint, rather than a true mortise and tenon. Slip joints can be used for double-hung sash, where wracking forces aren’t present. Hinged doors, however, can sag without the locking action of mortise-and-tenon joinery.
After the tenon is cut back, a stub portion remains to keep the stile and rail in alignment. This stub portion of the tenon is a haunch, and the process of cutting back the tenon is called haunching.
To accommodate the haunch, the mortise in the stile must be extended, but at a much shallower depth. This can be done on the mortiser, but a shaper does it quicker and cleaner.
Finally, I cut the lock mortises into the edges of the lock stiles. Cutting these in the shop is a real luxury if you’re accustomed to doing this on the job site with a chisel and spade bit.
Doors Assembled And Then Cut To Finished Dimension
After dry-fitting, the doors were glued and clamped (photo left). I had left the stiles in. oversize, which allowed me to pound and clamp directly on the edge of the door. I used Titebond II glue, which is rated for exterior use. When the glue was dry, the extra in. was trimmed off the doors, and a bevel was worked on the lock stile for jamb clearance. To determine the degree of this bevel, I swung an arc from the hinge barrel on the opposite jamb.
I sanded the doors lightly and sprayed on a coat of primer. Hinge gains were routed with the help of a plywood template. I used three hinges on the 6-ft. 8-in. door and four hinges on the taller doors for strength and stability.
I set the individual glass panes in a generous bed of paintable silicone/acrylic caulk. Then I shot diamond glazing points around the edges, using a spring-loaded point gun (C. R. Laurence Co. Inc.). After the caulk dried, I applied glazing compound with a wide, stiff chisel. To make handling easier, the glass energy panels were installed after the doors were hung.
The blind tenons connecting the top and bottom rails to the stiles were cut back, or haunched. This technique leaves more “meat” in the stile, preserving the strength of the door.
 |
Cutting mortises. The author used a hollow-chisel mortiser to cut mortises in the four cross muntins. To reduce tearout, the mortises were cut in stock that was later ripped into three muntins. |
Shaping The Rails
The cuts at the end of the workpiece, those against the grain, were made before the cuts along the edge, those with the grain. This way, any tearout that occurred in the first milling operations would be cleaned up during the second.
 |
1. The tenon is cut with two blades mounted on a shaper. The square mortise in the side of the rail was cut previously with a hollow-chisel mortiser. |
 |
2. The shoulders are cut with a radial arm saw. Note the difference in shoulder location (a complication resulting from the energy panel’s rabbet). |
 |
3. The groove between the shoulder and the tenon is cut with a shaper with a large-diameter shaper cutter. The cope below the tenon is cut on a router table. |
 |
4. The sticking on the side of the rail is molded on a shaper. The same shaper knife cuts the inner rabbet. The outer rabbet on the outside of the door is cut on a table saw. |
 |
 |
|
Tenon cheeks were cut on a shaper. Both cheeks of the tenon were cut simultaneously with sawblades mounted on the shaper spindle. The shaper’s speed was geared down for this operation. |
A cam clamp mounted on the sliding fence holds short pieces safely while tenoning. Some parts, such as the top and bottom rails of sidelights, were too small to hold by hand. Downward pressure on the cam lever clamps the workpiece to the shaper’s sliding table. |
 |
 |
|
Rails were coped on a router table with a sliding carriage. The ends of the rails were coped with a profile opposite that of the stiles. Note the stop block clamped to the table for registration. |
A paintbrush spreads an even coat of glue. After dry-fitting, an exterior-rated wood glue was applied to the mating surfaces of the door, which were then clamped. |
For more photos, illustrations, and details, click the View PDF button below:
