A Cabinetmaker’s Kitchen Remodel
When a pro is set loose in his own kitchen, the results are functional and furniture grade.
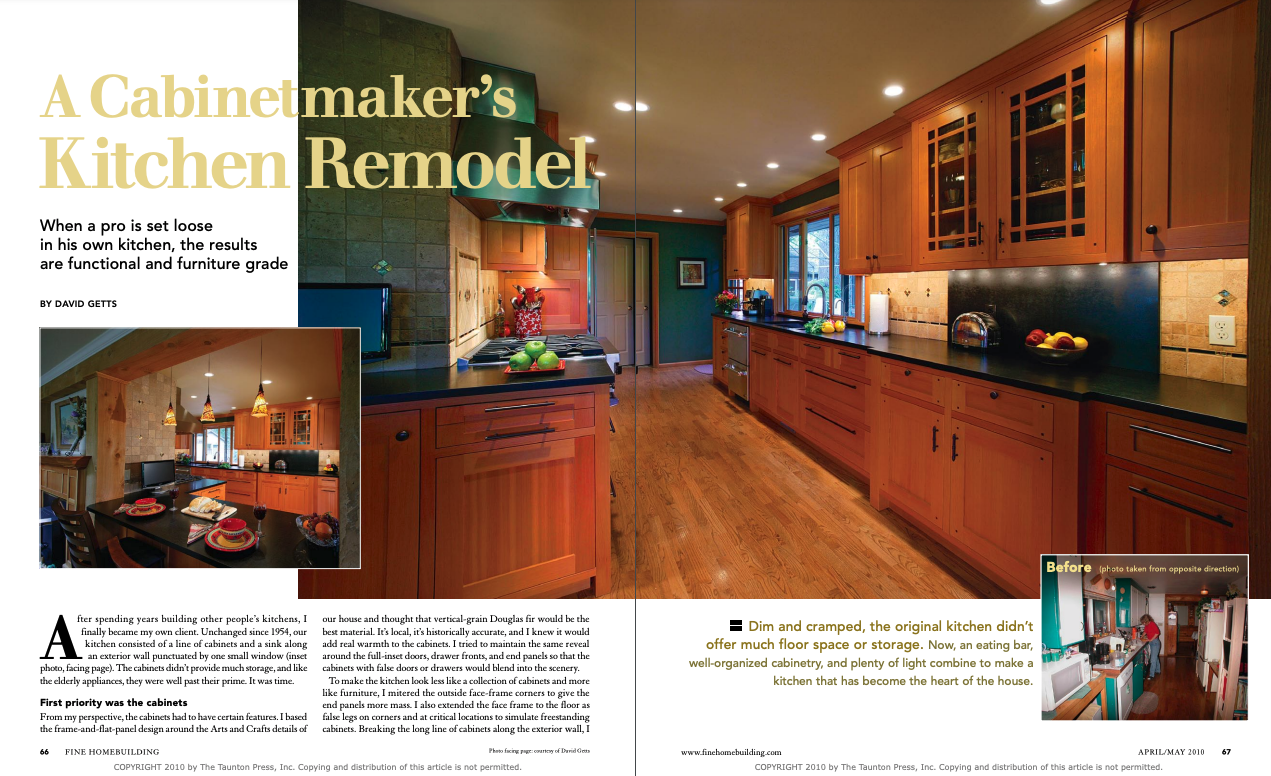
After spending years building other people’s kitchens, I finally became my own client. Unchanged since 1954, our kitchen consisted of a line of cabinets and a sink along an exterior wall punctuated by one small window. The cabinets didn’t provide much storage, and like the elderly appliances, they were well past their prime. It was time.
First priority was the cabinets
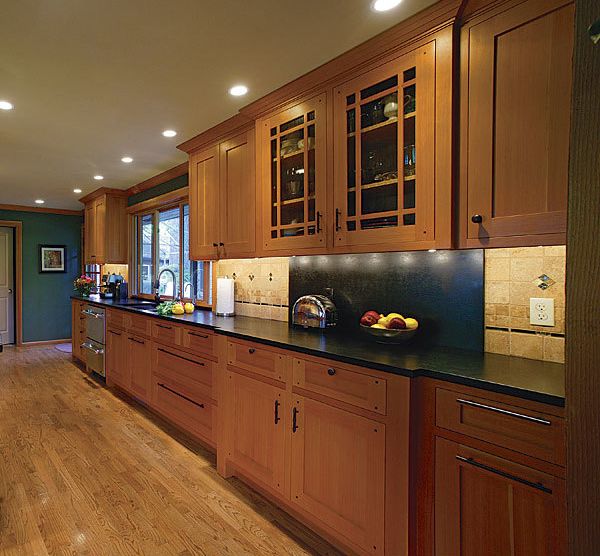
From my perspective, the cabinets had to have certain features. I based the frame-and-flat-panel design around the Arts and Crafts details of our house and thought that vertical-grain Douglas fir would be the best material. It’s local, it’s historically accurate, and I knew it would add real warmth to the cabinets. I tried to maintain the same reveal around the full-inset doors, drawer fronts, and end panels so that the cabinets with false doors or drawers would blend into the scenery. To make the kitchen look less like a collection of cabinets and more like furniture, I mitered the outside face-frame corners to give the end panels more mass. I also extended the face frame to the floor as false legs on corners and at critical locations to simulate freestanding cabinets. Breaking the long line of cabinets along the exterior wall, I shifted the design of one section of cabinets to look like a built-in hutch. I added two dozen drawers to the lower cabinets for easy access and kept doors where we needed extra clearance.
All the drawers are dovetailed solid-wood boxes. That’s an expensive way to put together boxes, but it’s a cabinetmaker’s thing. Also, it’s a time-honored symbol of quality. I used soft-closing hinges and drawer slides from Blum (www.blum.com), and pulls and knobs from Avante (available from online hardware suppliers). To finish the cabinets, I sprayed a clear two-part catalyzed varnish from M.L. Campbell (www.mlcampbell.com) that’s durable and will darken a bit over time to give the fir a warm amber patina.
Next, complement the wood
I knew that having a nice kitchen of my own was important as a statement of my trade. But it was equally important to me that the cabinetry not overwhelm the space. Therefore, I made it a priority to introduce elements that kept the cabinetry in perspective.
First, we bought commercial-grade stainless-steel appliances that would lend visual balance to all that wood. They were pricey, but they’re meant to last a long time. We also decided on a matte-black material called PaperStone (www.paperstoneproducts.com) for the counters. It’s relatively maintenance free, and its deep color really makes the cabinets pop. PaperStone’s best attribute is that it can be worked with ordinary woodworking tools, so I fabricated the counters in my backyard shop. Travertine tile makes up the continuous backsplash around the room. Small accents of Venetian-glass tile add a little sparkle to the field.
The final improvement to the room was more light. Although it’s hard to believe, we had used the kitchen under the dim glow of two 60w ceiling fixtures for all these years. It made a world of difference when we added 13 recessed ceiling fixtures (ten 4-in. cans, three 5-in. cans), low-voltage under-cabinet lighting, and three low-voltage pendants by Tech Lighting (www.techlighting.com) over the breakfast counter. All fixtures are controlled by dimmers, so we can vary the scene as the situation dictates. I also replaced the window over the sink with a larger unit with the sill set at counter height. This new window gets more light into the room and helps to enlarge the sense of space.
To view the entire article, please click the View PDF button below.