FHB Logo Facebook LinkedIn Email Pinterest Twitter Instagram Plus Icon Close Icon Navigation Search Icon Arrow Down Icon Video Guide Icon Article Guide Icon Modal Close Icon Guide Search Icon Skip to content
Main Menu
Subscribe

In every issue you'll find...

  • Expert insights on techniques and principles
  • Unbiased tool reviews
  • Step-by-step details to master the job
  • Field-tested advice and know-how
Subscribe Now!
Subscribe
  • How-To
  • Design
  • Tools & Materials
  • Videos
  • Blogs
  • Forum
  • Magazine
  • Members
  • FHB House
  • Podcast
  • Join
  • Log In
Main Menu Subscribe
How-To

Hinge Adjustment for a Door’s Final Fit

Easy adjustments to screws, mortises, and hinges on interior doors contribute to a perfect fit.

By Tucker Windover Issue 192
Article Image

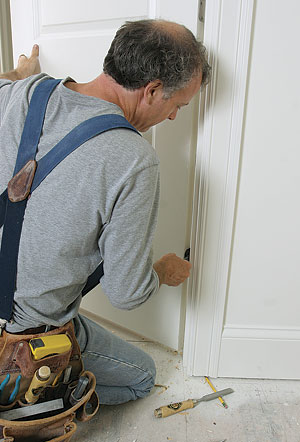
For finish carpenters, fine-tuning the fit of a new interior door offers plenty of bang for the buck. For little effort, there’s a lot of gratification. The final fit mostly involves door-hinge adjustment after the painters have finished.

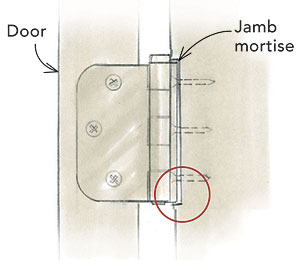
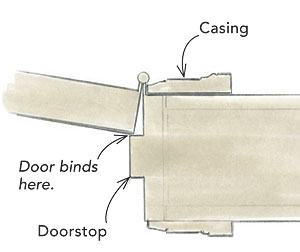
First, I check that the door is swinging properly on its hinges. If the hinge leaf fastened to the door is not set fully in the mortise because of paint, plaster, tape, or misalignment, the hinges will bind. This might cause the door to creak or to spring back from a closed position. If the mortise in the jamb is set too close to the stop the door will bind against the stop. If this is the case, you will probably see telltale signs of scraped paint on the door where it rubs.

When adjusting hinges, I often have to adjust the location of screw holes. Rather than struggle with a hole in the wrong spot, I simply tap in a plug and drill the hole where I want it.

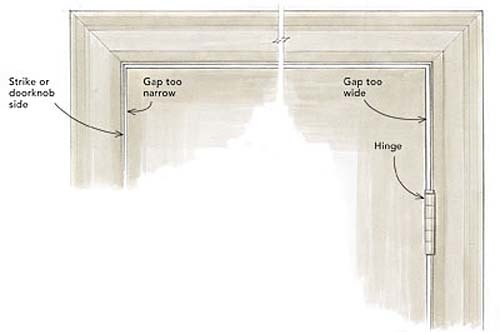
After I get the door swinging properly, I adjust the hinges so that there is a consistent gap between the door and the jamb. When making corrections to the gap or any adjustments to the door, I make incremental changes. Often, going forward by small degrees is easier than going back by any amount.

Secure the door to the framing

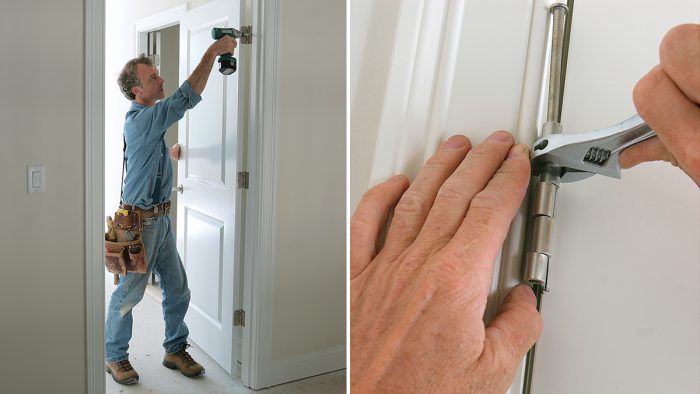
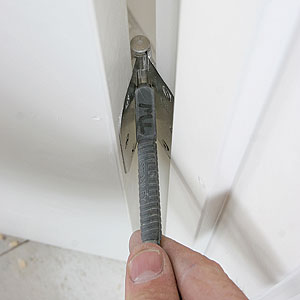
Secure the door with a long screw. Sometimes a door sags away from the hinge-side framing. To prevent this, I replace the short center screw of the top hinge with a 3-in. screw driven into the framing. Sinking this screw often changes the gap at the top and the opposite side of the door.

Secure the door with a long screw diagram Secure the door with a long screw.

A proud hinge might creak or bind

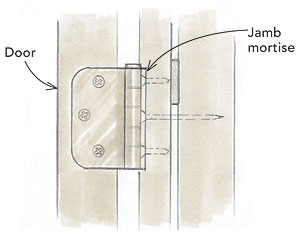
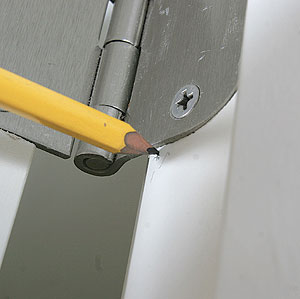
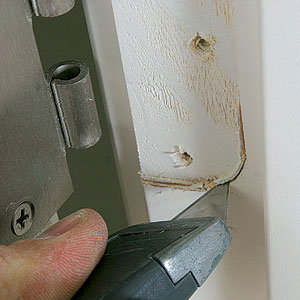
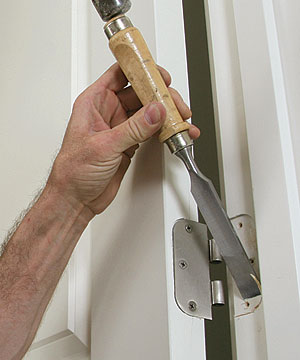
Fine-tune the mortise for a good fit. A hinge leaf that stands proud of the face of the jamb can prevent a door from operating properly. Remove the screws to reveal the mortise. If the hinge leaf and the mortise were not aligned so that the hinge leaf was fully seated in the mortise when the screws were driven, there will be a compression mark from the hinge. With a utility knife, carefully cut along this line to expand the mortise. Use a sharp chisel to remove the wood waste and clear any paint, tape, or wood debris that might keep the hinge from seating fully in the mortise; then reattach the hinge.

Fine-tune the mortise for a good fit. Fine-tune the mortise for a good fit Diagram
Use a sharp chisel to remove the wood waste Clear any paint, tape, or wood debris that might keep the hinge from seating fully in the mortise; then reattach the hinge.

Get the screw holes aligned correctly

Get the screw hole on target

Photos: John Tetreault (top), Charlie Reina (bottom)

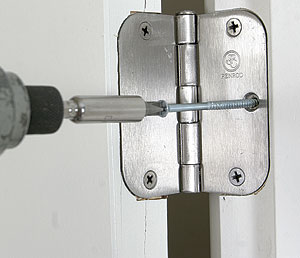
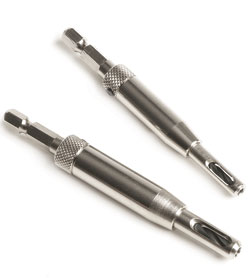
Centering a drill bit in a hinge hole without a self-centering bit is not impossible—but it’s not easy, and even a small error will move the hinge out of place, or make it difficult to seat the screw head completely. Self-centering bits eliminate this problem. The bit’s shank is chucked in a drill. The cutting end of the bit is encased in a sleeve with a beveled tip that centers it in the hinge hole. As the bit is pressed to the wood, the spring-loaded sleeve retracts, allowing the hole to be bored right where it should be. Self-centering bits come in sizes to fit cabinet and full-size door hinges. You can buy them at home centers or online for less than $15. 

Adjust the gap by bending the hinges

Open the hinge-side gap by spreading the hinges. I’ve seen shims used behind the hinge leaf to adjust the gap, but bending the hinge takes less time. I can widen the gap in small increments. Remember that when the gap is adjusted on one side, it affects the gap on the other side as well. Place the butt end of a nailset between the hinge leaves up against the pin eyelet, or hinge knuckle. When the door is pulled toward the closed position, the nailset spreads the leaves and widens the gap. This technique puts a lot of force on the hinge, so go slowly to avoid damaging the hinge or bending it too far.

Adjust the gap by bending the hinges Open the hinge-side gap by spreading the hinges.

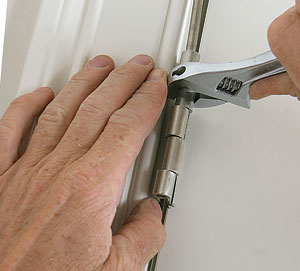
Close the hinge-side gap by bending the knuckles. Set an open-ended adjustable wrench, also called a Crescent wrench, just larger than the hinge knuckle. Remove the hinge pin, and bend the door-side knuckles toward the door handle. This will close the gap. Go slowly. A difference of 1/16 in. is easy to notice.

Close the hinge-side gap by bending the knuckles diagram Close the hinge-side gap by bending the knuckles

A binding hinge might require wood plugs

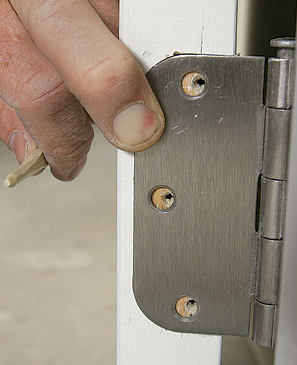
Correct offset screw holes. Sometimes, the mortise is in the right place, but the hinge wasn’t set properly. This can cause binding or gaps along the doorstop molding. In this case, resetting the screws to move the door away from the stop will allow the door to close completely without binding. In order to do that, plug the existing screw holes and drill new ones with the help of a self-centering bit.

Correct offset screw holes. To adjust the screw-hole locations, whittle plugs from poplar.


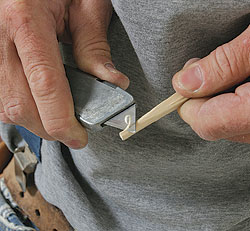
To adjust the screw-hole locations, I whittle plugs from poplar. Poplar is a common hardwood for paint-grade trim material that will give threads a good bite. Size the plug to fit snugly with a few hammer taps. Don’t overdrive the plug or you may crack the door.

Trim the plugs flush with a chisel.

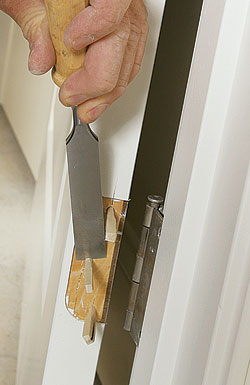
Trim the plugs flush with a chisel. There is no need for glue. Friction holds the plugs in place when I drill new screw holes in the correct locations.

Photos by John Ross, except where noted. Drawings by Dan Thornton.

More on doors:

A New Door Fits an Old Jamb – Are your doors looking tired? Replace them quickly and easily with a technique that works every time.

Hinge Adjustment for a Door’s Final Fit – Learn how to avoid a door that creaks or springs back from the closed position. Easy adjustments to screws, mortises, and hinges on interior doors contribute to a perfect fit.

How to Cut a Prehung Exterior Door to a Custom Height – You don’t have to order an expensive custom door if your rough opening is a non-standard size. Buy a stock door instead and make it fit. Watch this video by carpenter and former senior editor Andy Engel to learn how to cut a prehung exterior door.

Jigs for jambs (and other door-hanging advice) – Inventor and finish carpenter Jim Chestnut has hung his share of doors, and he has learned to depend on a variety of measuring and cutting jigs for jambs to make door-hanging quicker and easier. He uses one jig made from 5/4×6 stock to measure jamb legs.

Video Vault: Fine-Tuning Hinges – Whether the door is new or old, Tucker Windover’s technique produces a perfectly aligned door that closes properly and stays shut.

Sign up for eletters today and get the latest how-to from Fine Homebuilding, plus special offers.

Sign Up

Get home building tips, offers, and expert advice in your inbox

×
X
X

New Feature

Fine Homebuilding Forums

Ask questions, offer advice, and share your work

View Comments

  1. BobboMax | Jan 12, 2020 12:10am | #1

    For dealing with offset screws and reamed out holes, I carry some 3/16 dowel and a 5/32 bit- they give me a force fit, but I've never split a jamb with them, even in cabinets. On a good day, you can even drill through to the rough jamb and drive the dowel through the finish jamb into the underlying 2x4. It helps to chamfer the end of the dowel.

Log in or create an account to post a comment.

Sign up Log in

Become a member and get full access to FineHomebuilding.com

Up Next

Featured Story

2021 International Builders Show online experience

Attending in Sweatpants: The Virtual 2021 International Builders' Show

A pre-show primer on the first-ever online IBS trade show. Stay tuned for upcoming podcasts, product features, and more.

Featured Video

How to Install Exterior Window Trim

In this episode of Shop Class, learn how to measure, cut, and build window casing made of cellular PVC, solid wood, poly-ash boards, or any common molding material. Plus, get tips for a clean and solid installation.

Related Stories

  • Making a Wall a Focal Point With Stone Veneer

  • Installing a Range Hood

  • Installing a Bathroom Fan

  • Installing a Ceiling Fan

Discussion Forum

Recent Posts and Replies

  • |
  • |
  • |
  • |
  • |
  • |
View More Create Post

Highlights

  • Fine Homebuilding All Access
  • Fine Homebuilding Podcast
  • Tool Tech

    Plus, get an extra 20% off with code GIFT20

  • "I have learned so much thanks to the searchable articles on the FHB website. I can confidently say that I expect to be a life-long subscriber." - M.K.

    Get home building tips, offers, and expert advice in your inbox

    Sign Up See all newsletters

Video

View All
  • Podcast 193: Understanding Permeability, Insulating Behind Fiberboard Sheathing, and Building a Patio Door

  • How to Frame an Arched Doorway

  • How to Test Paint Stripper for Your Next Refinishing Project

  • Video: Build a Dutch Door

View All

Doors

View All
  • Replacing a Basement Door

  • Simple Technique for Round Corners

  • Expanding an Opening in a Masonry Wall

  • Why Is There an Angled Header Over My Door?

View All

BOOKS, DVDs, & MERCH

Shop the Store
  • Code Check Building 4th Edition

    Buy Now
  • Fine Homebuilding Magazine Slipcase

    Buy Now
  • 2020 Fine Homebuilding Archive

    Buy Now
  • Musings of an Energy Nerd

    Buy Now
  • Shop the Store

Fine Homebuilding Magazine

  • Issue 297 - Feb/Mar 2021

    • Foundations for Success
    • Staircase Renovation
    • Ditch the Hose
  • Issue 296 - Dec 2020/Jan 2021

    • Insulating Glass Keeps Getting Better
    • Simple Way to Make Old Walls Straight and Plumb
    • Making Sense of Minisplits
  • Issue 295 - Kitchens & Baths

    • Condo Kitchen Reimagined
    • Row-House Remodel
    • Rise of the IAQ Monitor
  • Issue 294 - Oct/Nov 2020

    • Schoolhouse Reimagined
    • Tool Test: Folding Sawhorses
    • A Better Way to Build Tall Walls
  • Issue 293 - Aug/Sept 2020

    • A Practical Guide to Fall Protection
    • Installing Frameless Cabinets
    • Make Any Tablesaw Safer

Fine Homebuilding

Follow

Newsletter

Get home building tips, offers, and expert advice in your inbox

Sign Up See all newsletters

Membership & Magazine

  • Online Archive
  • Start Free Trial
  • Magazine Subscription
  • Magazine Renewal
  • Gift a Subscription
  • Customer Support
  • Manage Preferences

Taunton Network

  • Green Building Advisor
  • Fine Woodworking
  • Fine Gardening
  • Threads
  • About
  • Contact
  • Advertise
  • Privacy Policy
  • Careers
  • Copyright
  • Terms of Use
  • Accessibility
  • CA Privacy Rights

© 2021 The Taunton Press, Inc. All rights reserved.

    Main Menu

  • How-To
  • Design
  • Tools & Materials
  • Video
  • Blogs
  • Forum
  • Reader Projects
  • Magazine
  • Members
  • FHB House
  • Podcasts

  • FHB Podcast
  • ProTalk
  • Account

  • Log In
  • Join

    Podcasts

  • FHB Podcast
  • ProTalk
  • Popular Topics

  • Kitchens
  • Business
  • Bedrooms
  • Roofs
  • Architecture and Design
  • Green Building
  • Decks
  • Framing
  • Safety
  • Remodeling
  • Bathrooms
  • Windows
  • Tilework
  • Ceilings
  • HVAC

    Magazine

  • Current Issue
  • Past Issues
  • Magazine Index
  • Subscribe
  • Online Archive
  • Author Guidelines

    All Access

  • Member Home
  • Start Free Trial
  • Gift Membership

    Shop the Store

  • Books
  • DVDs
  • Taunton Workshops

    More

  • FHB Ambassadors
  • Reader Projects
  • Podcast
  • Customer Support

    Account

  • Log In
  • Join

Newsletter

Get home building tips, offers, and expert advice in your inbox

Sign Up See all newsletters

Follow

Join All Access

Become a member and get instant access to thousands of videos, how-tos, tool reviews, and design features.

Start Your Free Trial

Subscribe

FHB Magazine

Start your subscription today and save up to 52%

Subscribe

We hope you’ve enjoyed your free articles. To keep reading, become a member today.

Get complete site access to expert advice, how-to videos, Code Check, and more, plus the print magazine.

Start your FREE trial

Already a member? Log in