
Fitting New Windows in a Crooked Old House
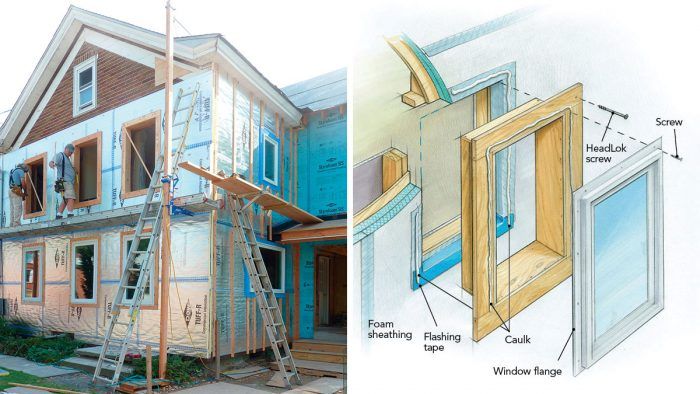
"Dudley boxes" are robust window bucks that ease window installation, flashing, and integration with insulation in walls sheathed with exterior rigid foam.
Synopsis: An energy-focused remodel of an old house revealed window openings that were not uniform in size, constructions, or installation details, and that were askew and misaligned. In order to fit new windows, three carpenters determined a method of using unique window bucks called “Dudley boxes” to create an accurate opening and sturdy attachment surface for flanged windows and exterior trim for walls with exterior rigid insulation. The Dudley boxes slide into a hole cut in the foam sheathing, and long screws through the foam secure each box flange to the house, while flashing tape keeps the assembly dry. The article includes detailed drawings that show how the boxes fit into the sheathing and how the preassembled trim slides into the boxes, creating consistent-size window openings for an energy-smart remodel.
A few years ago, I began an energy-focused remodel of my house in Saugerties, N.Y. This included replacing all the windows with new energy-efficient, fiberglass-framed flanged units from Inline Fiberglass; wrapping the house with two layers of 2-in. rigid polyisocyanurate insulation; and then residing using a rainscreen configuration.
The cold, drafty house dated from the 1840s, and the thickness of its racked and sagging walls varied by inches. The old windows were not uniform in size, construction, or installation details, and their rough openings were apparently framed without use of squares, levels, or rulers. Windows that once may have lined up horizontally were now askew and misaligned. Fortunately, carpenters Dan Dudley and Bob “Woogs” O’Keefe brought broad experience, creativity, insight, and common sense to the job. Between us, we figured out our own simple, repeatable method that gracefully handled the challenges of installing new windows in old construction. Although our installation involved adding 4 in. of foam to the outside of the building, the method we came up with could work in other scenarios.
|
The case for casements: More glass for your buckIn part to get the most glass in each opening, the new windows are casements. The sash frames of casements are narrower than those of double-hung windows, so the glass size is larger than what a double-hung window of the same size offers. |
 |
Typical installations take a lot of shimming
Most window manufacturers’ instructions assume that the rough openings are new-construction perfect and 1/2 in. larger than the windows. You shim the difference and fasten the unit with screws or nails through the window flanges into the studs. That doesn’t work when installing windows in walls insulated with thick, rigid foam on the exterior. Here, typical details include strips of plywood nailed to the jamb studs and extending to the face of the foam. The window frame then is shimmed and screwed to the plywood strips.
Neither of those details worked for us. Not wanting to disturb remodeling that had been done to the interior side of the walls over the years, we were stuck using the existing rough openings. Some of them had four different side lengths. Many were cocked more than 1/2 in., and some were out of line with the neighboring openings by more than an inch. Dan and Woogs recoiled from the idea of so much shimming and reframing, not to mention building an extension box for each window one stick at a time. In addition, we were concerned about achieving a positive air-seal with such extension boxes.
Enter the Dudley box
Our key insight was that if we built extension boxes that fastened to the face of the wall rather than to the sides of the studs, and that had the strength to stay square and planar during window installation, we could fasten the window to the box and not worry about dealing with the out-of-whack framing. Although the box design was very much a three-way collaboration, I think Dan Dudley contributed the most and deserves to have these boxes named after him.
Dudley boxes are 1/2-in. CDX-plywood extension boxes fabricated to fit loosely within the old rough openings. Flanges of 3/4-in. CDX plywood the same thickness as the furring strips we were placing over the foam as siding nailers provide a means of affixing the boxes to the exterior face of the wall. The flanges are 4 in. wide to provide strength and to serve as nailers for siding. Wall thickness determined the depth of the boxes. The boxes wouldn’t tie directly to the interior casing, so we kept their inside edges 1 in. to 2 in. shy of the inside wall plane.
By making the Dudley boxes smaller than the openings, we were able to position the boxes on the wall so that the window tops could align as if the wall were perfect. In addition to being simple and fast, this technique provides a tight air-seal.
Decide the size
We determined the sizes of the Dudley boxes both by the existing rough opening and by the available window sizes. For the most light, solar gain, and views, we wanted the biggest windows we could get, but there’s a trade-off between maximizing window size and ease of box installation. The smaller the Dudley box, the more clearance there is between it and the old framing, and the easier it is to correct for framing problems. Smaller Dudley boxes, however, mean smaller windows, which means less light, less solar gain, and restricted views.
We settled on window sizes small enough to allow at least 1/2 in. between the Dudley box and the framing. A space of at least 3/4 in. is even better because it makes applying spray foam easier. The internal dimensions of the box should leave 1/4 in. to 3/8 in. of space around all sides of the window. Tighter isn’t better. The ideal gap is wide enough to run the tip of a spray-foam applicator along all four edges to fill the space between the window frame and the Dudley box completely. With this approach, the outside dimension of the window should be at least 2 in. to 3 in. smaller than the rough opening. Too little space between the framing and the box, or between the box and the window, can lead to voids in the spray foam that compromise the thermal barrier and the air-seal.
We ripped the plywood for the boxes with a job-site tablesaw and fastened the sides together with exterior-rated Titebond III glue and 2-in. finish nails. After squaring the boxes by comparing diag onal measurements (if the diagonals of a rectangle are equal, its corners are square), we affixed the flanges by gluing them and nailing through the box sides. To keep the boxes square, we cut the flange pieces square and made the joints between flange elements tight. To provide strength and to help air-seal the boxes, we were generous with the glue.
Lay out the windows on the foam
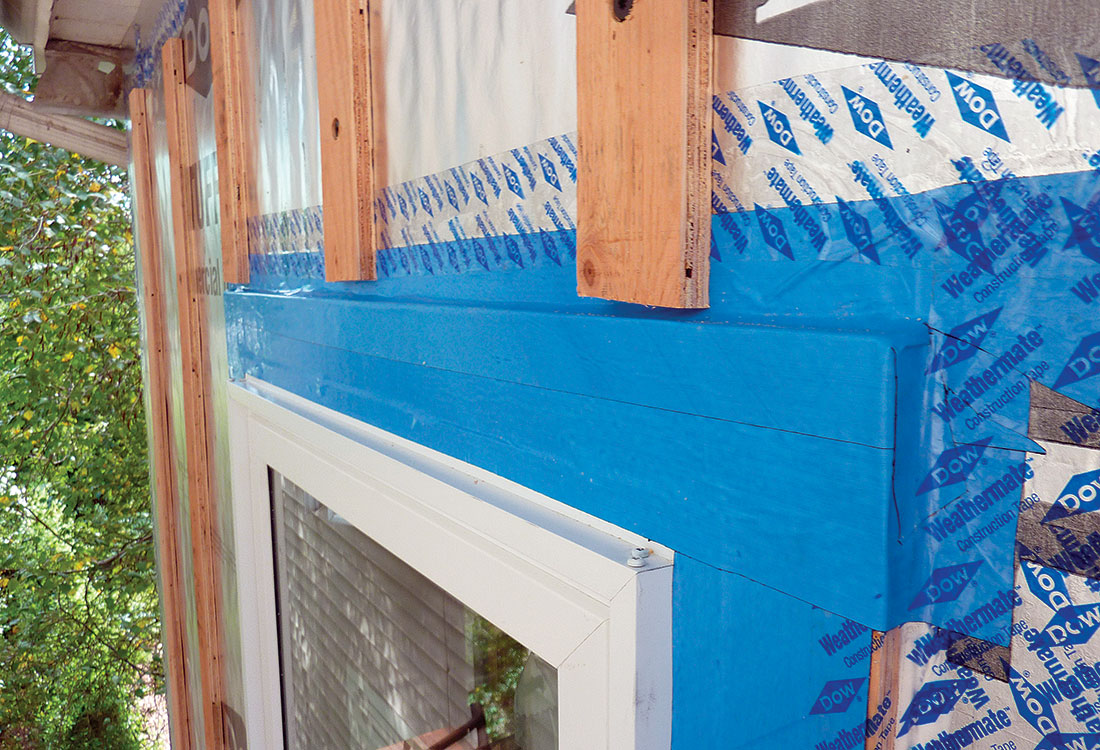
It was easier to install the boxes and windows at the same time as the rigid foam. We applied full sheets of foam right over the window openings, staggering the joints where possible and taping all the seams with 4-in. Dow Weathermate Construction Tape. The foam is secured to the studs with 8-in. HeadLok screws through furring strips.
We laid out the positions of all the windows in a wall at once, transferring the vertical and horizontal centers of the existing rough openings from inside to outside by sticking an awl through the foam from the inside. With the rough openings marked, we used a laser level to establish where to cut the foam for the tops of the Dudley boxes, 1/4 in. to 1/2 in. below the top of the lowest rough opening. From that top line, we measured down exactly the outside height of the Dudley box and marked the bottom cutlines. Next, we laid out the side cuts by measuring half the outside width of the Dudley box from the vertical centerline of each rough opening. We used a level and a Sharpie to draw the cutlines on the foam.
Fit the Dudley boxes
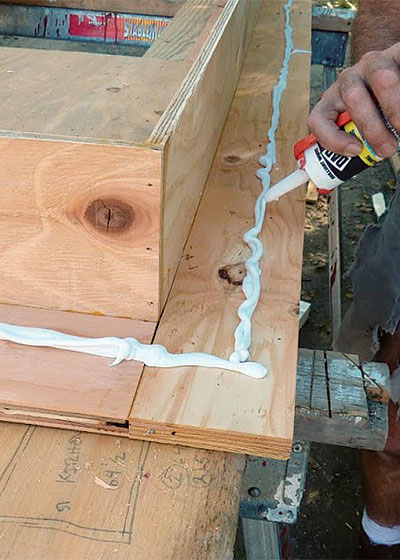
After cutting out the foam with a sharpened drywall taping knife, we test-fit the boxes without pushing them all the way in. When we achieved a satisfactory press fit, we removed the box and applied a bead of DAP Alex Plus caulk on the foam behind the top and side flanges.
The Dudley boxes are secured to the framing with 8-in. HeadLok screws through the flange. The long screws compress the foam, anchoring the Dudley boxes firmly to the wall. To avoid distorting the boxes, we did not screw through the sides. The flange screws are strong enough to take the weight of the window, and the foam we later sprayed around the boxes added even more support.
We mounted the windows by caulking the backs of the top and side flanges, then screwing through them into the Dudley boxes, just as we would fasten windows to traditional framing. We disregarded the manufacturer’s instructions to screw through the window frame to the studs, relying on the flange screws and the expanding foam we later installed around the windows for support.
Foam the window
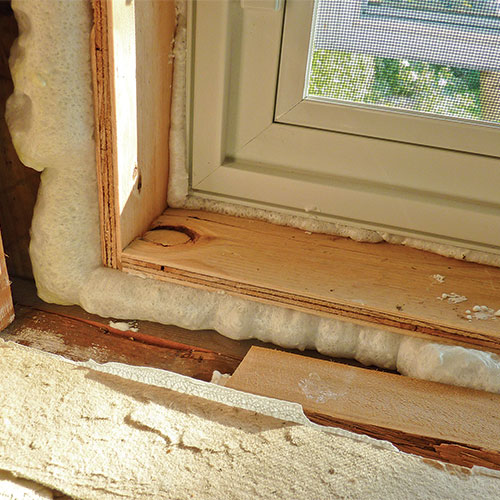
Inside, we filled the gap between the window and the Dudley box with low-expansion foam. We tried not to let foam froth out past the window frame because it’s a pain to trim later. We also sealed the spaces between the Dudley box and the studs, as well as any gaps between the box and the foam sheathing, with spray foam. This gap doesn’t need to be filled completely, just made airtight. We tested for air infiltration with a blower door and theatrical smoke; there wasn’t any. For bulk-water management, we used Dow’s Weathermate Construction Tape and Weathermate Straight Flashing (butyl).
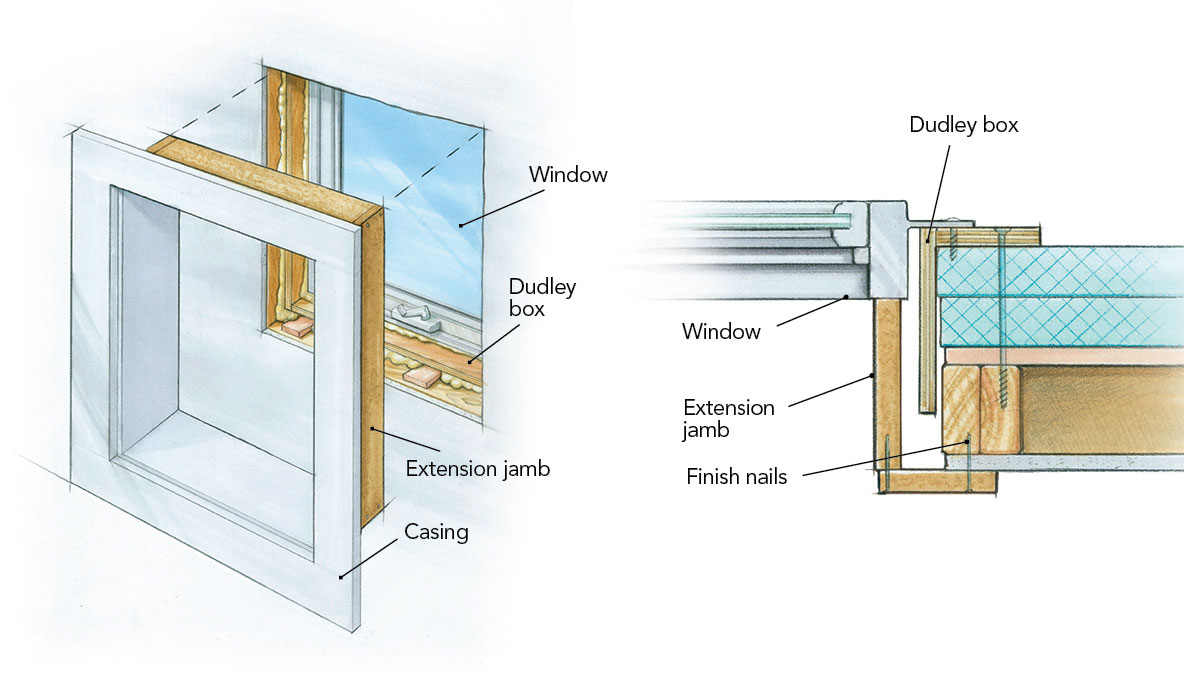
The consistent sizes of the Dudley boxes simplified trimming the interior. Dan and Woogs preassembled the window casing and extension jambs. The trim assemblies slipped inside the Dudley boxes with a satisfying “whoosh,” and a few nails secured them.
Dudley boxes go together much more quickly than built-in-place extension boxes, and units of the same size can be mass-produced. We got a better air-sealed wall because all connections are accessible with spray foam. Try it on your next retrofit. If you don’t agree it’s a better way, I’ll be surprised.
More about windows in well-insulated walls
An Alternative to Wood Window Bucks – ThermalBuck makes window installations over exterior insulation sturdy and energy efficient by replacing wood with high-density expanded polystyrene foam extrusions.
Flashing Window and Door Bucks – Preflashing the window and door bucks allows us to completely install the exterior insulation and rain-screen furring.
From FineHomebuilding #288
To view the entire article, please click the View PDF button below.
